HELIOS Guide to a perfectly matched soft proof
|
|

Intro
We'd like to share our experience from the soft proof testing and FograCert soft proof certification. One major characteristic of the Fogra certification is that the complete viewing environment is taken into account instead of measuring directly on the proof monitor screen only (which omits the viewing condition). Fogra uses the Konica Minolta CS-2000 spectroradiometer to measure colors from a viewing distance of about 80 cm, and they compare the soft proof colors against the reference print (or proof) in the viewing light box.
A good starting point to set up your own working soft proof system is an already FograCert certified soft proof solution. Usually, the certified solution includes or specifies a monitor, color measurement devices with profile-making software, proofing software, and a reference “viewing condition”, in this case, a Just Color Communicator 2 light box showing a reference print printed in accordance with the Fogra39 printing process. A Fogra certified solution means that the soft proof was certified with the setup and viewing conditions at Fogra.
This article gives advice on how to get a perfectly matching soft proof which is visually identical with a print or proof within a light box. Once the match is perfect, the resulting calibration values (paperwhite K, x, y and Candela) can be used to set up new soft proof stations matching your reference proofing environment.
For this documentation we give the instructions for Mac OS X computers. However, the same Eizo and Quato profiling applications are identical on Windows, therefore it should be easy to adapt this to Windows. Other operating system related settings should also be easy to adapt to Windows.
1.1 Viewing room condition
The viewing condition highly depends on the light condition within the room. Viewing a print or a soft proof using daylight will highly distort the colors. Important notes are:
- Avoid daylight at all
- Use D50 room illumination (omit other illumination)
- The proofing room should have dark/gray painted walls, and no white or colored (non-reflective!) furniture
Please consider that the proof viewing condition includes the ambient light as well as the monitor backlight and the light box light. A matching soft proof requires a stable light environment which will not distort the viewed result.
1.2 Viewing monitor condition
- On a Mac, open the “System Preferences” panel
- Set Appearance to “Graphite”
- Set the desktop background to the “Solid Colors” dark gray, which is about RGB 93 (36.5%)
- Clean up your desktop to have no color icons on it
- Hide the Dock
In WebShare, create a new “Proof” branding using these these settings:
- Use the default gray icons
- Use the Image Preview Background Color: #5D5D5D (which is RGB 36.5%)
- Use the WebShare Text Color: #000000 (i.e. black)
- Use the WebShare Background Color: #efefef (i.e. gray)
- Setup a virtual user, e.g. proofuser1 with the defined proof branding
It is important that the appearance on the monitor is not disturbed by a colorized background or colors in the menu or on the desktop. Also avoid a white desktop because this RGB 100% white will be different compared with simulation white of the printing process. Please also avoid a second monitor next to it with a white or colorized background/content.
2. Certified hardware calibrated proof monitor
There are only a very few hardware calibrated proof monitors available, namely from Quato, Eizo and NEC. Avoid non-specialized soft proof monitors; even wide gamut monitors may not work well because they don't have built-in hardware calibration and the backlight light distribution is not uniform across areas of the screen. We generally recommend using only soft proof monitors that have been certified by Fogra. Steps to prepare a monitor to use for proofing:
- Warm up the proofing monitor 2-3 hours before using it
- Warm up the measurement device (e.g. i1) in the same room
Please noteSwitching a monitor profile within the operating system for a hardware calibrated monitor does not work; this must always be done via the vendor's ICC profiling software. This will set the ICC profile in the operating system and download the hardware calibration into the monitor. Usually, the ICC profile for the hardware calibrated monitors just includes a very simple profile specifying the x/y/z values for the RGB colors. The correction tables are downloaded into the monitor and will be applied via the monitor video hardware. The benefit here is that the 256 step increments of each color channel are fully utilized to define colors because most of the calibration is done by the monitor hardware rather than by the ICC profile.
Select an ICC monitor profile
- Quato's iColorDisplay: use the “Select profile” option on the main screen
- Eizo's ColorNavigator: select the profile in the main menu, and click on the Apply button
- Select the new ICC profile within the proofing software (e.g. WebShare)
3. Light box for soft proof verification
When it is required to compare a proof or print against a soft proof, a stable viewing condition is needed. We use the “Just Color Communicator 2” for this. This light box comes with D50 illumination and offers the possibility to adjust the brightness to the required level. The following steps should be taken for preparation::
- Use a certified light box, e.g. Color Communicator 2 (warmup the device a few minutes)
- Put a white sheet of paper into the light box (printing paper which is used for final printing)
- Use multiple white sheets to avoid the enclosure gray shining through
- Turn the light box brightness to 160 Candela
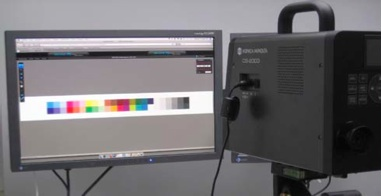
Tele-measuring from a distance of 70 cm allows metering the brightness in the middle of the light box, to adjust to 160 Candela. It is important to match the brightness between the light box and the proof monitor by showing an empty (white) page on the monitor simulating the printing process. This can be done with one of the following measurement devices:
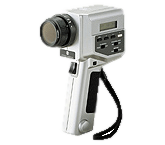
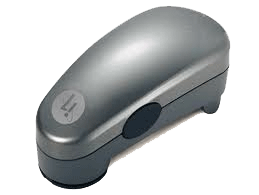
- Konica Minolta CS-2000 spectroradiometer
- Konica Minolta CS-100 luminance & color meter
- Konica Minolta LS-110 luminance meters
or similar devices that can measure the brightness in Candela from a viewer's distance.
In the following, we simply call it tele-measuring.
|
|
 |
Please note: Proof monitors will display a very stable white across the entire screen via their built-in area dimming control. The light distribution within the light box is not the same in different areas, therefore placing the reference print/proof into the middle of the light box will give you a better average.
4. Select the printing process
We used the Fogra39 printing process. For the printing simulation we used the ICC profile “ISOcoated_v2_eci.icc”, which implements the Fogra39 standard. Another option would be to use the “US GRACoL2006_Coated1v2.icc” profile which implements the IDEAlliance printing standard. The printing process is determined by an ICC profile and must be specified in the proofing software.
In WebShare this is done via Default Simulation Profile in the “My User Preferences” settings; general print process simulation profiles for all users can also be specified in the WebShare “Server Preferences
5. Monitor ICC profile generation and optimization
This paragraph is the most important section of this guide to get a perfectly matching soft proof. The point is that the initial soft proof monitor profile setup is unlikely to match the print in the light box immediately, therefore multiple passes of tuning including profile generation must be done to get a perfect match.
Gamma
There are different gamma settings possible. Once chosen, a gamma must be used consistently in the proofing process, because it is included in the calibration and it may be assumed by color editing solutions. In general, different gamma settings of 1.8, 2.2 and L* can be used for proofing, it is up to the customer. All HELIOS proofing certification has been performed using a gamma of 1.8.
| Operating system | Gamma |
| Mac OS 9 | 1,8 |
| Mac OS X 10.0-10.5 | 1,8 |
| Mac OS X ab 10.6 | 2,2 |
| Windows | 2,2 |
Gamma 1.8 was preferred in workflows without color management because a Gamma of 1.8 was matching the output of black and white printers. So far, prepress has also used a Gamma of 1.8 which is now changing to 2.2.
Gamma 2.2 used for modern video formats such as QuickTime H.264. Gamma 2.2 is also used with Mac OS X 10.6 and on Windows.
Gamma L* means the gamma is adjusted so that the L channel from CIELab is always mapped into monitor RGB grayscales, e.g. L30 means all RGB channels are set to 30% (a dark gray) on the monitor. The special feature of L* is that all RGB gray definitions will always represent the natural grayscale.
5.1 Setting up the initial monitor calibration with Quato iColorDisplay
- Launch “iColorDisplay”
- Click on Settings icon on the left
- Click on Advanced Mode in the button area
- Select custom white point field, enter 5300
- Set the luminance to 160 cd/m2 (160 Candela)
- Set the gamma to 1.8
- Click on Calibration on the left, run the calibration
- Save the ICC profile with the LUT profile option (the profile is usually saved into the system folder: “/LibraryColorSync/Profiles”)
- Set the ICC profile in your soft proofing software (upload and set in WebShare)
5.2 Tuning the monitor calibration with Quato iColorDisplay
After step 5.1 has been completed, do the following:
-
Put multiple white printing paper from the final printing process into the light box
(We use several white pages to avoid that the gray background shines through) -
The light box should have a brightness of about 160 Candela (approx. 14% setting or position 24 on the old model)
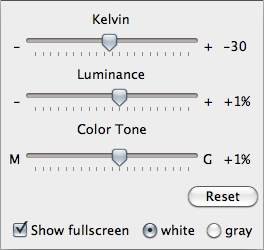
(The best method is to verify the light box via tele-measuring of the brightness) - Click on Edit Whitepoint in the right menu of iColorDisplay
- Select Show as floating palette
- Select Show fullscreen (a white screen with the tuning palette is shown)
- Adjust the Luminance slider to match the light box brightness. This can be done visually, but the best procedure would be to measure the monitor luminance via tele-measuring and verify that it is 160 Candela or identical with the light box.
-
Adjust the Kelvin to match the the paperwhite of the light box
(negative Kelvin means more yellow, positive Kelvin means more blue) - Adjust Color Tone to match the paperwhite of the light box
- Continue with Kelvin and Color Tone tuning until it matches the paperwhite
- Disable Show fullscreen in the palette window but keep it open
- Put the test image (see here) into the light box and verify it visually with your soft proofing solution
- Continue with Kelvin and Color Tone tuning until the monitor test image matches the test image in the light box
- Next, verify an empty page print job in the soft proof with the white paper in the light box
- Click on Calibrate when the tuning is done
- Save the ICC profile with the LUT profile option
 |
5.3 Setting up the initial monitor calibration with Eizo ColorNavigator
- Launch ColorNavigator
- Click on Create a new target…
- For “RGB Gamut” keep Monitor native setting
-
In Brightness select Extend the target brightness range and set it to 160 Candela in field (cd/m2)
(Soft proofing requires a higher brightness than 120; Eizo gives a warning that higher brightness will reduce the monitor lifetime. It must be accepted that the proofing monitor will not last for 5 years, likely it will only last 2 years depending on the operating hours. This is the same with all monitor vendors but Eizo provides a warning.) - Set the White point field to 5300 and click on Next
- Keep the Set the target black level option turned off and click on Next
- Gamma All RGB on, set the gamma to 1.8
- Set Priority to Gray balance and click on Next
-
Specify/confirm the ICC profile name
(The new "Target" setting is now saved) - Click on Finish to run the calibration
- Select Adjust now to start measuring
- If using the built-in Eizo monitor measurement device, turn the lights off to darken the room, to avoid that the measurement gets disturbed by the ambient light. The built-in measurement device is not fixed directly on the screen, therefore external light must be avoided during measurement. When using the X-Rite i1 measurement device this is not a problem because the i1 is put directly onto the monitor. As a result, no external light gets included.
- Click on Proceed
- When the measurement process is done, click Return to the startup window
- The new hardware calibration is applied to the monitor and the new ICC monitor profile is saved in the user's folder “Library/ColorSync/Profiles”
- Set the ICC profile in your soft proofing software (upload and set in WebShare)
5.4 Tuning the monitor calibration with Eizo's ColorNavigator
After step 5.3 has been completed, do the following:
-
Put multiple white printing paper from the final printing process into the light box
(We use several white pages to avoid that the gray background shines through) -
The light box should have a brightness of about 160 Candela (approx. 14% setting or position 24 on the old model)
(The best method is to verify the light box via tele-measuring of the brightness) - Open “ColorNavigator”, the currently used profile is shown in the “Target List”
- Click on Detail… on the button menu
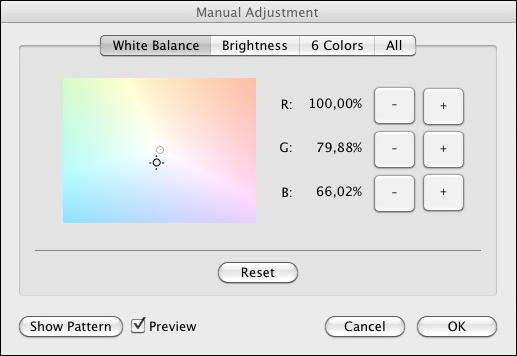
- Click on Adjust manually…
- Open a white page document within the proof application and have it displayed in the soft proof window filling the monitor screen
-
Adjust the Brightness slider to match the light box brightness
(This can be done visually, but the best procedure would be a tele-measuring of the brightness, to verify that it is 160 Candela or visually identical with the light box.) - The Eizo monitor brightness slider will be about 70% when the light box is on 160 Candela
- Select the White Balance tab
-
Adjust Color Tone to match the paperwhite of the light box
(This is done by moving the black circle (up/down/left/right) until the proof window white matches the light box printing paper white. Make sure that the visual paper white has no color shift compared to the light box paper – when the monitor color is neutral and it matches the light box paper white, it is ok.) - Put the test image into the light box and verify it visually with your soft proofing solution
- Continue to tune the “White Balance” circle until the monitor matches the test image in the light box
- Verifiy again an empty page print job with the white paper in the light box
- Click on OK when the tuning is done
-
Click on Proceed to re-run the profile generation with the new tuning settings
(Make sure you are doing the profile generation in a dark room so that no external light goes between the display and the Eizo built-in measurement device) - Click on Save and Return to startup window
 |
5.5 Additional fine tuning
Now a new calibration is done and additional iterations of the tuning b) should be performed until the result represents the perfect match. Our experience is that this procedure must be done multiple times until you have a perfect visual match between the light box and the soft proofing solution.
Once you have a perfect match, make sure you write down the x/y/K values of your working settings, these can be applied to additional monitors of the same model/vendor.
6. Test image for optical soft proof verification
In general customers can use their own test images to verify the visual match between the printing process/proof and the soft proof.
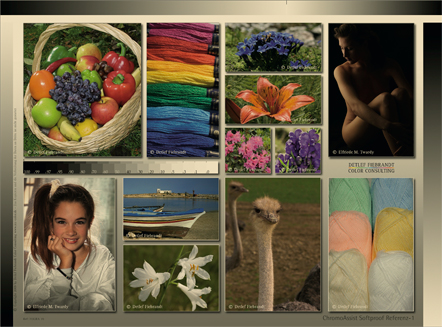 |
To verify the match of the soft proof against the light box check the following:
- Does the grayscale gradient on the right look correct?
- Is the gradient white (bottom right) matching the assumed paper white?
- Is the gradient black (top right) matching the assumed black?
- Are the wool hank's colors correct? Check each single color …
- Is the girl's face matching?
- Is the girl's white dress matching the brightness and color?
- Does the ostrich's neck look identical? Check brightness and color …
- Are the boat's and sky's colors correct? Check brightness blue and boat color …
- Are the fruit basket's colors correct?
- Are the dark tones in the nude photograph still visible? Verify the edges from body color and the background …
- Verify each flower for brightness and color match, and the lilies' white
- Verify the colorized wool stripes for color match and note that each stripe has a different color!
Whenever the white point or brightness is changed, ensure that you have done a visual verification using your test image.
7. Cloning multiple monitors to match a master reference monitor
This task is very simple assuming you use the same monitor model and measurement device for multiple locations/users. The following must be done:
- Set the brightness to 160 Candela
- Set the specified White point (K) identical to the master monitor
- Set the “x” and “y” values identical to the master monitor
- Set the gamma value identical to the master monitor
These settings can usually be done in the custom settings of the profiling software
For Quato iColorDisplay, e.g. Select Settings > Advanced Mode, set the luminance to 160 and the K/x/y as described here, and run the calibration.
For Eizo ColorNavigator create a new Target with the specified settings and "Proceed" with the new measurement.
Don't use any tuning because the goal is to replicate the calibration of the reference monitor.
Once the calibration is finished upload the new ICC profile to the WebShare user settings and proofing should match the printing process.
8. Validating adjustment status of monitor
It is required to verify regularly the monitor calibration. The easiest procedure would be to do this always before starting a proofing session. Monitors should be stable for many days, however a validation will document that the current calibration is up to date.
Quato includes the Ugra UDACT profile validation. Eizo's Color Navigator ICC profiling software includes a verification option
9. Setup tips for non-light box environments
This section gives you some sample values for different printing processes. Viewing will be easier if a soft proof is viewed in a dark/gray room (no daylight) because there is no direct print reference and the human eye will quickly adapt the minor white point details. A certified and calibrated proof solution will ensure that the whole system works in general. Then it is merely a question of the appropriate reference settings. Please note that different measurement devices may give slight variations in the color measuring results. Even multiple devices (e.g. X-Rite i1's) of the same vendor will show minor differences.
These are estimated values (with a luminance of 160 cd/m2):
| Process | ICC print profile | x/y |
| Fogra39 | „ISOcoated_v2_eci.icc“ | 5300 K |
| IDEAlliance | „US GRACoL2006_Coated1v2.icc“ | 5300 K |
Conclusion
Once a matching white-point is developed or specified by a reference soft proof monitor, setting up additional soft proofing workstations is simple and can be done straightforwardly with little work. Using certified solutions provides the confidence that the whole system works.
Using non-certified components (monitors, measurement devices, profiling software, proofing software) will likely fail to provide matching and stable results. The HELIOS WebShare PrintPreview UB2 soft proofing solution has been certified already using six different monitor combinations.
Glossary
paperwhite K: Kelvin is the color temperature of the white. The ICC uses a reference color temperature called D50 (K5000) which is a little yellow compared to the D65 (K6500) PostScript reference which is more blue. Today's consumer PC monitors have a white which is often very blue D90 (K9000). Coated offset printing paper is somewhere between K5000 and K5300. Print copy paper has usually a blue touch.
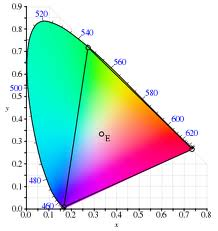 CIE x/y comes from the 1931 x/y color position definitions. x defines the horizontal axis and y the vertical axis of the color.
 Candela is the base unit of luminous intensity (cd/m2). See http://en.wikipedia.org/wiki/Candela
 The HELIOS soft proofing solution is Fogra soft proof certified and works from any Windows or Mac computer using a Web browser and allows remote soft proof with multiple users. It also allows signing-off proofs and discussing the content via annotations between multiple users. The solution includes the HELIOS WebShare UB2 and HELIOS PrintPreview UB2 products. It is a purchased software package and runs on the customer's intranet server. The solution costs about 5,900 Euros for 10 remote users.
Konica Minolta CS-100 is a luminance & color meter, we used it for brightness measuring of the light box and soft proof monitor. The CS-100 costs about 4,500 Euros. The Konica Minolta LS-100 is a luminance only meter which is sufficient to compare the brightness between the light box and the soft proof monitor. The LS-100 costs about 2,300 Euros.
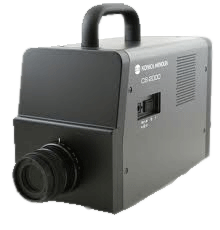 Konica Minolta CS-2000 is a spectroradiometer used for high-end professionals to measure color. The Fogra soft proof certification uses the CS-2000 for technical reference measuring to verify color patches on the light box with the soft proof monitor. The device costs about 25,000 Euros.
 X-Rite i1 Pro is a spectral measurement device which supports emissive (monitors) and reflective (print) profiling. The i1 device is directly supported by Quato and Eizo profiling software. X-Rite offers the i1 Basic Pro with and without X-Rite ICC profiling software. For the soft proofing procedure described here we used the i1 Basic Pro revision D without any X-Rite software. The device costs about 800 Euros.
 iColorDisplay is the ICC profiling software from Quato which is included with their soft proof monitors.
 ColorNavigator is the ICC profiling software from Eizo which is included with their soft proof monitors.
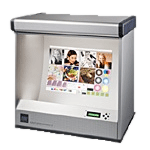 JUST Color Communicator2 is a viewing cabinet (light box) to view printed samples. It supports even illumination at D50 and can adjust the brightness. It is glare- and reflection-free. See also: www.just-normlicht.de
Related Links
-
HELIOS WebShare proofing and annotation video tour:
www.helios.de/web/EN/news/podcasts_videos.html (WebShare Proofing and WebShare Annotations) -
Read more about HELIOS Fogra certified soft proofs:
www.helios.de/web/EN/solutions/FograCert.html -
Find out all about HELIOS proofing solutions:
www.helios.de/web/EN/solutions/proofing.html -
WebShare proofing on mainstream inkjet printers:
www.helios.de/web/EN/solutions/webshare-proofing.html -
WebShare and PrintPreview UB2 data sheet:
www.helios.de/web/EN/products/HELIOS-WebShare.html
www.helios.de/web/EN/products/HELIOS-PrintPreview.html - Calibration and Profiling for Soft Proofing
-
Fogra Soft Proof Certified Systems:
www.fogra.org/en/fogra-fogracert-en/prepress/softproof-/softproofing-system/certified-softproofing-systems.html -
Fogra (in German): 1. Sonderdruck Nr. 21 München, Oktober 2009
Warum stimmen Bildschirm-Messtechnik und visuelle Empfindung nicht immer perfekt überein?
www.fogra.org/plugin.php?menuid=125&template=mv/templates
/mv_show_front.html&download=1&
file=1306839975_Sonderdruck21.pdf&field_id=97&mv_id=10&
mv_content_id=140305 -
Fogra Monitor PreCert:
www.fogra.org/en/fogra-fogracert-en/prepress/softproof-/monitor-pretest/tested-monitors.html -
Fogra Soft Proof Handbook:
www.fogra.org/dokumente/upload/e0499_fogra_softproof_handbook.pdf -
Eizo Proof Monitors/Quato Proof Monitors:
www.eizo.com/global/solutions/graphics/index.html
www.quato.de -
UV light and optical brighteners (in HELIOS Newsletter 1/2012):
www.helios.de/news/Newsletter/01_12-e/page1.html
- Home
- Products
File Server Products
- Powerful and fail-safe
- Perfect for mixed networks (Mac, Windows, Web clients)
Cloud Products- Secure access to files anytime and anywhere
- No “Cloud” disadvantages
- For businesses and IT service providers
- For Mac, PC, iPad, iPhone, web
Automation- Server-based workflow automation via hot folders
- Automate applications on remote computers (e.g. Photoshop actions and Acrobat PDF creation)
- Launch scripts depending on file type
- No polling
Marketing & Premedia- Server-based image processing with ICC color management
- Image conversions for Internet and print
- Automation via hot folder
- Certified soft proof with annotations
- Industries
- Solutions
- SupportSupport
Offering professional support and excellent technical resources is very important to us. HELIOS partners offer first level support. Our goal is that every problem and question must be resolved.
Updates & Tech InfoKeep the installation always up to date. Install important updates, read technical information on various topics.
Developers & Advanced StuffHELIOS solutions are often integrated into custom solutions. Here you will find advanced technical information.
MediaAll documentation is available online. We provide great overview and training videos which should help you getting started.
- News
The HELIOS News contains …
Latest Press Release: > HELIOS Universal File Server G8 released … • Latest Newsletter: > HELIOS Newsletter 02/2021 …
- Company
- English
 Enterprise Server
 Developers / SDK
 Retail / Industrial
 Newspapers / Publishers
 Photographer / Studios
 Ad Agencies / Premedia / Printers
 Video & Entertainment
 Cloud Collaboration
 HD Color
 Image Processing
 Proofing
 WebShare Connectivity
 Workflow Automation
 File Server
 Press Releases
  Videos
  Newsletters
  Events