8 Create PDF Server
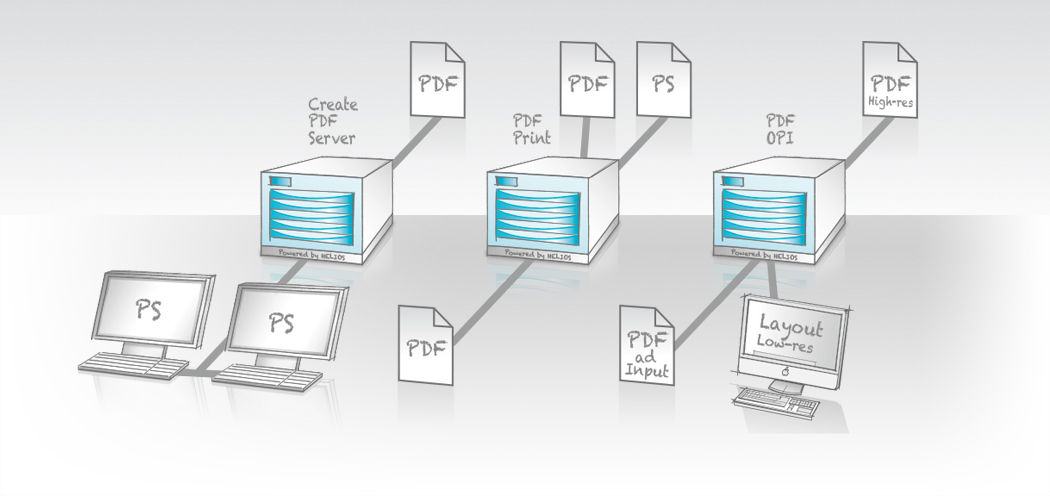
PDF HandShake has a feature to automate the PDF creation
of any PostScript job. This is done by creating a new printer
queue in HELIOS Admin, with the connection type Create
PDF. This queue prints the PostScript job over the network to a
dedicated Mac or Windows based workstation which is used to
create the PDF file. After a PDF file is successfully created,
it is returned to the HELIOS printer queue.
Create PDF Server utilizes Adobe Acrobat Distiller, which must be purchased separately. It is important to comply with the licensing terms of Adobe Acrobat. Specific terms related to using Acrobat on a server can be found in the Acrobat license file. The purpose of Create PDF Server is to use Acrobat Distiller more efficiently, reduce administrative and training costs, and to ensure consistent, reliable PDF job production.
Alternatively, you may use Ghostscript to convert the PostScript print job into a PDF file. Ghostscript is license-independent and is available for major platforms. However, it can only generate low-end PDF documents.
Ghostscript (“gs” binary) is available in various distributions, free of charge. HELIOS supports all current Ghostscript 8.x and 9.x versions. The Ghostscript executable (“gs” on UNIX, “gswin32c.exe” on Windows) must be installed in some standard directory, or the ghostscript preference must be set to the executable path.
The benefits of Create PDF Server are:
Server-based automatic PDF creation from any UNIX, Mac or Windows client by printing to a HELIOS “Create PDF” print queue
Create PDF Server works without any local configuration of the Mac/Windows server, the Distiller settings are attached to the HELIOS printer queue
PDF creation requires a lot of computing which will be off-loaded from the host to a dedicated workstation, e.g. a Mac with a fast network connection
Office PDFs: Ghostscript PDF generation support
- Note:
-
There is no speed up for the Adobe Distiller or Ghostscript from multi-processor machines.
There is no temporary PostScript file stored on the dedicated server
There is only the spooled job stored on the HELIOS server. Font or OPI resolving is done on-the-fly and does not use additional disk space on the HELIOS server.
Error Messages will be saved to the HELIOS printer accounting log file and sent back to the user by e-mail
The created PDF document will be attached to the hold queue, similar to the HELIOS PrintPreview application
The created PDF document can be saved to any HELIOS volume or into a subfolder which can be created for each user name
Job distribution to the next available Create PDF Server – HELIOS supports balance queues which allow a cluster of “dedicated” servers which are used to distill many print jobs in parallel
Distiller security settings can be specified individually for each queue with HELIOS Admin
No shared folder/volume needed; Create PDF Server behaves like a network printer
Job-pipelining via multiple queues allows the creation of PDF files with different settings, e.g. one input job produces web, press and archive optimized PDF files
Create PDF Server fail safety; when multiple Create PDF Servers are used, automatic load balancing (cluster) ensures availability in case one server node should fail
Section 8.2 “Set up a “Create PDF” printer queue with HELIOS Admin”, presents and explains the features within HELIOS Admin which are specific to Create PDF Server. However, other features which are already described in the corresponding chapter in the HELIOS Base manual are merely referenced.
8.1 Installation
8.1.1 Prerequisites
A dedicated Power Mac running Mac OS 9, with a working TCP/IP connection and at least 64 MB RAM
Acrobat 4.0.5 (Acrobat 4.0 will not work!), Acrobat 5
A Mac (Intel or PPC) with a working TCP/IP connection, running OS X 10.3.5 or later,
Acrobat 6/7/8/9/X/XI
A PC with a working TCP/IP connection, running Windows Vista, Windows Server 2008 or newer
Acrobat 4.0.5/5/6/7/8/9/X/XI
A host running PDF HandShake and EtherShare, PCShare or WebShare
In order to ensure trouble-free server operation it is most important that the “dedicated” server is not employed with tasks other than running the Create PDF Server process.
During the installation of the HELIOS software modules, “createpdf” is created in the “HELIOSDIR/sbin” directory. It is started every time a print job is sent to port 2018 (see “TCP ports used by HELIOS” in the HELIOS Base manual).
8.1.2 Server memory requirements
The performance of Create PDF Server on the dedicated server increases with the size of the available RAM memory.
8.1.3 Mac server installation

-
Mount the “HELIOS Applications” volume and open MacOS > PDF Tools > Create PDF Server.
- Important:
-
For instructions on how to install Create PDF Server on different Mac systems, refer to the “README.txt” document!
8.1.4 Windows server installation
-
Connect the “HELIOS Applications” network drive and open Windows > PDF Tools > Create PDF Server.
- Important:
-
For instructions on how to install Create PDF Server on different Windows systems, refer to the “README.txt” document!
There are two ways to make use of Create PDF Server, by installation as a service or by use in a console window:
Advantages:
Runs as background application
No user login is needed
Error reporting in “Windows Event Log” file
-
Double-click “InstallPDFService”, which installs “HELIOS Create PDF Server” as a Windows Service. This means that it is started each time the Windows PC is booted. Calling this install script will also start the server immediately.
Verification of the installation:
-
Start the Windows “cmd” program and change to the “Create PDF Server” directory. Type
"Create PDF Server.exe" -sand press RETURN (-s= “status”).
Your Create PDF Server service installation was successful
if the line Service is installed. appears in the
Windows “cmd” program command line.
Alternatively, you can do the following:
-
Open “Start > Control Panel > Administrative Tools > Services”. Then double-click the “Create PDF Server” entry.
Removal of the service:
-
In the Create PDF Server folder double-click “RemovePDFService.bat”.
Advantage:
Job processing can be monitored
-
To start Create PDF Server manually (in a console window), double-click the Create PDF Server icon.
-
To stop Create PDF Server use “Ctrl-Pause” (Break key functionality) or close the console window.
- Important:
-
Create PDF Server can run as a service or in a console window – but never simultaneously!
In the event of an error, respective messages are written to
the “Windows Event Log” and can be displayed with the
Windows Event Viewer.
If Create PDF Server is used as a service, you need to run
the “AdoptSettings.exe” program each time you change the
Font Locations... settings within Acrobat Distiller.
This is because Acrobat stores its settings in
user-dependent trees of the Windows Registry. In order to make
these settings available to the service, “AdoptSettings.exe”
copies the settings to a global node.
- Note:
-
When running Create PDF Server on Windows as a system service, jobs may get stuck if Adobe Acrobat tries to display a dialog. System services on Windows run as user “SYSTEM”, so Acrobat's dialogs about registration, activation, demo expire time or updates are not shown to the user that is currently logged-in. To make dialogs being shown to the currently logged-in user, open the service's properties (
Computer
Management > Services > HELIOS Create PDF Server
), select the tabLog on, and checkAllow service to interact with desktop. To avoid these dialogs and stuck jobs, you should activate Acrobat and disable registration and automatic updates.
8.2 Set up a “Create PDF” printer queue with HELIOS Admin
Creating or editing printer queues with HELIOS Admin, which is essential for the following, is described in detail in the HELIOS Base manual. In this chapter, the focus is on the “Create PDF” printer queue only.
8.2.1 Create PDF connection
-
In the HELIOS Admin
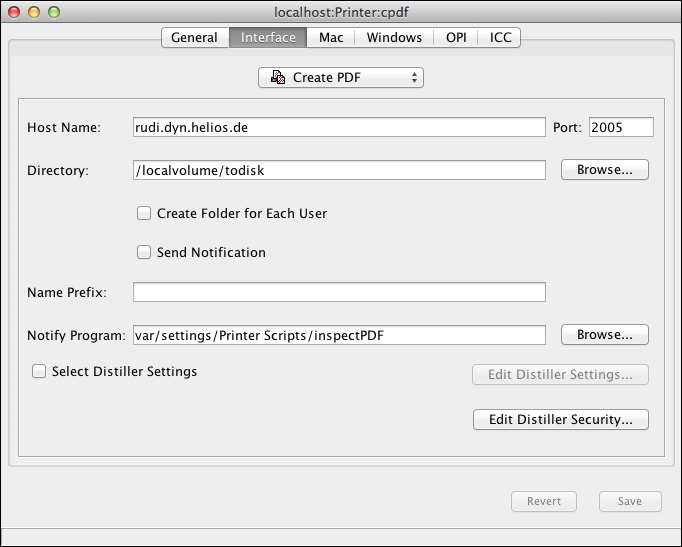
Printerstab selectFile > Newand specify a new printer according to the instructions given in the Base manual. SelectCreate PDFfrom theConnectionpop-up menu, so theInterfacetab comes into the foreground (Fig. 8.2).
-
Enter the IP address of the host where Create PDF Server and Acrobat Distiller are installed in the
Host Namefield, and specify the port number in thePortfield.
- Note:
-
The port number allows you to specify whether the PDF is generated via Create PDF Server (2005) or Ghostscript (2018).
Instead of the IP address you may also specify the server host name on the network. However, this requires a configured and working DNS server on the network.
The directory path to the location where the processed PDF
print jobs are saved must be specified in the Directory field.
You may also use the Browse... button to select the spool directory.
If the option Create Folder for Each User is active, a
subfolder for each print job “owner” is created in the directory path where
the print jobs are stored. The user name is the Owner Name
as stated in the %% For: (name) string inside the PostScript job.
- Note:
-
If the user name is not known to the HELIOS server, the PDF will be stored inside a folder “nobody”.
If the Send Notification checkbox is activated, the “Create PDF”
interface reports events to all listening services.
- Note:
-
Note that with the option
Send Notificationactivated, layouts are generated if the target volume is configured to create layouts.
If desired, you can enter a Name Prefix and a
Notify Program.
The prefix serves to identify the files that are coming from
this specific printer queue (in case you have several “Create
PDF” printer queues which print to the same destination).
The Notify Program option lets you enter a path that leads to
a specific program. Again, you may also use the Browse...
button to select a notify program which will be started automatically
after printing has been successfully finished. A notify program can
perform any arbitrary action.
To set up the preferred Distiller settings for the “Create PDF” printer queue, do the following:
-
Start Acrobat Distiller and select a pre-defined PDF job option from the
Default Settingspop-up menu in theAdobe PDF Settingssection.
-
Open
Settings > Edit Adobe PDF Settings.... Modify the settings according to your needs (see 15 “Create PDF files using Acrobat Distiller”) and save your changes – under a new name – to the Distiller “Settings” folder by clickingSave as.... Optionally, the job options file can be saved to the HELIOS “Settings” volume, in the “Distiller Settings” folder. Then highlight your “Create PDF” printer queue in the HELIOS AdminPrinterstab and selectSettingsfrom thePrintermenu. In theInterfacetab activate theSelect Distiller Settingscheckbox and enter the path to the job options file in the text field or clickBrowse...to search for it.
Now your job option settings have been saved to the “Create PDF” printer queue on the host and are stored in the “SETTINGS” file of the spool directory.
In the Interface tab of the “Create PDF” printer queue you
can display the contents of the Distiller settings file in a text
window. “root” and members of the “SysAdm” or
“QueueAdm” group can edit it:
-
Click the
Edit Distiller Settings...button.
- Note:
-
It is not recommended to edit the “SETTINGS” file manually because this can introduce syntax errors.
You may want to protect your created PDF documents against unauthorized use, e.g. from being opened, printed, or changed.
The different types of protection can be set in any Acrobat Distiller:
-
Start Acrobat Distiller and go to
Settings > Security.... In the “Security” window (Fig. 8.3) specify the required options, and finally confirm your entries with theOKbutton.
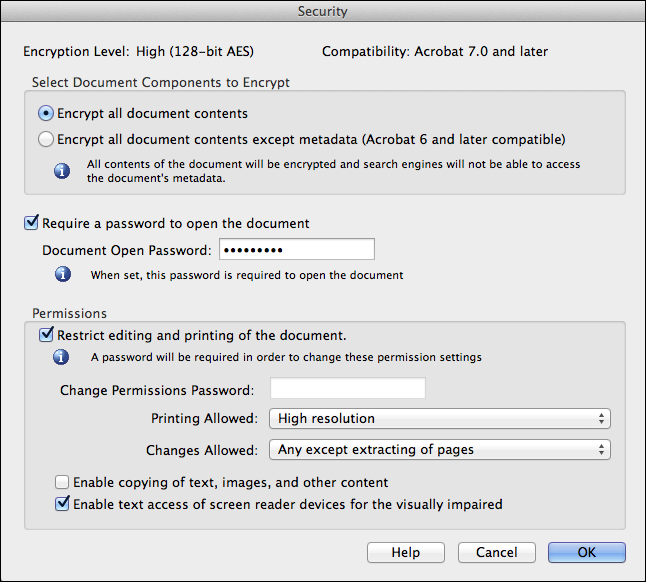
Likewise, Create PDF Server can tag PDF documents, during the generation, with security settings which restrict the opening, printing, changing (i.e. editing) of a PDF document.
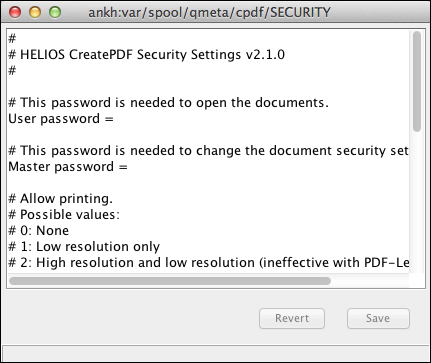
Create PDF Server stores the security information in “HELIOSDIR/var/spool/qmeta/<printer>/SECURITY”. To use security settings with Create PDF Server, proceed as follows:
-
Start HELIOS Admin and select the desired “Create PDF” printer queue. Open the security settings window (Fig. 8.4) of the respective “Create PDF” printer queue by clicking the
Edit Distiller
Security...
button in theInterfacetab of the printer queue configuration window.
-
Apply your changes in the “SECURITY” window, then close the window and confirm your changes.
Create PDF Server will produce PDF files which behave according to the specifications in the “SECURITY” file.
- Note:
-
If no security settings are specified in the “SECURITY” file, Create PDF Server does not put up any restrictions. However, if security settings are defined in the used Distiller they will be applied! So make it a habit to remove all PDF security related restrictions in the Distiller settings, and apply such restrictions via Create PDF Server only.
8.2.2 Composite PDF without color space transforms
When printing composite PostScript to a “Create PDF”
queue, if color matching is turned off (i.e. the Default
Printer Profile in the HELIOS Admin tab ICC is set to
None), then no color matching will take place, and all objects
will be sent in their original color space to be Distilled.
However, color space conversion may still occur if the
Distiller “Adobe PDF Settings” are set to do so.
8.3 Print to the “Create PDF” printer queue
Printing to a “Create PDF” printer queue is almost the same as printing to any other HELIOS printer queue. The only difference is that here a Mac or Windows host with Acrobat Distiller acts as a “Create PDF” printer. So any (authorized) user on the network can benefit from the functionality of Create PDF Server.
-
In the application from which you want to print, open the print menu and choose the “Create PDF” printer queue. There, specify the required settings (e.g. paper size and PostScript options) and start the job.
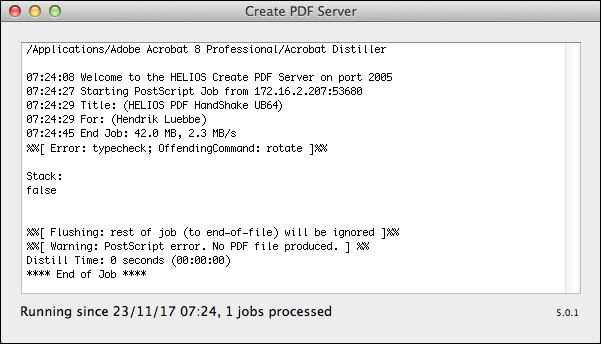
Create PDF Server then starts processing the jobs – one at a time – according to their order in the spool queue. You can monitor the process and the state of each print job in the “Create PDF Server” window.
While idling, the window states with a “Welcome” message that the server is ready to receive print jobs. When a print job is being processed the window displays information about where the job comes from and via which port as well as the total print job size and the transfer rate. After Create PDF Server has completed the job and the PDF file has been created, the window shows the size of the PDF file and the transfer rate (Fig. 8.5).

If there should arise a problem during the print processing, a warning message appears in the “Create PDF Server” window specifying the cause of the problem (Fig. 8.6).
After that, Create PDF Server is idle again and ready to accept new print jobs.
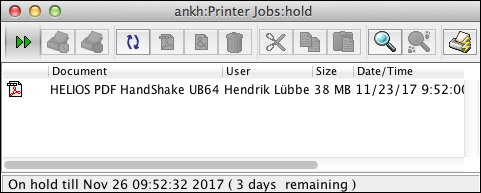
There are two ways to obtain the printed PDF file: from the “hold” queue of HELIOS Admin, provided that the “Create PDF” printer queue is configured to pass printed jobs to the “hold” queue.
-
Double-click the “hold” queue in the
Printerslist to access the file in the job window (Fig. 8.7). The PDF icon in front of the file name indicates that PDF generation has been successful. Double-clicking a job’s PDF icon in the “hold” queue automatically starts your Acrobat application. Also, you can select the job in the “hold” queue window and go toSave as...in theFilemenu of HELIOS Admin.
You can also obtain the created PDF file via the HELIOS
volume (which should be described by the path in the
Directory entry) and get access to the file there or, if you
checked Create Folder for Each User, in the directory’s
subfolder.
- Note:
-
Please note that the PDF file still remains in the HELIOS directory even if the print job is erased from the “hold” queue. This is because the printer queue only references the PDF file.
8.3.1 Balance “Create PDF” print jobs (Balance queue)
To enhance the data throughput you may group two or more “Create PDF” queues in one balance queue. The user then prints to this “balance” queue where the print server distributes the job to the next idle “Create PDF” queue.
Because the PDF job options and security settings are sent along with the print job, the print job can be sent to any of the Create PDF Server hosts.
For comprehensive and more detailed information about how to set up a balance queue, see the respective chapters in the HELIOS Base manual.
-
Activate the
Printerslist and chooseNewfrom theFilemenu. HELIOS Admin then opens a new printer data window, which – to some extent – is already filled out with default values from the “Server Settings” window.
-
Fill out the
Printer Name, select a PPD, and if desired, assign “hold” and “error” queues. In theConnectionpop-up menu selectBalance Group. From thePrinterslist drag the “Create PDF” queues you want to group for load balancing into thePrinterfield (Fig. 8.8). To finish, enter theTCPandSMBnames in theMacandWindowstabs, and clickSave.

- Important:
-
It is most important that the “Create PDF” printer queues which form the “Balance Group” have been assigned the same Distiller and Security settings (see Select Distiller Settings and Edit Distiller Security). Also select the same PPD for the “Balance Queue” which is already assigned to the “Create PDF” printer queues in the
Printersfield. Otherwise the printing results may not be predictable.
8.4 Possible problems
Acrobat Distiller sometimes produces strange error
messages if it is running out of memory. Sometimes there
is an error message no PDF file created or a PostScript
error message. Please verify the failed PostScript job by
dropping it on the Distiller application icon, maintaining
the same Distiller Settings and Memory
allocation.
If no PDF file is created the reasons could be:
PostScript errors in the print job
Incomplete Acrobat Distiller installation
Missing fonts
The status in the “Printer” window issues “Waiting for printer…”. The possible cause is:
Host or Create PDF Server is not up and running or wrong IP address in printer configuration