15 Create PDF files using Acrobat Distiller
PDF HandShake offers the opportunity of using PDF as an exchange format in the printing business. The results on the output side, however, depend on the quality on the input side. So for PDF generation you should follow the instructions given below or communicate the instructions to every customer who submits PDF files to you. We recommend to use Acrobat Distiller for PDF generation, and to consult the Acrobat online help.
In the following, we briefly discuss the Distiller job options that might be relevant for the PDF HandShake workflows.
- Note:
-
Please note that some of the Distiller settings described below are best suited for printing only – they may be disadvantageous for other purposes such as web production or re-editing of files using Adobe Acrobat.

-
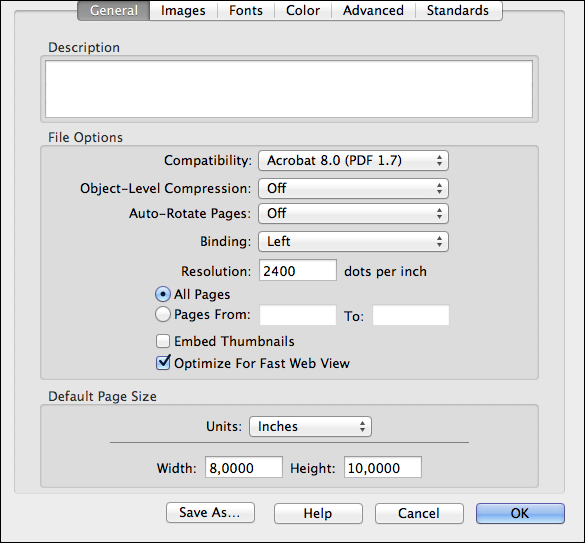
Start Acrobat Distiller, open
Settings > Edit Adobe PDF
Settings...
and select theGeneraltab to open the dialog shown in Fig. 15.1.
Compatibility should be set to Acrobat 4
(PDF 1.3) in order to provide a high grade of compatibility with
different Acrobat versions. For “Create PDF” printer queues with the
PDF Transparency option enabled, compatibility should be
set to Acrobat 5 (PDF 1.4) or higher.
The default document page size can be arbitrarily specified in this section.
-
In the
Unitspop-up menu selectCentimetersorInches.
-
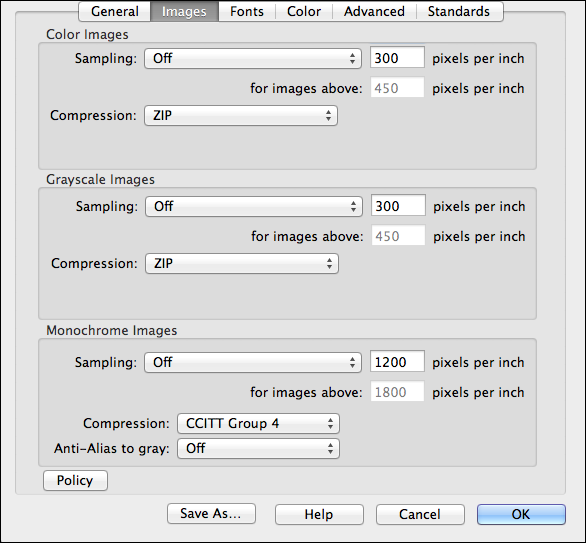
Then select the
Imagestab as shown in Fig. 15.2.
Sampling should be switched off in the pop-up menu,
and Compression should be ZIP. Even
though PDF HandShake is able to uncompress every kind of
PDF file, any type of JPEG, JPEG 2000 or
Automatic compression may entail data loss and thus
reduce quality on the output side.
Here, the same settings as described in Color Images
above should be applied.
If you intend to decrease the file size for monochrome
bitmap images switch Sampling off and select
CCIT Group 4 or Run Length from
the corresponding pop-up menu.
-
Switch to the
Fontstab to specify the fonts you want to include in your PDF file. Fig. 15.3 shows the settings that are best suited for printing.
Embed All Fonts guarantees that all fonts used in
the original document will be contained in the resulting PDF
file. This is especially important if you plan to use the PDF
file with PDF HandShake on a different system later. Note that the
Distiller software can only embed fonts that are either
embedded in the PostScript file or available in one of your
system’s font locations. TrueType fonts will only be
embedded if they are already included in the PostScript file.
If you are fairly sure that the fonts you used for document
creation are available on the system that will be used for
production, you may uncheck Embed All Fonts.
The Subset Embedded Fonts When Percent Of Characters
Used Is Less Than option should be used, and set to 100%, to
make sure that the fonts embedded in the PDF file are really
used for printing.
When printing with the Acrobat plug-in or “pdfprint”, all fonts that are embedded in a PDF file will be sent to the printer. However, depending on the printer’s default settings, a font from the document might be rejected in case the printer already has a font of the same name. Problems can arise if the font in the PDF file, e.g. Chicago, is not identical to the printer’s Chicago font.
If you use Subset Embedded Fonts When Percent Of
Characters Used Is Less Than and set it to the highest value
– 100% – you can make sure that every
embedded font in the document will be assigned a new and unique
font name (e.g. “CMFONL+Chicago” for a Chicago subset font) that
does not coincide with the standard font names on a printer.
- Note:
-
If you work with
Subset Embedded Fonts When Percent Of Characters Used Is Less Thanand set it to a rather high value you should keep in mind that the Adobe Acrobat cannot re-edit text – in a PDF file – that uses subset fonts.
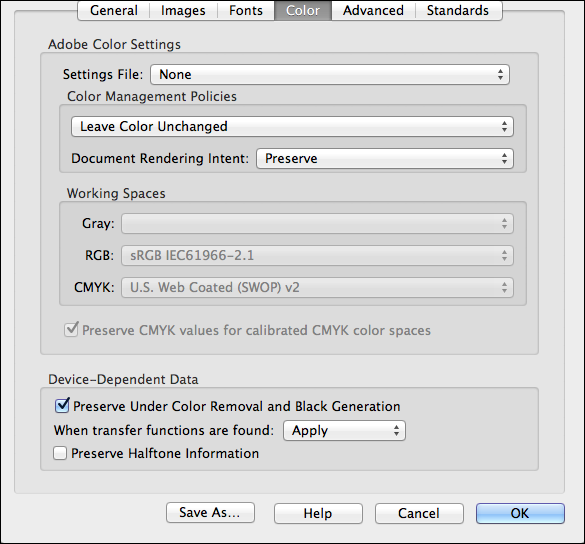
The Color tab
can be used to apply color settings. We recommend to use the settings
shown in Fig. 15.4.
-
Choose
Leave Color Unchangedfrom the pop-up menu, as shown in the example, unless you intend to edit the colors in the PDF document.
The profiles pop-up menus for Gray, RGB
and CMYK remain grayed out as long as you maintain
Leave Color Unchanged.
Preserve Under Color Removal and Preserve Halftone
Information can be checked if required. If your PostScript
file contains e.g. halftone information you want to use for
later printing, check Preserve Halftone Information. The
“pdfprint” program and the Acrobat plug-in both have an
option that allows to use for printing the halftone information
that is included in the PDF file.
-
Switch to the
Advancedtab as shown in Fig. 15.5.
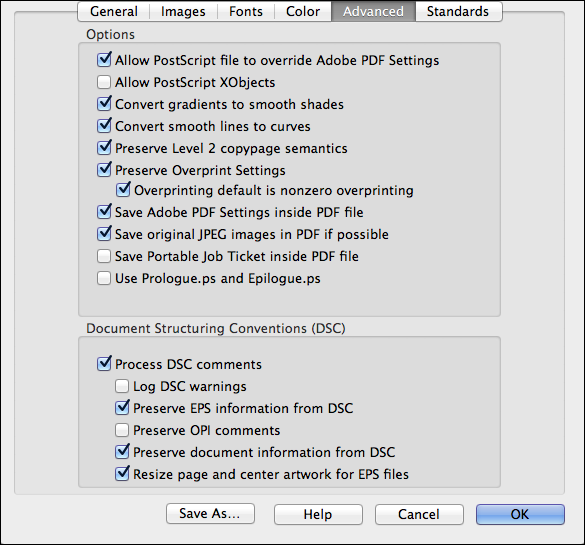
Preserve OPI Comments is only relevant if you
are using ImageServer. Both choices are possible: If you
are fairly sure that your input document is complete,
meaning that all required fonts and high-resolution images
are embedded, you should uncheck the option. In that case
OPI comments are no longer relevant. If you check
Preserve OPI Comments this would mean that OPI
comments that are already included in your EPSF or PostScript
file will be included in the PDF file as well; and they will
be resolved by the OPI server later. For example, if the PDF
document contains a TIFF layout file and a reference to the
high-resolution original, the OPI server will be able to perform
image replacement according to the reference in the PDF file.
Problems can arise if you send PDF files with OPI comments to another
company and do not also send the high-resolution images.
In that case, the OPI comments cannot be resolved and the
PDF files cannot be printed correctly.
- Note:
-
Creating PDF files from separated PostScript files using Acrobat Distiller works just as well as with composite files.
-
Finally, switch to the
Standardstab as shown in Fig. 15.6.
The ISO (International Organization for Standardization) has issued several PDF/X standards by now. Each PDF/X standard describes a specific subset of an Adobe PDF standard version. The goal of all PDF/X standards is to achieve high interoperability and reproducibility without appearance variations. Unrestricted PDF documents are known for color, font, and trapping problems, which PDF/X eliminates.
PDF/X, a subset of the PDF specification created by Adobe, eliminates many of the color, font, and trapping variables that lead to printing problems.
There are two commonly used versions of PDF/X, both approved ISO standards:
PDF/X-1a is a specification for the blind exchange of PDF files which contain CMYK and spot color information.
The second, PDF/X-3 is very similar to PDF/ X-1a, except it allows using device independent color (Lab, color profiles and calibrated color spaces).
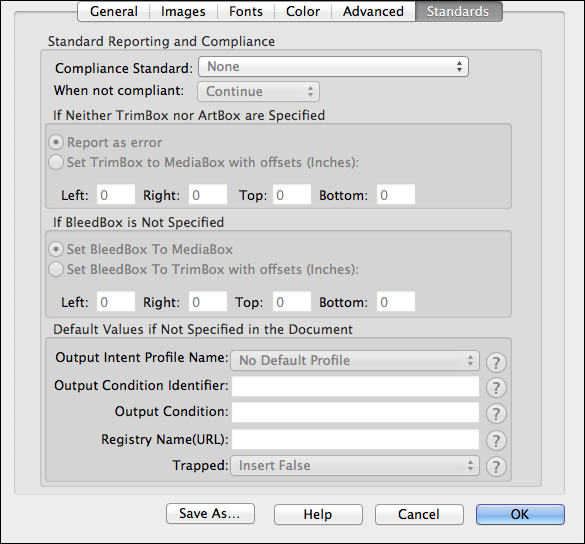
Standard Reporting and Compliance defines
the PDF/X specification used, what Distiller is to
do when it finds files that are not compliant, etc.
The Compliance Standard pop-up menu is used to specify
which version of PDF/X is desired. PDF/X-1a is used for device CMYK
and spot color workflows; PDF/X-3 is used for color managed workflows.
When not compliant – Distiller can either fail a non-compliant
job or it can continue to create a PDF file that is as close
to PDF/X compliance as possible. Using Continue is not
recommended, because it does not create PDF/X compliant
files.
If neither TrimBox nor ArtBox are Specified – The
specification of at least one of these boxes is a requirement of
PDF/X (even if the offset values are set to zero.)
It is always best to check with the printer to get this setting
correct, otherwise, leave the offset values set to zero. This will
cause the trim box to be set to the page size.
If BleedBox is not Specified – The Bleed Box specification
is another requirement of PDF/X. If it is not specified or
Distiller cannot detect the bleed box from the incoming
file (Distiller contains smarts to detect this
information, even if the user does not specify it), you can
set the bleed box value in relation to the trim box value.
Because the size of the bleed box is always greater than the
size of the trim box, the offset indicated here is the distance
outside the trim box.
Default values if not specified in the document
– The document output intent is specified in this document. This
describes the intended output condition for the file. The
PDF/X specification allows you to identify these output
conditions in two ways. You can choose either an ICC
profile that describes the device or condition for which the
file is prepared or a characterized printing condition can be
used. Distiller has a preference for specifying an ICC
profile. Based on the profile chosen, Distiller will select the
proper characterized printing condition for you.
If you do specify a characterized printing condition, it must be registered in order for it to comply with the PDF/X standard.
In addition, the Trapped parameter is specified
in this section. This parameter is meant to indicate whether
or not the file contains trapping information. In almost all cases,
the value of this flag will be Insert False. Unless you are
manually trapping a file, using a trapping plug-in or do not
want the file to be trapped, leave this as Insert False.