HELIOS EtherShare 2.6 User manual |
||||
The following list gives details about the hardware and software you need for successfully working with EtherShare 2.6 as released on HELIOS CD 015.
- One of the following UNIX systems:
- CD-ROM drive (or possibility of using a tape instead)
- 6 MB in the "/usr" file system, in addition to the individual disk storage requirements of each of the users
(This value is valid for pure EtherShare. It becomes considerably higher if you install any add-ons such as EtherShare OPI or PDF Handshake.)- about 1 MB RAM per active user
- about 1 MB RAM per printer queue that receives a job
- about 1 MB RAM per print process
- at least 64 MB RAM on the server
- at least one supported network adapter installed and activated
- RPC (UNIX) and TCP/IP must be installed and running
Note: For installing EtherShare, you have to be able to log in as "root" on your host.
- PostScript compatible printer
- Network printers are usually connected to the network via Ethernet (EtherTalk)
The Print Server also supports "TCP/IP streams", "Remote LPR", "Shared Memory", and "Print To Disk" connections. And - it also allows PostScript printers to be connected to the UNIX host via a serial port on the File Server. However, you may get problems with applications that send images as binary bitmap data, since serially connected PostScript printers interpret certain binary codes as control signals. (Please refer to chapter 11.6 "Configuring printers manually" for more information.) Accordingly, we recommend Ethernet, because it is transparent to 8-bit data and much faster than a serial connection - which is an important factor for images. See chapter 11 "The Print Server" for more information.This chapter describes the steps that are indispensable for a standard installation, and gives short explanations if necessary. Please remember that all activities you have to perform are marked by an "instruction" arrow in the left margin. For a quick installation, you may proceed directly from one instruction to the other and skip the explanations in between.
Our EtherShare 2.6 software is delivered on an ISO-9660 CD-ROM. For convenience, the CD-ROM also includes a script which allows you to copy each of the products to a standard installation tape. The procedure is described in chapter 4.4 below.
The installation is executed by two separated programs. The first program ("install.sh") must be started from the CD-ROM. It lets you select the product you want to install and copies all related files and the product specific installation program to the local disk of your UNIX computer. Then, the product specific installation program (here: "install") is started automatically by the "install.sh" program and guides you through the installation procedure. If required, "install" can be started again at any time from the local disk.
HELIOS issues EtherShare updates every now and then to enhance the product. These updates are distributed via the HELIOS Web server www.helios.de, and they are included on every HELIOS CD-ROM. The installation procedure for software updates is described in chapter 4.8 "Installing updates using the HELIOS update installer".
You cannot start the EtherShare software without a software activation key (kind of password). The key has to be entered during the installation procedure on your host computer. In case you have no activation key at hand, please follow the instructions given in paragraphs License information and What you have to do in the chapter "Welcome to EtherShare 2.6" at the beginning of this manual.
Note: If you do not enter any Activation Key the HELIOS product you have installed will run in a 3 hour demo mode only.
Under certain conditions, HELIOS issues so-called demo licenses. If you are entitled to get a demo license, you will receive an activation key for demonstration purposes that expires after a given period of time.
Important: The old EtherShare 2.2 activation key will not activate program version 2.6!
The UNIX host must be provided with a fully installed and fully configured operating system. You should have the rights to boot the host yourself, in case a reboot is necessary during installation. You must also be able to log in as the superuser ("root"), in order to allow the installation program to create subdirectories and make the required system modifications.
Since it may be necessary to reconfigure the operating system, no other users should be logged-in during the installation.
Important: Before starting the installation, you should create a backup copy of the system disk of your host computer.
If you have a network without routers you can use the EtherShare "Automatic configuration" option for network configuration. This also applies to networks with different zones and an existing AppleTalk router. For more information and manual EtherShare network configuration, see appendices A 3.3 "Network automatic configuration option" and A 3.5 "Manual network configuration".
The host's "/etc/hosts" file must contain the following loopback entry in addition to the host's own entry (and optional entries for other hosts):
EtherShare usually cannot co-exist on the same host with AppleTalk software, such as file servers, from other manufacturers (with the exception of Mac OS X Server and Linux). You must uninstall all other AppleTalk software on the host before installing EtherShare, and stop all related host processes.
Depending on your hardware which affects the installation procedure the C compiler and the linkable operating system may need to be installed.
Printers may need to be configured. Depending on the printer, this is done for example with DIP switches, front panel settings, or with Apple's "LaserWriter Utilities" program. With some printers, it is first necessary to unplug the serial interface cable before the printer's AppleTalk interface will operate (see the printer's documentation). For serial printers, please also refer to chapter 11.6 "Configuring printers manually".
If you want to install additional HELIOS products, e.g.
PCShare or EtherShare OPI, we recommend to install the programs on the server in a fixed order, namely the order that is suggested by the installation menu on your current product CD-ROM. The following order is valid for the HELIOS products as delivered on CD-ROM 015:
- install EtherShare 2.6 first
- install PCShare 3.0 second
- install EtherShare OPI 2.1 and/or PDF Handshake third
EtherShare's AppleTalk modules, which form the backbone of the EtherShare system, are either contained in a UNIX loadable module, which is designed to be added to the operating system during runtime, or in a driver which is built into the UNIX kernel during EtherShare installation. Kernel modifications require a system reboot. The behavior depends on the type of server: DG/UX e.g. does not support loadable modules. On some architectures dynamic loading is supported, whereas unloading requires a reboot.
If a Macintosh computer is to be connected via Ethernet or FDDI, it may need to have an appropriate network card installed. Please install the network card according to the manufacturer's instructions before installing EtherShare.
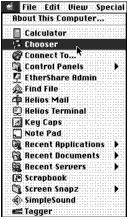
No changes are required to the Apple system software in order to use EtherShare. However, please make sure that each workstation has the option "AppleShare" in the Chooser. This option appears automatically if the "AppleShare" file is present in the "Extensions" subfolder of the System Folder when booting the Macintosh. If necessary, use the system program "Installer" to install the AppleShare client software. AppleShare is responsible for making the logical connection to all network devices of type "AFPServer". It allows users to log on to the EtherShare File Server and select file server volumes. Please refer to the Apple documentation for more details about AppleShare. Please note that Mac OS 8 contains the AppleShare client software by default. Installation is not required.
If you are using an Apple LaserWriter, Apple LaserWriter Plus or a compatible PostScript printer, the "LaserWriter" printer driver is required in the "Extensions" subfolder of the Macintosh's System Folder. "LaserWriter" is responsible for making the logical connection to all network devices of type "LaserWriter". Note that the Apple Laser Writer GX driver is not compatible to EtherShare and has to be uninstalled.
If you are using an ImageWriter II or ImageWriter LQ, appropriate printer drivers (such as "AppleTalk ImageWriter" for the ImageWriter II printer) must be present in the "Extensions" subfolder of the System Folder. "AppleTalk ImageWriter" is responsible for making the logical connection to all network devices of type "ImageWriter".
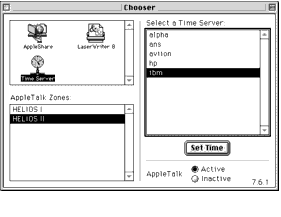
"AppleShare" and printer drivers such as "LaserWriter" are accessed through the Chooser to allow you to select network zones, file servers and printers. On some systems, the AppleTalk Zones: scroll box is only visible if you have any zones. Refer to the Apple Macintosh user manual for more details.
The AppleShare and AppleTalk files, and printer drivers such as "LaserWriter", are included in the standard Apple system software. If the AppleTalk connection is being made via Ethernet, FDDI, or Token Ring, the EtherTalk, FDDITalk, or TokenTalk file must also be available.
EtherShare is also provided with several Macintosh utility programs. One of these programs, Helios Mail, uses the UNIX "mail" program, which must be installed and working for Helios Mail to work. To test this, make a UNIX login and try to send a mail between two UNIX users. If necessary, refer to your UNIX documentation for details.
DOS/Windows PCs can also be connected to EtherShare, provided that appropriate software is installed on the server. A very convenient and fast way of connecting IBM-PC-compatible computers to your network is to use HELIOS PCShare 2.5 or higher which smoothly co-operates with EtherShare 2.6.
Please note that installing EtherShare 2.6 will require a stop of all EtherShare services, that is file access as well as spooling and printing. On some architectures even a reboot of the UNIX server is required. If EtherShare volumes are shared with PCShare 2.x on the same server, make sure to stop PCShare prior to the EtherShare 2.6 installation, otherwise the PCShare 2.x clients will encounter loss of write access to the shared volumes. Only after successful installation of EtherShare 2.6, PCShare server processes can be started again.
Before you install the new EtherShare 2.6 version you should make sure that all Macintosh users are logged-out from the EtherShare server and that there are no active print jobs. The installation script will stop all EtherShare services in order to install the new software version successfully.
You should keep all existing files in your old EtherShare directory. The EtherShare 2.2 configuration files in "$ESDIR/conf" are re-used by EtherShare 2.6 if the new version is installed on top of the old version in the same directory.
The EtherShare 2.6 distribution differs slightly from the earlier EtherShare 2.2 version; some data and program files became obsolete and will be moved to a directory "$ESDIR/obsolete" after a successful installation.
If you have changed any of the UNIX script files in the "$ESDIR" directory for your old EtherShare installation, you should make a copy of these files to integrate your changes into the new version.
In case you implemented your own scripts or adjusted some of EtherShare's, please verify these scripts immediately in order to assure proper operation of your scripts.
Due to major differences between EtherShare 1.x and EtherShare 2.6, EtherShare 1.x has to be removed prior to the EtherShare 2.6 installation. Therefore, you must run the "$ESDIR/stop-atalk" script to stop the EtherShare processes. You then need to run the "$ESDIR/etc/uninstall" script to uninstall any kernel extensions which may have been applied by an EtherShare installation script.
After you have written down the EtherShare 1.x configuration you must remove the complete contents of the EtherShare 1.x directory before you begin the installation of EtherShare 2.6. After the installation you can setup the new configuration according to your notes from the EtherShare 1.x configuration. After successful installation, a reboot of the UNIX server is required.
At first, we will describe the installation from CD-ROM. Instructions on how to install EtherShare from a tape are given at the end of this chapter.
During the installation, you are guided by menu-driven programs. Most questions in these programs have a default answer which is given in brackets. You can accept this default by simply pressing ENTER or type an alternative answer. If there is nothing within the brackets, the system will expect an entry from you.
Important: Please note that if you quit the installation before having finished the complete procedure, you will have to start with step 1 again when you install EtherShare anew. Do not skip any steps you think you have already taken.
Important: The following installation example describes the steps that are to be taken on an IBM RS/6000 computer under AIX 4. Slight deviations may occur - depending on your system type and configuration.
To start the installation, log in as "root" on your host.
For upgraders only: Please follow the instructions given in chapter 4.3.6 "Preparing upgrade installations" before proceeding.
Then place the CD-ROM in the CD drive of your UNIX computer and enter the mount and install commands which may be different for different UNIX systems. The correct commands for your specific computer are stated in the booklet we enclose to our CD-ROM.
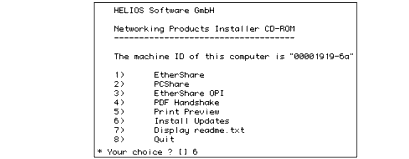
As soon as you have entered the last command, the "Networking Products Installer CD-ROM" menu will appear (see figure 1).
Select EtherShare by entering the number of the respective menu item (here: 1) and press ENTER.
Read the information about update installations that is displayed now, and type y (for "yes") to continue.
Select the version you want to install. (This prompt is skipped automatically, if there is only one program version available on that CD-ROM.)
The program will then display a list of the currently available disk space. This list can help you find an adequate directory for EtherShare.
Select the directory you want to install EtherShare in (the default directory is /usr/local/es) and then start the installation procedure.
The installation program ("install.sh") now stops EtherShare, in case an older version is running on the server. Then, the program removes old updates - if there are any - and copies the EtherShare program files to the directory you have selected.
At this stage, you can induce the installation program to automatically start the HELIOS update installer and install all updates that are available on the CD-ROM. If there are no updates, this step is skipped. Otherwise, you will see a prompt similar to the following:
The following updates are available for the newly
installed product:
u0101: (subject line)
u0104: (subject line)
.
.
u0125: (subject line)
u0128: (subject line)
* Do you want to install these ? [y]
If you decide to install the updates now (which is convenient and thus recommended), the update installer will start and perform the installation automatically. Else, you can start the update installer manually at a later date and install the updates you want to use.
After update installation, the script will call the product specific installation program for EtherShare.
Calling product installation script
/usr/local/es/install
The product specific installation menu is shown in figure 2. Items 1 to 5 of this menu deal with the installation and Display README file should be selected if you want to check the latest information which has not done it into the manual yet.
Important: Items 1-3 must always be executed, even if you are upgrading from an earlier version.
Select Install programs and configuration files from the "EtherShare Installation Menu".
The "install" program automatically creates a suitable shell script to start the EtherShare server programs. The script includes a command to set the UNIX environment variable "$ESDIR" to the EtherShare home directory (by default /usr/local/es).
Setting up configuration files ...
Changing ESDIR variable in various shell scripts ...
Performing symlinks from files in /usr/local/es/lib to /usr/lib ...
Arranging for EtherShare to start automatically after the next reboot ...
To install a shared volume, we recommend that you choose the local partition from the following list with the
biggest available free space. Then use that partition's mount point (the rightmost column) as the prefix to the ethershare directory to be created. Please make sure that volumes do not overlap, e.g. do not make /home a volume if you want to access your home directory under /home/username.
The crontab entry to periodically clean up EtherShare log files does not exist. This entry will make sure that the server.acct and printer.acct files will not grow without bounds.
Please note that Ok to create the crontab entry ? may fail on hosts on which "root" privileges have been manipulated. In case of failure, please refer to the crontab manual pages.
Select item Install and configure AppleTalk kernel modules from the "EtherShare Installation Menu".
Important: You must select item [2], even though a kernel rebuild may not be required on all platforms. The script will verify this and will behave accordingly.
The script will have to perform configuration and administrative tasks for a successful installation. So this part of the installation may be different for different platforms.
In case the installation program installs a new kernel it will inform you about the steps it will take. The program will finally come up with the prompt:
If your answer to this question is n (for "no"), you will have to copy the kernel manually to the directory "/".
Please note that after a kernel rebuild you will have to reboot the system after installation. The installation script will inform you about this as well.
Now, you have to license your HELIOS product.
Select Enter activation key to license Helios programs from the "EtherShare Installation Menu".
Press RETURN and then select item [1] or [2] - depending on whether you want to install a new base license or expand an existing license - from the "EtherShare License Menu" that is shown below.
Enter your 8-digit software serial number.
Enter an expiration date if you have a demo license.
Enter the number of users allowed to work with this license.
Enter the checksum that is stated on your "Activation Key Reply" form.
Important: If you get any error messages instead of the License is valid ... prompt, you may check your entry again and repeat the licensing procedure if necessary.
Make sure you have used the correct key reply form values.
When all procedures to enter the Activation Key fail, direct to your HELIOS distributor, or - if you received the key from HELIOS directly - to HELIOS.You have successfully licensed your EtherShare copy and may now choose from the "EtherShare License Menu" either item [3] to display all license information again, or item [5] to return to the "EtherShare Installation Menu".
Proceed to item [4] in the "EtherShare Installation Menu" and create a demo user to allow Macintosh users to log on to the server without further configuration.
Select a home directory for the demo user as shown below.
* Home directory for user macuser ? [/data/macuser]
Created group "macusers" for Macintosh users.
The test user "macuser" has now been created. This user has no password at present. This user should be deleted as soon as you have created real users, for example by using the EtherShare Admin program.
When you see the "EtherShare Installation Menu" again, choose [5] to configure the network connections by setting up the "atalkd" entry in the main EtherShare configuration file "atalk.conf".
If your EtherShare host has a single network interface only, you will get the following message when you select
This system has only one network interface installed, thus there is no need to configure any network numbers.
Else, if your host has more than one network interface, the AppleTalk Network Setup Program "netconf" will be started automatically. It will, by default, show "Automatic configuration" for every network interface. You can - at this stage - press ENTER and then quit "netconf". In some cases, however, it will be necessary to configure your network manually. The usage of the "netconf" program is described later in this manual: See A 3.3 "Network automatic configuration option" for a technical explanation of automatic configuration, and the other paragraphs of the appendix for details about manual configuration of network interfaces and zones.
Unless you opt for manual network configuration, the EtherShare base system is now fully installed and is ready for testing. Press ENTER to reach the "EtherShare Installation Menu" again and choose [6] to check the information given in the README file and then item [7] to quit the "install" program:
The EtherShare configuration is now finished. If you want to add printers, users, groups or volumes, read the book first and use vi, or use our EtherShare Admin application from one of the Macs. The latter is much easier, even if you are experienced with vi (the famous UNIX editor).
For No kernel generation necessary only: If loadable modules are supported and enabled, you will not be asked to reboot. Instead, the installation program will start EtherShare automatically and you will see the "Networking Products Installer CD-ROM" menu again. Select Quit to finish the installation procedure on the host and go on with the verification and client installation (chapters 4.5, 4.6).
For systems with kernel rebuild only: If a kernel rebuild was necessary on your host you have to reboot now.
Because we have now built a new kernel, it is time to halt the system and reboot with the modified kernel.
If you want to add printers, users, groups or volumes, read the book first and use vi, or use our EtherShare Admin application from one of the Macs. The latter is much easier, even if you are experienced with vi (the famous Unix editor).
Note: If it was necessary for the installation process to modify your UNIX kernel, the old kernel version is preserved as a copy with the same file name but a different extension (e.g. ".noatalk"). The dialog of the "install" program will tell you whether this was necessary or not, and which file name was chosen for the old copy.
The files MKTAPE.SH and README.TXT on our CD-ROM give a full description of how to make an EtherShare tape. When installing EtherShare from tape you have to be logged-in as "root" and enter the following commands:
Please do not forget the command "umask 0". It influences the permissions which are set for the EtherShare program modules and directories. Incorrect permissions can cause serious malfunction of the EtherShare system.
Finally, you have to start the product specific installation program manually - using /usr/local/es/install - and then follow the instructions given in paragraph The Ether-Share installation menu above.
All EtherShare programs are contained in the EtherShare home directory "$ESDIR" specified during the installation (default /usr/local/es), and in several sub-directories. For example, "$ESDIR" contains EtherShare system and utility programs, "$ESDIR/etc" contains sub-programs of the "install" program and example configuration templates, "$ESDIR/conf" contains EtherShare configuration files and "$ESDIR/macapps" contains Macintosh programs for use with EtherShare.
"$ESDIR/psfonts" and "$ESDIR/dicts" are for manually installed printer fonts and PostScript "dicts", respectively. The former directory is initially empty and the latter contains several special "dict" files. The Print Server automatically captures more "dict" files there when you use EtherShare.
Please see appendix A 2: "Files in the EtherShare directory" for more details about the files that make up EtherShare.
In some cases, the "install" program needs to rebuild the hosts's kernel. A copy of the old kernel is retained (under the name "vmunix.noatalk") to allow you to boot if the new kernel does not work successfully.
The "install" program also adds the following command to the file "/etc/rc.local" or "/etc/inittab":
The "install" program automatically sets up the EtherShare main configuration file ("atalk.conf") with default values for the parameters. The values can be changed if necessary by using an editor such as vi, but we strongly recommend that you do this with the EtherShare Admin program and the network configuration option of the "install" program instead.
The first thing to do after starting EtherShare for the first time is to check the process list with the ps command.
Enter the ps command ("ps -ef", "ps -e", or "ps ax" - depending on your UNIX system) to prompt a listing of all the processes currently running on your server (the following example shows a listing on Solaris 2.x).
If one of the EtherShare processes is missing, something is wrong. You should then inspect the system message file which will contain an error message from the program in question. The name and location of the system message file is dependent on the operating system, it is e.g.:
The File Server ("afpsrv"), Terminal Server ("termsrv"), Administration Server ("admsrv"), and Mail Server ("mailsrv") each spawn an additional process for each user login, so you may see these entries more than once if someone is already logged-in. The Print Server ("papsrv") spawns an additional process for each printer queue and each print job. You should see only one Desktop Server ("desksrv") process. Seealso the discussion of the process list in the description of the "swho" command in chapter 8.5 "AppleTalk stack utility programs".
The EtherShare Desktop Server requires RPC (remote procedure call) to be configured on your host. First make sure that the "portmap (UNIX)" or "rpcbind (UNIX)" process is running. Then check all RPC registered processes with the command rpcinfo -p. The following shows a typical RPC list:
The EtherShare Desktop Server has the official allocated program number 300261; the AFP Server has number 300619. You have to add suitable entries to "/etc/rpc" to make sure that the strings "desksrv" and "afpsrv" are displayed alongside the "desksrv" and "afpsrv" processes as shown above. Use the following command to check for example whether "desksrv" is running and responding:
The next thing you should do is use the AppleTalk echo diagnosis program "$ESDIR/atechoping" to test the network for services, and thus see if the EtherShare base system is communicating with other AppleShare nodes. When you run this program on the host, you should get one response line for the host's loopback channel and one for each Macintosh which is switched on and connected to the same network segment. If no Macintosh computers are connected you should get a single response line for the host's loopback channel.
When you enter the atechoping command, you will see something like the following:
You can also enter atechoping <nn>, where <nn> is the network number, to echo test other networks. Other EtherShare hosts also return a one-line message.
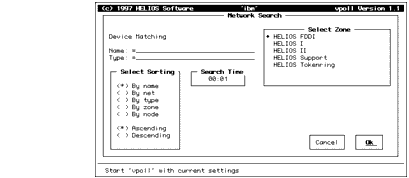
Our UNIX application "vpoll" can be used to get a more detailed view of the available devices in the network. The program is comparable to the former Macintosh application "Inter·Poll". However, it is a very sophisticated program that can be used on different occasions - not only for verifying the installation. "vpoll" is an interactive program that lets you set several parameters before starting the network check, and it lets you observe how fast the different devices in your network respond to the network check.
After installation "vpoll" is available in the "$ESDIR" directory. To start the program, just enter:
Note that "vpoll" provides the information online, but also allows to save the data in a file. Use Ctrl-W for that purpose. If you press CTRL-W, e.g. in the "Device-List" window, you will be queried for a "Logfile Name" where current settings and lists should be saved as ASCII. Subsequent saves will be appended to the logfile. After finishing and restarting "vpoll", the first CTRL-W you enter will induce the program to query for a "Logfile Name" again.
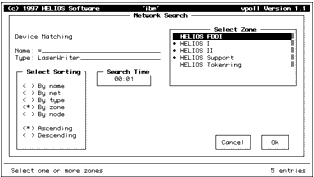
Whenever a user changes any parameters (as shown in figure 4), the new settings will be saved for this specific user. You can use the Name and Type lines to limit the network check to specific devices. The "=" is used as a wildcard.
Please note that the bottom line gives short descriptions of the currently selected item (compare figure 4 again).
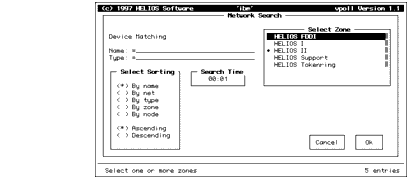
In figure 5, we have set up a network check for all devices in zone "HELIOS II".
To start the network search, proceed to the Ok button (using the TAB key) and then press ENTER.
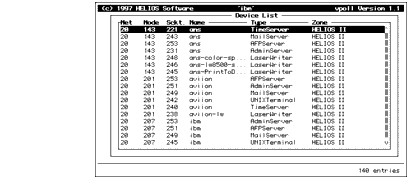
You will get a device list like that shown in figure 6. All devices of the zone "HELIOS II" are listed - they are sorted by name. The device list includes the network number (Net), the node number (Node), the socket number (Sckt.) and the Name, Type, and Zone of the respective device. Usually, any combination of Net, Node and Sckt. should be unique. It is possible, however, that a combination appears several times; in that case the zones are different.
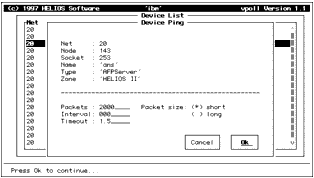
You can scroll through the device list and press ENTER to open the "Device Ping" dialog for a specific device.
In the "Device Ping" dialog you can - again - set individual parameters for a device check, namely: the number of packets, the packet size, the poll interval and a value for timeout.
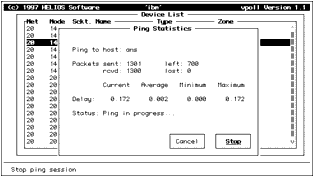
The device check will start the moment you select the Ok button in the "Device Ping" dialog (see figures 7 and 8).
You can stop and restart the ping statistics at any time; the behavior of the respective button (the Stop button in figure 8) will change, depending on the status.
Use the Cancel button (or the ESC key) to close the current dialog. The Cancel button in the "Network Search" dialog (see figure 3) will quit the "vpoll" program.
The HELIOS "poll" program is older than "vpoll", and in contrast to the latter one, it is a command line utility for network checks. It can be executed automatically in the background, e.g. if you include the poll command into a batch program. "poll" returns one message line for each AppleTalk service (entity) on any network, that can be found within 1 second response time. This includes one response line for the EtherShare servers "atalkd", "afpsrv", "papsrv", "admsrv", "termsrv", "timesrv" and "mailsrv" for each EtherShare host that can be found and for each registration (if the services are registered in several zones).
Each line shows the network number, node number, socket number, object name, object type and zone name. The network number is the netno parameter in the main configuration file "atalk.conf".
- "desksrv" does not appear in this list.
- "poll" can be specified with command line parameters as follows:
poll "name:type@zone"
You can use "=" as a wildcard for "name", "type", and "zone".- "poll" has a limited buffer - only 3 to 4 pages of information can be displayed at a time - for large networks, you may need to use wildcards to limit the range of services which are polled. For example:
poll "=:Laser=@*"
lists all services whose type starts with "Laser". The "*" represents "this zone"; the zone you are currently a member of.
The "zones" program can be used to list the names of all zones that can be found and to quickly find out which zone is the current default zone. You should get the same zone list as that shown in the Chooser of Macintosh computers connected to the same network segment. If given an "-l" argument, only local zones are shown.
Since the "zones" program uses the EtherShare AppleTalk protocol modules, which reference "atalk.conf" for configuration details, mistakes in the latter file will cause you to see less zones than those shown on the Macintosh clients. For example, if you get the zone name(s) wrong for a router, "zones" will not show any zones which exist on the other side of the router.
In the following example, you see all zones and a "*" in front of the current default zone "HELIOS I":
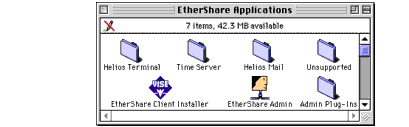
Several Macintosh applications were copied to the directory "$ESDIR/macapps" and its subdirectories when installing EtherShare. They are available to all Macintosh computers on the network in the "EtherShare Applications" volume and can be installed using the "EtherShare Client Installer" which is described below.
You should save your work and quit all applications before using the installer because you will have to restart your Macintosh after successful installation.
To install our Macintosh applications, mount the
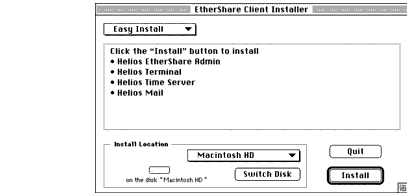
"EtherShare Applications" volume and double-click the "EtherShare Client Installer" (compare figure 9).With the Easy Install option (see figure 10) the installer program copies the EtherShare Admin program, the terminal emulation (Helios Terminal), and the mail program (Helios Mail) to the Apple folder of your client computer. If older versions of these applications exist in the Apple folder, they will be overwritten. The Helios Time Server will be added to the Chooser. The result of Easy Install is shown in figure 11 below.
If you use Custom Install (instead of Easy Install) you can install two additional items, namely the OPI Tools "touch" and "Tagger". Both programs are only meant for EtherShare OPI 2.1 users and thus are described in the EtherShare OPI documentation.
In order to work properly, Helios Terminal and Helios Mail both need to access the ADSP driver. Helios Terminal also needs to access the Macintosh Communications Toolbox, the communication tool "AppleTalk ADSP Tool", and the emulation tool "VT320 Tool". The Helios Mail program requires the "Mail Notification Program" ("Helios Mail Init"). All these drivers or tools are either available with the system software or installed automatically by the "EtherShare Client Installer":
Mac OS 7.5 and higher already includes the Macintosh Communications Toolbox and the ADSP driver in the operating system. The "AppleTalk ADSP Tool", the "VT320 Tool", and the "Helios Mail Init" are copied automatically from the "EtherShare Applications" volume to the "Extensions" subfolder of your local System Folder.
You have to restart your Macintosh after successful installation.
Repeat this procedure for each Macintosh that needs to use the client applications and then proceed to chapters 5 "EtherShare Admin" and 6 "HELIOS Mail" in order to set up users, groups, printers, and volumes, and in order to configure the Helios Mail program. Helios Terminal and the Time Server are described in the chapters 7 "HELIOS Terminal" and 16 "The Time Server".
If you want to uninstall EtherShare completely, please, first of all, open the EtherShare Admin program to delete all printers which are registered for use with EtherShare. This is indispensable for removing EtherShare from the server (see chapter 4.7.2 "Deleting the EtherShare UNIX software"). Furthermore, you should delete all data files from the EtherShare volumes and the volumes themselves.
The Macintosh utilities can be deleted by simply putting them into the trash. You have to remove the following items:
- Helios Terminal and any connection documents it has created
- EtherShare Admin
- Helios Mail
- the "Mail Preferences", "Terminal Prefs" and
"EtherShare Prep" (from the "Preferences" subfolder of the System Folder)- the "AppleTalk ADSP Tool", "VT320 Tool", "Helios Mail Init", and "Time Server" (from the "Extensions" subfolder of the System Folder).
First of all, you have to use the EtherShare Admin to delete all printers which are registered for use with EtherShare. Delete all jobs and spool directories under UNIX.
Additionally, delete all EtherShare volume directories under UNIX.After this, you can delete the EtherShare software itself by entering a command similar to the following:
Replace "/usr/local/es" in the above command with your "$ESDIR" path if you did not use the default directory.
The "uninstall" script disables any kernel modifications made by the EtherShare installation. The kernel changes will be removed completely the next time you do a rebuild of the kernel. Some systems also need to be rebooted. If your system did not need any kernel modifications for EtherShare, "uninstall" is a dummy script.
If EtherShare is already running on your server you can use the EtherShare Admin on a Macintosh client to get information about the current update level of the EtherShare modules. Log in as "root" or "SysAdm" and open the Versions window as described in chapter 5.13.6 "Versions". This window lists all modules of EtherShare and the respective update level. For example, the entry "afpsrv 2.5.0u0117" indicates that the HELIOS update u0117 is already installed.
The Versions window, however, is sorted by module names and does not give an overview about updates. Thus, it is more reliable to insert the HELIOS CD-ROM and use the update installer (options List Updates and List History) for precise information about the update level on your server. The update installer is described below.
New HELIOS updates are available on every new distribution CD-ROM and can also be downloaded from our Web server. If you receive a new CD-ROM and want to add the updates on this CD-ROM to your EtherShare installation you should check the /updates directory for the update program files and the /support/techinfo directory for detailed descriptions of the updates.
For update installations, we strongly recommend to use our update installer. The tool is able to find and install all updates that are required for a particular product and to check interdependencies of certain updates. The installer is easy to handle and can also be used to retrieve information about updates or to uninstall a particular update, if required.
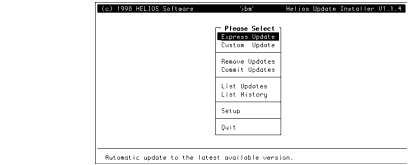
To start the update installer, mount the CD-ROM, open the "Networking Products Installer CD-ROM" menu as described in chapter 4.4 "The UNIX installation procedure", and select item Install Updates (compare figure 12).
- Express Update will induce the installer to automatically perform the installation of all available updates for the chosen product.
- Custom Update lets you select the updates you want to install.
- Remove Updates allows you to uninstall certain updates.
- Commit Updates removes backup files and makes updates permanent. Usually, if you install an update, the system stores a backup file of your old EtherShare version. This allows you to uninstall the update in case of problems and to return to your initial installation. If new updates work as expected you may want to remove the backup files. This can be achieved by using the Commit Updates option.
- List Updates lets you list all available updates, and can also be used to display the update info texts that describe the purpose of the respective updates.
- List History gives information about the date of previous update installations. The list tells you who did what, and when he did it.
- Setup allows you to set preferences, e.g. change the search path. This can be necessary if you move the update files to another directory, or if you have the CD-ROM and additional update repositories.
Note that the update installer does not automatically stop EtherShare, because this is usually not required. However, to avoid problems, we recommend to stop all printer queues before starting to install updates and to stop and restart EtherShare (commands stop-atalk and start-atalk, respectively), some time after update installation to make the newly installed modules available. You must stop EtherShare before you select the update installer's Commit option. Otherwise, serious problems can arise.
Important: We recommend to install the programs on the server in a fixed order, namely the order that is suggested by the installation menu on your current product CD-ROM. The following order is valid for the HELIOS products as delivered on CD-ROM 015:
- install EtherShare 2.6 first
- install PCShare 3.0 second
- install extensions or add-ons (EtherShare OPI,
PDF Handshake, Print Preview) third.
Skip those modules which are not installed.The items in the main menu can be selected by typing the first letter. Typing s, e.g., will highlight the Setup item.
Press ENTER to open a pop-up menu - in case there is one available. The ENTER key also activates the item that is currently highlighted.
Use the TAB key to proceed from one option in a dialog window to the next one, e.g. from the Cancel to the Ok button.
The ESC key always lets you return to the start-up window and the main menu which is shown in figure 13.
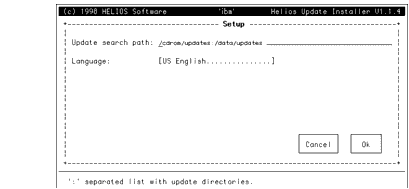
To install new updates, you should always open the Setup dialog first and check whether the update search path is correct (compare figure 14).
If you have to replace the path entry use the BACKSPACE key to delete the old one. You can enter several search paths at a time, in case you have different updates repositories. In figure 14, e.g., we have defined two search paths. They are separated by a ":".
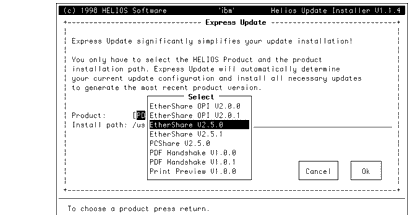
The easiest way of installing updates is to use the Express Update option. In the "Express Update" window (see figure 15), you only have to select the product you want to update. The correct Install path is detected automatically by the update installer. However, it is possible to overwrite the path entry. The installation will be performed automatically when you click the Ok button.
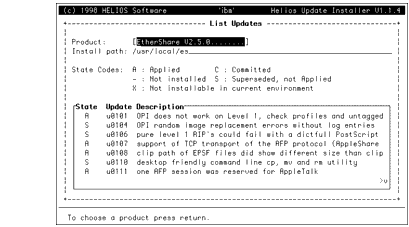
The "List Updates" window is for information purposes. It lists all updates that are related to a certain product and indicates the state of each update. This means, you can see e.g. whether an update is applied, already superseded, or not installed (compare figure 16). If you select an update from the list and press ENTER the update installer will display the corresponding update info text.
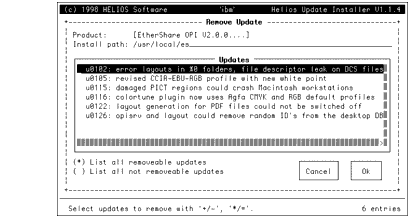
Some updates change the behavior of certain product modules. To uninstall updates you do not want to work with, use the Remove Update option. The respective dialog window is shown in figure 17.
Note that there may be interdependencies between several updates. This means that certain updates cannot be removed as long as they are required by other updates that are still installed. You can display in the dialog window either all removable, or all not removable updates. Remember that updates you have already committed can no longer be removed.
Please remember that you have to stop EtherShare before committing any updates. Otherwise, the Commit command could "kill" certain processes.
If a certain update contains a new, revised Macintosh application, e.g. a new EtherShare Admin, this application will be copied to the "EtherShare Applications" volume by the update installer. You have to mount the volume on your Macintosh clients and replace any old local copies of the respective application.
| © 2002 HELIOS Software GmbH |