7 Volume Management
The entire storage management, including the root file system, is done using LVM2 (Local Volume Manager) which is included in Linux for some time. LVM has the benefit that it allows very flexible dynamic disk, volume group, and partition management without being limited to older disk partition formats. More background information on LVM is available at: en.wikipedia.org/wiki/Logical_Volume_Manager_(Linux). It offers similar features as IBM AIX or Oracle Solaris ZFS volume management.
As LVM is very powerful, it uses many tools to manage it. HELIOS has developed HELIOS Configuration Assistant to manage all interactive storage management needs, see 4.5 “Storage setup (data volumes)”.
The HELIOS Virtual Server Appliance uses basically two volume groups:
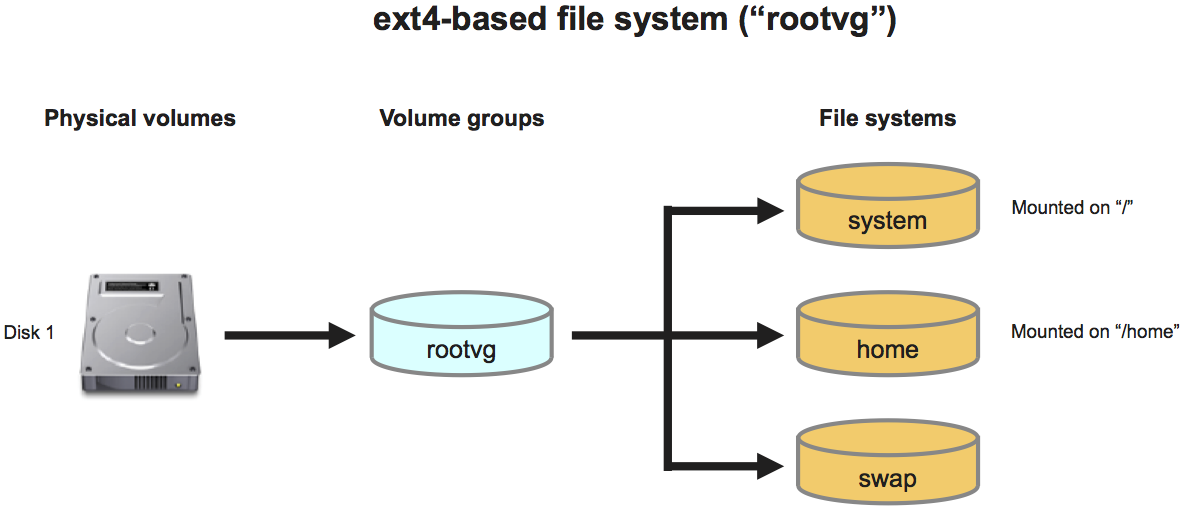
rootvg (“root volume group”) for the operating system and swapping memory. “rootvg” is also LVM-based, however there is an additional ext4 partition (“/dev/sda1”) which is used for the GRUB boot system. The LVM manages the system disk partition (“/dev/sda2”) as a physical volume.
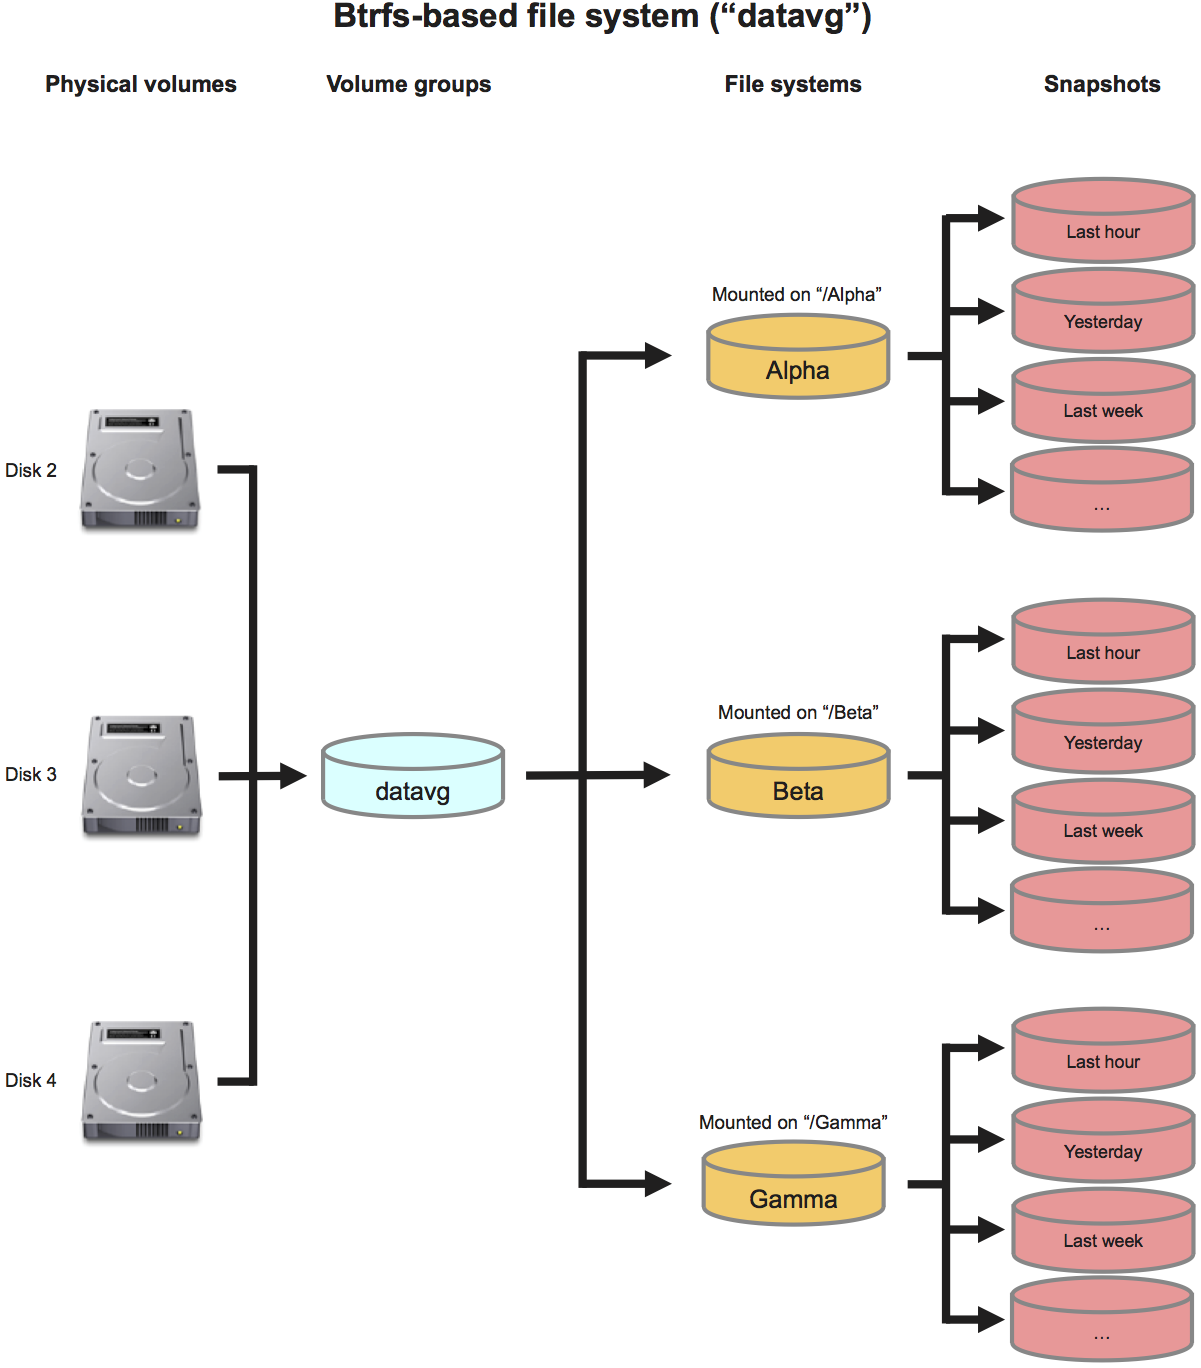
datavg (“data volume group”) for all customer data that is separated from the operating system to allow upgrading the OS without changing the customers' data. The LVM handles all disks of the “datavg“ volume group directly and without any traditional partition table.
7.1 LVM overview
This section describes special characteristics of the individual components of the LVM storage. It gives you an overview of the HELIOS default storage setup.
- Note:
-
There is no need to work manually with disks, physical volumes, volume groups, or logical volumes because HELIOS Configuration Assistant will do this for you.
The system group is realized by an LVM that is based on the ext4 file system:
The data group is based on the Btrfs file system:
- Note:
-
Although the ext4-based file system is also supported, its usage is not recommended because the huge advantage of the Btrfs file system is the availability of snapshot data volumes which can be published as HELIOS volumes. This allows a quick and easy restoration of the data status by the user, e.g. from yesterday, last week or last month. In addition, it is possible to revert a specified snapshot to the current file system (
Revert file system to this snapshotoption).
7.2 Physical volumes
Physical volumes represent disks that have been assigned to a volume group. All disks or RAID combined disks are managed by LVM. Disks are called physical volumes if used with LVM. We do not use any DOS partition table or GUID partition table (GPT) for disks, to avoid size and resizing limitations. LVM uses each disk directly as a physical volume to overcome limitations and to allow increasing existing disks, which can be done in the hypervisor. Another option is adding additional disks to the hypervisor, which are used automatically.
- Important:
-
Traditional partitioning tools, e.g. “fdisk” or “parted”/“GParted”, do not recognize disks without partition table and will therefore display the LVM disk as empty. Do not partition these disks!
Disks can be scanned in Configuration Assistant (see 4.5.9 “Show physical disk overview”) or via the LVM command: “lvmdiskscan”.
Physical volumes can be listed in Configuration Assistant (see 4.5.1 “List physical volumes (disks used for volume group)”) or via the LVM commands: “pvs”, “pvdisplay”, “pvscan”.
7.3 Volume groups
A volume group (e.g. “datavg”) is a container combining multiple physical volumes. Disks can be added to or removed from a volume group, assuming there is space left over to remove a physical volume. Volume groups combine physical volumes and supply logical volumes (partitions with file systems) with storage blocks.
Volume groups can be listed in Configuration Assistant (see 4.5.7 “Switch volume group (manage other volume groups)”) or via the LVM commands: “vgs”, “vgdisplay”.
7.4 Logical volumes (file systems)
Logical volumes are created in a volume group and
represent a block device to be used with a file system. LVM supports
snapshots of a logical volume. By default, HELIOS Virtual Server Appliance
uses Btrfs based file systems (ext4 file systems
are also supported) which are created with the mkfs.btrfs
(mkfs.ext4) command on the block device. A block device can
be enlarged, which requires the file system to be converted in order to
support the new size. HELIOS Configuration Assistant will do this
automatically, and manage the storage in a secure way.
Logical volumes can be listed in Configuration Assistant (see 4.5.5 “Manage logical volumes (edit/remove file systems)”) or via the LVM commands: “lvs”, “lvdisplay”, “lvscan”.
- Note:
-
Once disks are managed by LVM there is no configuration file containing them because LVM manages the disks directly by scanning all devices enabling physical volumes, volume groups, and logical volumes. This is also independent from the disk slot position or SCSI IDs, which makes it very flexible compared to static configurations.
Data security (RAID or mirroring) is not provided by LVM which means that, if multiple disks are added to a volume group, one failing disk will possibly make the entire volume group unusable. Therefore a hardware mirror or RAID solution is required to provide safe disks to be used by LVM. Another option is to re-initialize a volume group and its logical volumes, and restore all data from a backup.
7.5 File system snapshots
Snapshots allow a copy of file systems, which can be used to create a backup while the real logical volumes are still being used. A snapshot reflects the state of a file system at a certain point in time.
HELIOS Virtual Server Appliance uses two different types of snapshots: Btrfs subvolume based snapshots, and LVM block device snapshots.
7.5.1 Btrfs snapshots
For Btrfs file systems, the Btrfs subvolume functionality is used on file system level to create snapshots. This allows for snapshots with minimal performance impact, and therefore time-based automated snapshots are possible without negatively affecting the performance.
When enabled, snapshots are created automatically hourly, daily, weekly, and monthly. This will take up additional disk space, but will allow you to access older states of the volume to recover deleted or changed files at any time or to revert the whole volume:
Hourly snapshots (the latest 24 are stored, older deleted)
Daily snapshots (the latest 7 are stored, older deleted)
Weekly snapshots (the latest 4 are stored, older deleted)
Monthly snapshots (the latest 12 are stored, older deleted)
Furthermore, snapshots can automatically be published as HELIOS volumes allowing clients to access older states of the file system without administrator interaction. By default, the latest daily snapshot is automatically published as a HELIOS volume.
Automatic snapshots can be enabled or disabled individually per file system. Also, the amount of stored hourly/daily/weekly/monthly snapshots as well as automatically user accessible (published) snapshots can be adjusted. See the Snapshot creation section.
7.5.2 LVM/ext4 snapshots
For ext4 file systems, the LVM snapshot functionality is used to create snapshots.
LVM/ext4 snapshots are not created automatically, but can easily be generated and removed using Configuration Assistant, just like Btrfs snapshots.
However, existing LVM snapshots can slow down the system significantly. The reason for this is that, depending on the number of snapshots, all changed data is stored multiple times, once in the original file system and secondly in the snapshot volume as difference to the original data.
Also, when volume groups are manually activated, or automatically at system startup, all existing snapshots are initialized. Therefore all snapshot data must be read-in to create the LVM internal structures. Depending on the disk or RAID performance, this can take a significant amount of time, up to hours if hundreds of gigabytes have been modified since creating the snapshot(s).
For this reason and when using the ext4 file system, we strongly recommend to activate snapshots on a temporary base only, e.g. for creating backups. When not needed anymore, snapshots should be removed to prevent poor performance or long booting times.
7.5.3 The benefit of snapshots
A snapshot data volume, e.g. from yesterday, can be made available as a HELIOS volume. Therefore previous snapshot data versions can easily be accessed by users via HELIOS volumes to recover files.
When using Btrfs snapshots, you can specify how many snapshots are automatically published to users so those can access older states of the file system without administrator interaction. By default, yesterday's snapshot is automatically published. Older snapshots, as well as LVM/ext4 snapshots, can be published as HELIOS volumes by the administrator using Configuration Assistant.
Alternatively, an entire data volume snapshot can be declared to be used as the default server volume, which allows reverting the data within a minute to a historical snapshot and continuing the work.
While the snapshot exists, the original data can be modified without affecting the snapshot data. The snapshot serves as a temporary backup in a consistent state, and can be used as a source to create a full backup of the file system. During this process, you can continue to work with and modify the original data.
7.5.4 Publish snapshots
Btrfs snapshots can be in an unpublished or published state. When published, the snapshot file system is mounted in “/snapshots” and a HELIOS volume is created on the mount point. The volume can be made available to certain users, to allow easy access to the previous data version when the snapshot was taken.
Publishing and unpublishing individual snapshots can be done manually using Configuration Assistant (see the Manage snapshots section).
Also, publishing and unpublishing is done automatically for scheduled snapshots. When automatic snapshots are active with default configuration, the latest daily snapshot is automatically published.
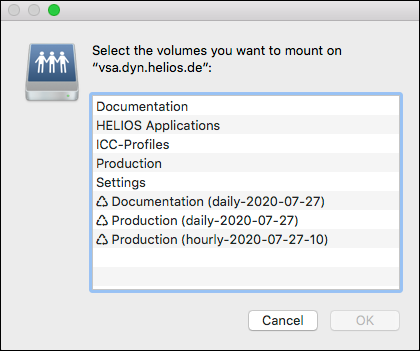
Fig. 7.3: Volume “Documentation” with daily snapshot, volume “Production” with hourly and daily snapshot
When a new snapshot is created and due for automatic publishing, older snapshots of the same file system are unpublished automatically. However, this is not done until the last client has disconnected from that volume.
7.5.5 Example snapshot description
The illustrations below show three example snapshots of the “/Beta” file system in the “datavg” volume group.
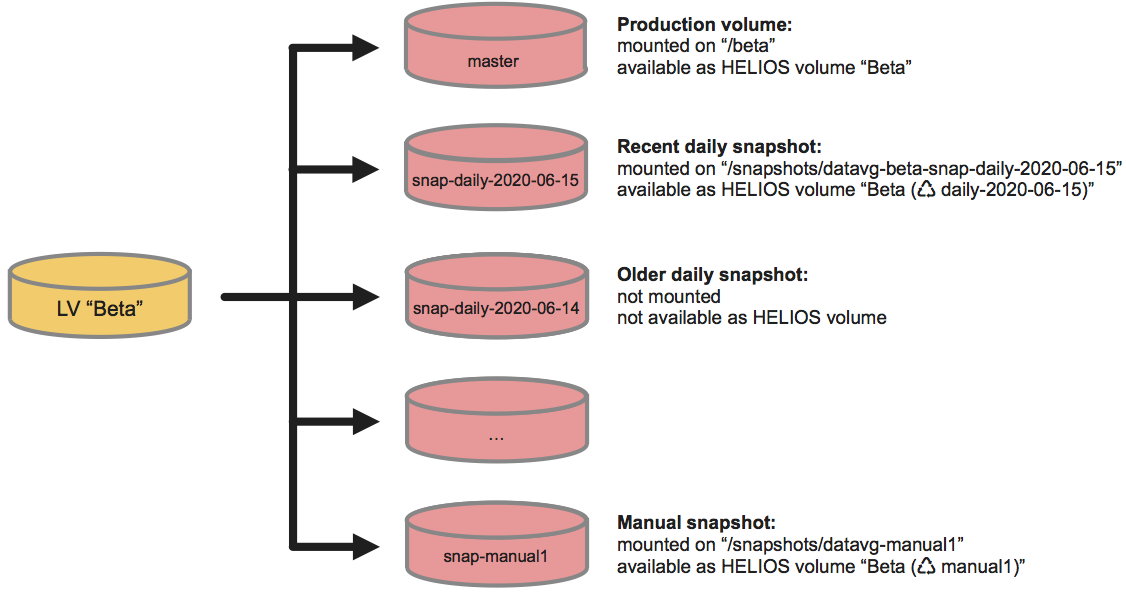
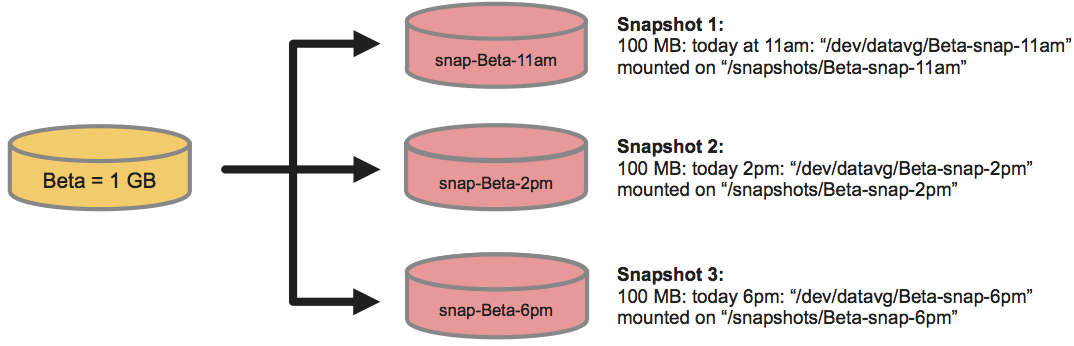
As seen in the figures, file system snapshots can be a very powerful solution to create stable backups from a running system, i.e. while the system is still modifying data. Another option is to use snapshots to permit access to data from an earlier point in time, e.g. from 11am today (see “Snapshot 1” in the illustrations above).
7.6 A typical “datavg” setup with a RAID
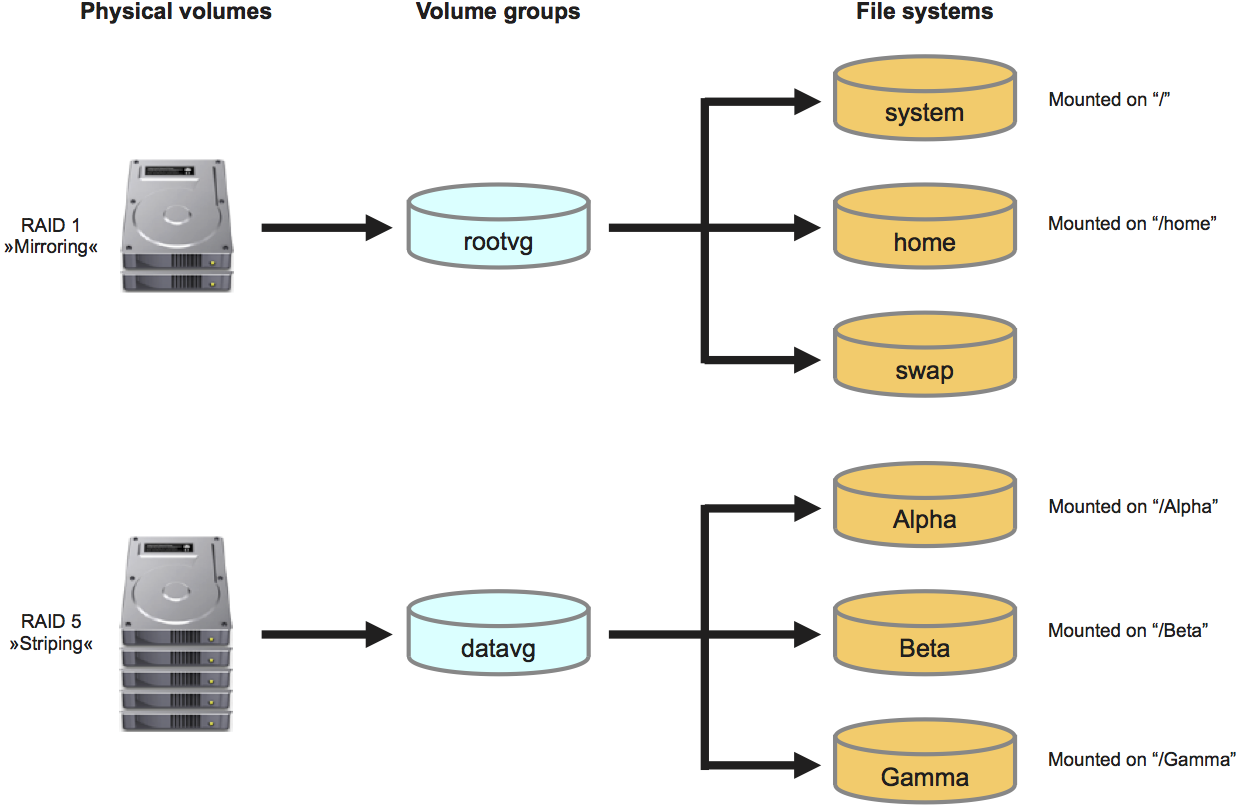
The illustration below shows a RAID 5 (with disk fail protection) which is included as a physical volume into the “datavg” volume group, and on the right hand the file systems “/Alpha” … “/Gamma” which use storage space from “datavg”.
7.7 Replace data disks or a RAID system
Disks can be swapped without interrupting the server. Reasons for doing so could be an upgrade to larger disks or an upgrade to a new RAID system.
7.7.1 Upgrade to a new RAID system
To upgrade to a completely new RAID system, the new RAID must be added
to the “datavg” volume group. This is best done via HELIOS
Configuration Assistant in the Storage setup menu (see
4.5 “Storage setup (data volumes)”).

-
Connect the new RAID system to the hypervisor that is used to assign the RAID to the VSA.
-
In Configuration Assistant select
Create or extend data
pool (add disks)
which will detect the new RAID (in the following referred to as “disk”).
-
Select the desired disk by entering the device name(s). (If you are not sure which disk is the correct one compare the SCSI ID with your hypervisor configuration!)
Configuration Assistant will add the disk(s) to the “datavg” volume group.
-
Back to the
Storage setupmenu, select the menu itemReduce data pool (remove disks).
-
Enter the disk device name(s) of the old RAID and confirm the removal.
This will take a while because all blocks in use will be moved to the new RAID system to free up the old RAID.
-
Disconnect the old RAID from the hypervisor.
7.7.2 Replace disks in an existing RAID
Replacing one or more disks in the RAID system (e.g. to increase the storage capacity) works similarly to the description in 7.7.1 “Upgrade to a new RAID system”. If the storage capacity of the remaining disks is not sufficient to temporarily store the whole RAID data you will need a temporary disk or RAID system, e.g. a USB disk drive or any other kind of disk system.
-
Connect this temporary disk to the hypervisor like you would attach a new RAID (as described in 7.7.1 “Upgrade to a new RAID system”).
-
Via the menu item
Reduce data pool (remove disks)remove the old disk from the volume group.
-
Now remove the old physical disk from the RAID and replace it with the new disk.
-
Add the new disk via the
Create or extend data pool (add
disks)
menu.
-
Via the menu item
Reduce data pool (remove disks)remove the temporary disk from the volume group.
-
Finally, remove the temporary disk from the hypervisor.
- Note:
-
Before doing this kind of operation, a backup of the entire server data is mandatory. Although we expect that the backup is never needed, every customer must have backups of all their server data to ensure that there is a restore option if something goes wrong.
7.8 Increase volume group size
There are two ways to increase the size of a volume group, e.g. “datavg”:
Add disk to the volume group
Grow the size of an existing disk
The described tasks are done quickly within a minute.
7.8.1 Add disk to the volume group
-
In the hypervisor configuration create a new virtual disk. This can be an image or a hardware disk attached to the hypervisor.
7.8.2 Grow an existing disk
-
In the hypervisor configuration expand the disk image of one of the physical volumes assigned to the volume group.
- Note:
-
VMware ESX Server allows growing the disk size on-the-fly without any service interrupt for the HELIOS Virtual Server Appliance. Also HELIOS Configuration Assistant will automatically detect the grown disks and update the affected physical volume and the volume group behind it. However, some hypervisors require a shutdown of the VM before you can grow the disk size. In such a case shut down the VM before doing changes to the disk images.
Growing a disk image can only be done if the disk is not partitioned, i.e. completely used as LVM physical volume. See also 7.2 “Physical volumes”. This means that if you wish to increase the size of the volume group “rootvg”, you should not grow the disk “/dev/sda” but add a new virtual disk to the volume group instead.
- Important:
-
Never shrink the disk on the host because this will destroy the data!
7.8.3 Add new or grown disk(s) to the volume group
-
In the Configuration Assistant
Storage setupmenu chooseCreate or extend data pool.
Configuration Assistant will scan for new or grown disks and offers to add the additional storage space to the volume group. Both new and grown disks can be added at the same time.
7.9 Reduce volume group or logical volume size
7.9.1 Reduce volume group size
Hypervisors usually do not have an option to shrink virtual disks, and neither has the LVM. The only way to reduce the volume group size is to remove virtual disks (“physical volumes” in the LVM) from the volume group. To do so, see 4.5.3 “Reduce volume group (remove disks as physical volume)”.
In the case that the volume group is comprised of only one disk the way to go is to add a second, smaller virtual disk as a physical volume to the volume group first, and then to remove the first virtual disk. LVM will then automatically migrate the data to the second, new virtual disk.
If you plan to have a more flexible volume group size we recommend using multiple smaller virtual disks as physical volumes for your volume group from the beginning, so you can add or remove storage easily at any time.
7.9.2 Reduce logical volume
Configuration Assistant does not support shrinking logical volume sizes. This is because it proved to be error-prone in testing, and unlike increasing sizes is not possible while the file system is in use, so it would interfere with the running HELIOS services and connected clients.
However, all the required LVM and file system tools for shrinking are included, and you may reduce file system/volume sizes manually after stopping the HELIOS services and planning some downtime. For details, please refer to the “lvreduce”, “resize2fs”, and “btrfs” utilities documentation.
7.10 Use a RAID 1 (mirroring) on the system disk
Installations may require a mirrored system disk. This feature is not included in the HELIOS Virtual Server Appliance. System disk mirroring must be configured via a hardware RAID system. This is called RAID 1 (mirroring without parity or striping) and is supported by most RAID controllers. We recommend to keep the system disk image on a separate physical disk to isolate the operating system from the customer data. This will make things much easier in case of problems and also make OS disk performance independent of the data disk (RAID) performance.
7.11 Use a RAID 5 on disks
from: http://en.wikipedia.org/wiki/RAID
A RAID 5 (block-level striping with distributed parity) distributes
parity along with the data and requires all drives but one to be
present to operate; the array is not destroyed by a single drive
failure. Upon drive failure, any subsequent reads can be calculated
from the distributed parity such that the drive failure is masked
from the end user. However, a single drive failure results in reduced
performance of the entire array until the failed drive has been
replaced and the associated data rebuilt. … RAID 5 requires at
least three disks.
7.12 Restore the operating system disk
In case a system disk is defective, a new HELIOS Virtual Server Appliance image can be reimported and used as new system disk. Then the following files/directories must be restored from a backup:
• /etc/fstab
• /etc/passwd
• /etc/shadow
• /usr/local/helios/var/
• /home/
In addition, custom configuration settings like date/time and network setup must be done anew using HELIOS Configuration Assistant.
- Note:
-
We recommend that you define all users' home directories in a logical volume on “datavg”. The advantage is that “rootvg” is not loaded with variable amount of data stored in the home folders. This limits the variable data on “rootvg” to a few MB only, which can be saved and restored quickly.
All volume groups and their connected logical volumes (partitions), e.g.: “/data1” from the volume group “datavg” are automatically detected when a new system disk is attached or existing disks are added into a new server. During the system boot process, Linux will create the proper device entries in “/dev/mapper” with their names, e.g.: “datavg-data1”. Setting “/etc/fstab” entries (if missing) allows mounting these existing file systems.
7.13 Summary
HELIOS Configuration Assistant makes the LVM management very easy. The LVM benefit is that it handles disks, volume groups and partitions (logical volumes) in a very flexible and efficient way. This saves the customer an enormous amount of time when adding, changing or modifying storage needs. Doing this manually without LVM would take many days of work, compared to hours or sometimes even minutes.