4 The Base product
In the following descriptions, instructions, and examples, the expression “HELIOSDIR” is used for the directory path where the HELIOS software is installed. This could be e.g. the default installation path “/usr/local/helios”. Under UNIX, the actual HELIOS installation path can be traced by entering the command:
$ cat /etc/HELIOSInstallPath
4.1 Software installation
The following list gives details about the hardware and software you need for making the HELIOS Base software successfully work.
4.1.1 Network requirements
Ethernet compatible network interface
Any TCP/IP network
4.1.2 Server requirements
One of the following host systems:
Oracle Solaris
IBM AIX
Linux
Apple OS X
Windows
- Note:
-
A detailed list of supported platforms and operating systems can be found on the HELIOS website (www.helios.de/platforms).
Local or remote DVD drive or option to mount DVD image
At least 400 MB in the file system where the HELIOS products are installed in addition to the individual disk storage requirements of each user. An additional amount of up to 800 MB is needed when PDF HandShake is installed
At least 256 MB RAM on the server
At least one supported network adapter installed and active
Java 6 or newer (64-bit)
Required for WebShare Web Server and the Index Server indexing modulesOS X
Download Java from support.apple.com/kb/DL1572- Tip:
-
You may also install Java by launching a Java desktop application once, e.g. HELIOS Admin:
After installing the HELIOS software on the server, navigate to the “Applications” folder, and launch HELIOS Admin. If it detects that the necessary Java is not installed, it will offer a download link.
Windows
Download Java from www.java.com- Important:
-
Make sure to download the 64-bit Java version because, depending on your browser, the website may offer a 32-bit version!
TCP/IP must be installed and running
NTFS file system (for HELIOS installation path and shared folders)
Perl 5.8.4 or newer (www.perl.org)
ActiveState and Strawberry Perl were successfully tested. Perl is used for all scripts (“start-helios”/“stop-helios”, HELIOS Script Server scripts, HELIOS action scripts, etc.) and must therefore be downloaded and installed first. Make sure that the path to the Perl program was added to “PATH" in the Windows environment!
4.1.3 Client requirements
HELIOS Admin, HELIOS WebShare Manager and HELIOS ICC Tagger require Java 6 or newer (64-bit):
OS X
If Java is not yet installed, you will be offered a download link when HELIOS Admin is launched for the first time. Alternatively you can download it from support.apple.com/kb/DL1572.Windows, UNIX, Linux
If not yet installed, it can be downloaded from www.java.com.- Important:
-
On Windows, make sure to download the 64-bit Java version because, depending on your browser, the website may offer a 32-bit version!
WebShare Manager on Windows requires Windows XP SP2 or newer. The “HELIOS WebShare Manager Setup.exe” program installs the 32-bit Manager on a 32-bit Windows, and likewise the 64-bit Manager on a 64-bit Windows. The 64-bit Manager requires a 64-bit Java.
4.1.4 General remarks
This chapter describes the steps that are indispensable for a
standard installation, and gives short explanations where
necessary. All steps are marked by an arrow ( )
to the left. For a quick installation, you may proceed directly from one
instruction to the other, and skip the explanations in
between.
)
to the left. For a quick installation, you may proceed directly from one
instruction to the other, and skip the explanations in
between.
All installed firewalls must be turned off for the initial HELIOS installation (see 5.10 “Windows firewall problems”).
The machine ID is required to license the HELIOS software. Without a valid license the software only works in a 3-hour demo mode, or with demo activation keys (see What you have to do in “Welcome to HELIOS Base” above).
When installing the HELIOS software on virtual machines, the machine ID is generated automatically (see 4.1.10 “Software installation (Virtual machines)”).
References to “CD017 or earlier” mean EtherShare 2.6, PCShare 3.0, EtherShare OPI 2.1, PDF HandShake 2.0, and PrintPreview 1.1 or earlier.
References to “4th generation” mean EtherShare 3.1, PCShare 3.1, WebShare 1.0, ImageServer 2.5, PDF HandShake 2.1 and PrintPreview 2.0. These versions were available on HELIOS CD018, CD019, and CD020.
References to “HELIOS UB” mean EtherShare 4.0, PCShare 4.0, WebShare 1.2, ImageServer 3.0, PDF HandShake 3.0 and PrintPreview 3.0. These versions were available on HELIOS CD021 and CD022.
References to “HELIOS UB+” mean EtherShare 4.5, PCShare 4.5, WebShare 2.0, ImageServer 3.5, PDF HandShake 3.5 and PrintPreview 3.5. These versions were available on HELIOS CD023 and CD024.
References to “HELIOS UB2” mean EtherShare 5.0, PCShare 5.0, WebShare 3.0, ImageServer 4.0, PDF HandShake 4.0, and PrintPreview 4.0. These versions were available on HELIOS CD025.
HELIOS UB64 is available on CD026. This manual
covers the HELIOS software versions as of CD026, including
EtherShare 6.0, PCShare 6.0, WebShare 4.0, ImageServer 5.0,
PDF HandShake 5.0, and PrintPreview 5.0.
CD026 is distributed as a disk image file. For convenience, we refer
to it as the HELIOS CD.
The installation is carried out by two separate programs. The first program (“installer”) must be started from the HELIOS CD. It lets you select the product(s) you wish to install and copies all related files to the local disk of your host. The “backend” installer then automatically completes the installation.
HELIOS issues software updates every now and then to enhance the product. These updates are distributed via the HELIOS website (www.helios.de/updates), and they are included on every HELIOS CD. The installation procedure for software updates is described in 18 “HELIOS Update Installer”.
4.1.5 Preparing the installation
- Note:
-
For installing the HELIOS software, you must be able to log in as “root” (“Administrator” on Windows) on your host.
You can install the HELIOS software without a software activation key (kind of password).
In case you have no activation key at hand, please follow the instructions given in the paragraphs License information and What you have to do in “Welcome to HELIOS Base” at the beginning of this manual.
Under certain conditions, HELIOS issues demo licenses. If you are entitled to use a demo license, you will receive an activation key for demonstration purposes that expires after a given period of time.
The host must be provided with a fully installed and configured operating system. You must be able to log in as user “root” (“Administrator” on Windows) to allow the installation program to create subdirectories and make the required system changes.
- Important:
-
Before starting the installation, you should create a backup copy of the system disk of your host computer!
Those who upgrade from an earlier product version, e.g. CD016, install as described in 4.1.7 “Software installation”, 4.3 “Migrate from earlier versions (CD017 or earlier) to UB2 or newer”, and 4.2 “Upgrade product generations”.
4.1.6 Navigating within HELIOS Installer
HELIOS Installer is a server program and does not support mouse operation. It is designed to be fully operable with the keys available on a standard “vt100”-keyboard. You can highlight menu items either by:
Positioning the cursor with the cursor keys
Typing the first letter of the menu item
Positioning the cursor with the TAB key
 TAB (or Ctrl+I)
In screens with several input fields, you can skip to the next field by means of the TAB key.
- Shift+TAB
In screens with several input fields, you can skip to the previous field with “Shift+TAB”.
- BACKSPACE (or Ctrl+H)
In lists, the BACKSPACE key deletes the selected entry. In text fields, it deletes the character to the left of the cursor and moves all other text one position to the left in order to fill the gap.
- Note:
-
If BACKSPACE (on some special terminals/keyboards) does not work, try Delete instead.
 Delete
The Delete key deletes the character under the cursor and moves all other text one position to the left to fill the gap. Delete is not always available on a UNIX terminal keyboard.
 Home (or Ctrl+A)
The cursor is moved to the start of the current field or the first line of the list.
 End (or Ctrl+E)
The cursor is moved to the end of the current field or the last line of the list.
 PgUp (or Ctrl+P)
The cursor is moved to the previous page of a multiple-page list.
 PgDown (or Ctrl+N)
The cursor is moved to the next page of a multiple-page list.
 CsrUp (or Ctrl+K)
The cursor is moved up one line.
 CsrDown (or Ctrl+J)
The cursor is moved down one line.
 CsrLeft (or Ctrl+H)
The cursor is moved left one character.
 CsrRight (or Ctrl+L)
The cursor is moved right one character.
 Esc (or Ctrl+X)
The currently selected function is aborted and the program goes back to the previous prompt or action.
 Return
The current input or selection is accepted.
- Insert (or Ctrl+V)
The cursor inserts a space (on some machines it may be necessary to press “Ctrl-V” two times).
- Ctrl+R
Refresh the screen display. Sometimes needed for terminals.
4.1.7 Software installation
- Note:
-
If you plan to install the HELIOS Software on an OS X platform, skip ahead to 4.1.8 “Software installation (OS X)”.
If you plan to install the HELIOS Software on a Windows platform, skip ahead to 4.1.9 “Software installation (Windows)”.
Before installing and migrating the new product versions, all previous HELIOS products must be stopped and deactivated in order to prevent the old product versions from being loaded instead of the new ones (Note that running the “uninstall” script is only required for versions before CD017):
# cd /usr/local/es
# etc/uninstall
# cd /usr/local/pcshare
# etc/uninstall
The installation and migration can be done by installing the new versions without removing the previous versions. If you are upgrading from versions prior to EtherShare 3.1, PCShare 3.1, etc., please install the new versions in a different directory, e.g. “/usr/local/helios”.
You are guided through the installation by the menu-driven HELIOS Installer which does nearly everything on its own. You merely have to start the installation.
- Note:
-
The following installation example describes the steps that must be taken on an IBM RS/6000 computer under AIX. Slight deviations may occur – depending on your system type and configuration.
-
To start the installation, log in as “root” on your host.
-
Mount the ISO image burnt to physical disc or the ISO image file.
The commands for your platform are stated in the “First Steps” PDF document.
- Example:
- (IBM/RS 6000 computer running AIX)
# mkdir -p /mnt/helios
# mount -r -v cdrfs /dev/cd0 /mnt/helios
# cd /mnt/helios
# ./installer
As soon as you have entered the last command, you are asked to choose the installer operating language. After selecting the desired language the “Introduction”, “Welcome to HELIOS”, and “License Agreement” windows appear.
-
If you agree to the terms and conditions select
Agree. If you do not agree selectDisagree; the HELIOS software installation will then be aborted.
- Note:
-
The bottom of the “HELIOS Installer” window provides helpful details and instructions.
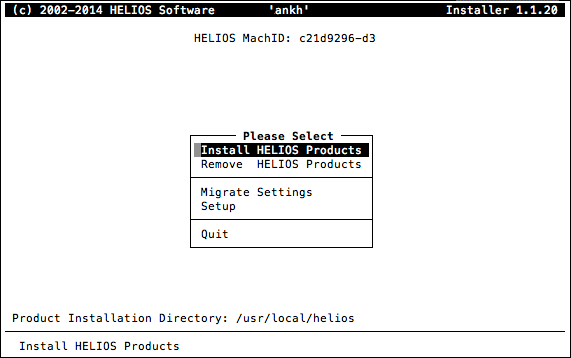
The default installation path of the HELIOS software is “/usr/local/helios”. However, if you want to use – for whatever reason – a different path you must first specify it in HELIOS Installer.
-
Select
Setupfrom the main menu (Fig. 4.1) and specify the desired path. Then confirm your changes withOk, else selectCancel.
- Note:
-
HELIOS Installer creates an installation log file (“helios.installer.log”) in the “/tmp” directory which records all actions and steps that have been taken during the installation or migration process.
-
Select
Install HELIOS Productsfrom the main menu and press RETURN.
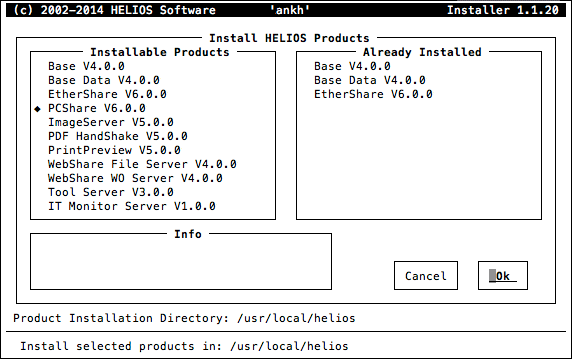
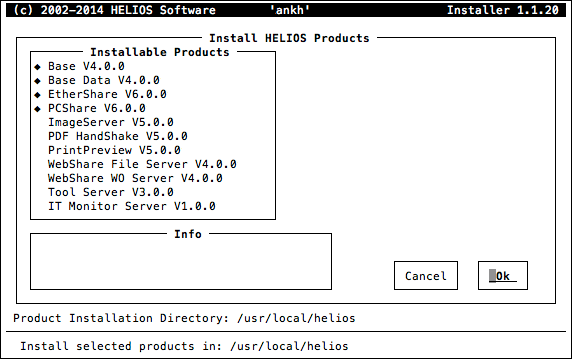
The Installable Products section shows all available
HELIOS software products. HELIOS software products
already installed on the server are listed in the Already
Installed section. Otherwise this section is missing
(Fig. 4.2 and Fig. 4.3).
- Note:
-
The HELIOS products Base and Base Data are always required for the installation of any other HELIOS product, e.g. EtherShare, PCShare.
-
In the
Installable Productssection highlight the product you wish to install and press the space bar, so it becomes marked. To deselect one (or more) item(s) in the list, press the space bar again.
The example in Fig. 4.2 shows that Base (with Base Data) and EtherShare are already installed, and PCShare is about to be installed.
- Important:
-
Starting the installation will stop all HELIOS services running on the server. Therefore, please make sure all HELIOS users are logged-out before you install new products. To verify the HELIOS user status you may use the “swho” command (8.7 “swho”) or HELIOS Admin (
Lists > Active Users).
-
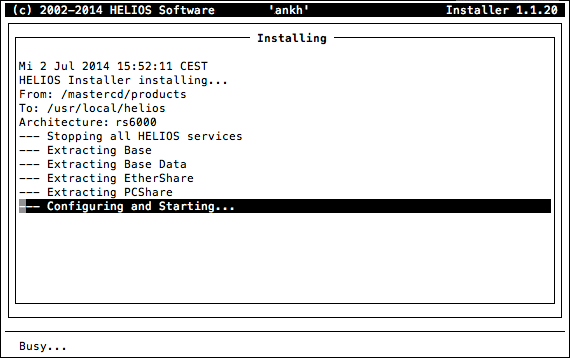
After you have marked all products you wish to install confirm with
Ok.
The “Installing” window shows the progress of the installation (Fig. 4.4).
-
Leave the installation menu with Esc or Ctrl-X (see also 4.1.6 “Navigating within HELIOS Installer”) to get back to the main menu. You can now quit HELIOS Installer.
HELIOS Installer has now installed all the specified applications from the HELIOS CD. You should now check if there are updates available for download and installation. See 18 “HELIOS Update Installer” for complete details.
See 17 “Remove the software” for instructions on how to remove the HELIOS software from the server.
If this is an upgrade installation, from CD017 or earlier, you can now migrate your settings from the previous versions. To do so, skip ahead to 4.3 “Migrate from earlier versions (CD017 or earlier) to UB2 or newer”.
Otherwise, your next step is to enter the HELIOS software license(s) for the installed product(s). Find instructions on how to do that by skipping ahead to 4.4 “Licenses”.
4.1.8 Software installation (OS X)
In order to install the HELIOS software on an OS X platform, do the following:
-
Copy the “CD026.iso” image file to the OS X computer, and double-click on it to mount it.
-
Open the “mac-os-x” folder and start the installation by double-clicking the “HELIOS Installer” icon.
The “Welcome to the HELIOS Installer” dialog opens (Fig. 4.5).
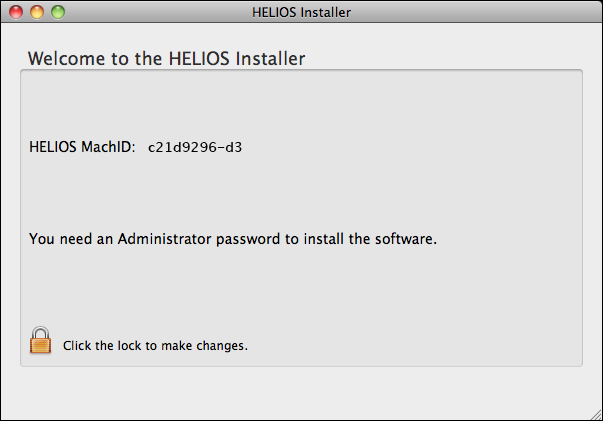
-
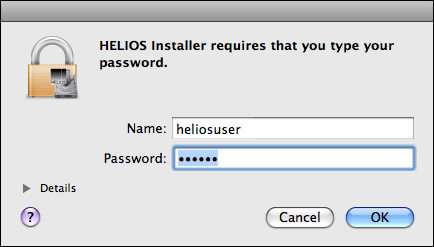
Then click on the padlock symbol in order to authenticate with administrative rights to make changes (Fig. 4.6).
If you have administrative rights on the machine you can use your name and password in the authentication dialog.
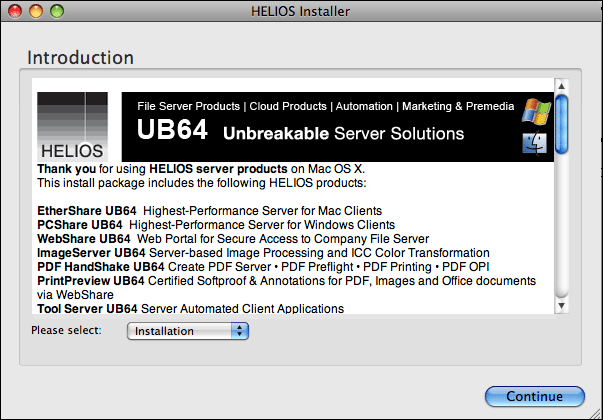
The Introduction dialog (Fig. 4.7) gives an overview of the installable HELIOS products and their main features.
-
Make sure that the
Please selectpull-down menu shows the entryInstallation, and clickContinueto proceed.
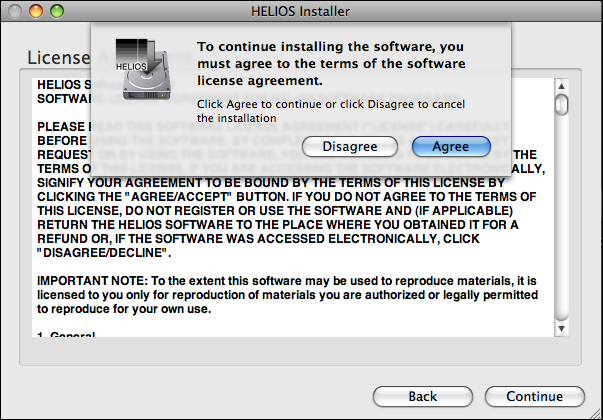
The “License Agreement” is displayed (Fig. 4.8).
-
Read the content carefully and click
Continue.
-
If you agree to the terms and conditions click
Agree. If you do not agree clickDisagree; the installation of the HELIOS software will then be aborted.
-
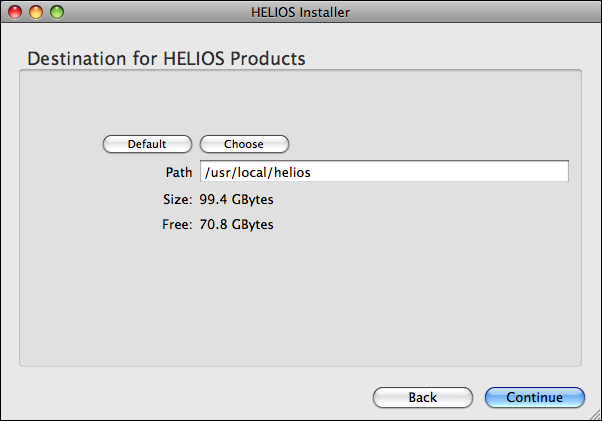
In the “Destination for HELIOS Products” dialog (Fig. 4.9) enter the path to the location where you want to install the HELIOS products or click
Choose, which brings up the Mac File Selector. Then clickContinue.
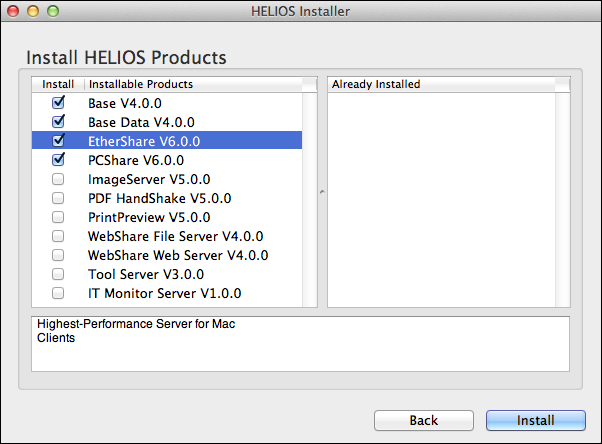
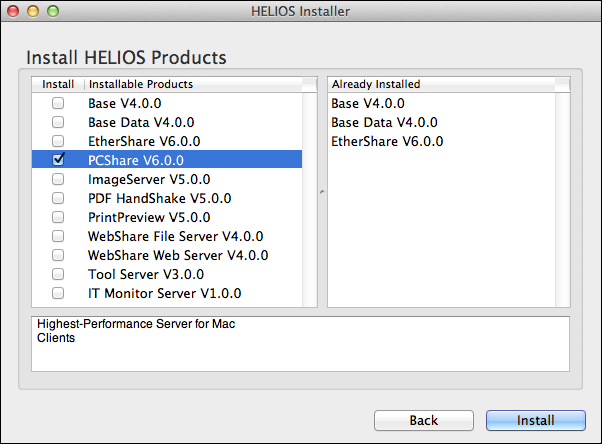
The “Installable Products” section shows all available HELIOS software products. If there are already HELIOS software products installed on the server they are listed in the “Already Installed” section. Otherwise this section is empty (Fig. 4.10 and Fig. 4.11).
-
In the “Installable Products” section click the checkboxes of the products you wish to install (see Fig. 4.11).
The example shows that Base (with Base Data) and EtherShare are already installed, and PCShare is about to be installed. Fig. 4.10 shows a “fresh” installation of Base (with Base Data), EtherShare and PCShare, where no HELIOS product software was installed before.
- Important:
-
Starting the installation will stop all HELIOS services running on the server. Therefore, please make sure all HELIOS users are logged-out before you install new products. To verify the HELIOS user status, you can use the “swho” command described in 8.7 “swho” or use HELIOS Admin (
Lists > Active Users).
-
After you have marked all products that you want to install confirm with
Install.
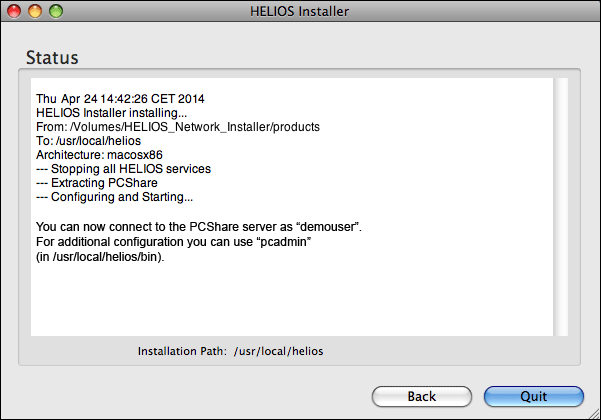
The “Status” window (Fig. 4.12) informs you about the progress of the HELIOS software installation. As soon as the installation is finished, the software is started so the services are available immediately.
-
Enter the HELIOS software license(s) for the installed product(s) according to 4.4 “Licenses”.
4.1.9 Software installation (Windows)
The HELIOS product PCShare UB64 is not available for Windows.
Every Windows version already includes SMB/CIFS
On Windows, PCShare SMB/CIFS printing is included in HELIOS Base
EtherShare UB64, WebShare UB64, ImageServer UB64, PDF HandShake UB64, and PrintPreview UB64 are available for Windows.
The default HELIOS installation path on Windows used in the examples in this manual is “C:\Program Files\Helios”.
If desired, you can have the machine ID on Windows computers provided by a USB dongle (see What you have to do in “Welcome to HELIOS Base” above). When it is plugged in for the first time, a driver must be installed. You will find the driver on the HELIOS media, in the “windows\usbdriver” directory.
-
Mount the “CD026.iso” image file as a drive on your Windows machine (either by burning the ISO image file to DVD-ROM or using a virtual mount solution). Start the installation by double-clicking the “HELIOS Installer.exe” icon in the “windows” subfolder.
The “HELIOS Installer” window opens.
-
Click
Continue.
The introductory dialog gives an overview of the installable HELIOS products and their main features.
-
Make sure that
Installationis selected on the pull-down menu and clickContinueto proceed.
-
Read the license agreement carefully (the “license” file is also available on the HELIOS CD) and – if you agree to the terms and conditions – activate the
Accept Licenseradio button and clickContinue.
-
If you do not agree, leave the
Do Not Accept Licenseradio button as is and close the window. The installation of the HELIOS software will then be aborted.
-
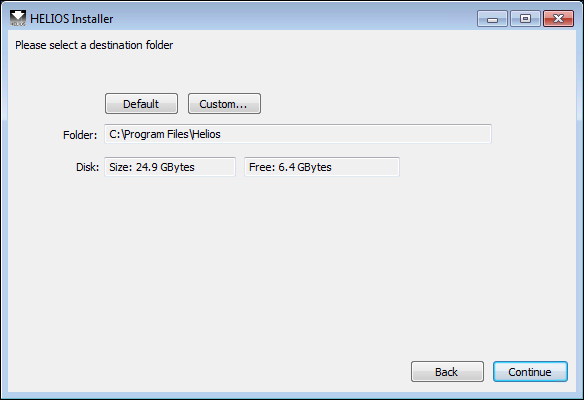
To specify a different HELIOS product installation path (Fig. 4.13) click
Custom..., which brings up the Windows file selector.
-
Select the desired installation directory and click on
Continue.
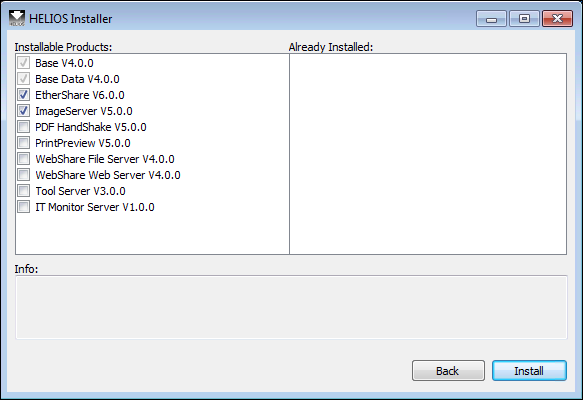
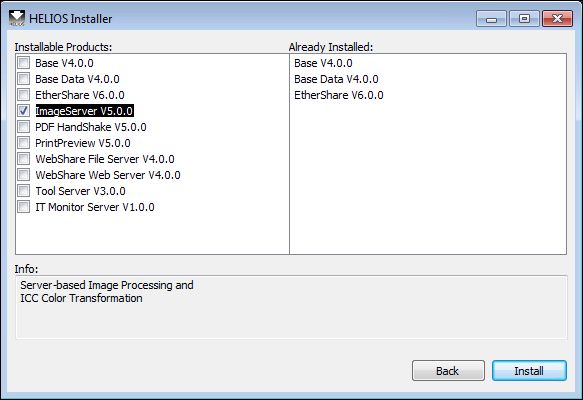
The Installable Products section shows all available
HELIOS software products. If there are already HELIOS
software products installed on the server they are listed in
the Already Installed: section. Otherwise this section is
empty (Fig. 4.14 and Fig. 4.15).
-
In the
Installable Productssection click the checkboxes of the products you wish to install (see Fig. 4.14). You can select multiple products at once.
Fig. 4.14 shows a “fresh” installation of Base (with Base Data), EtherShare and ImageServer, where no HELIOS product software was installed before. Fig. 4.15 shows that Base (with Base Data) and EtherShare are already installed, and ImageServer is about to be installed.
- Important:
-
Starting the installation will stop all HELIOS services running on the server. Therefore, please make sure that all HELIOS users log off before you install new products. To verify the HELIOS user status you can use the “swho” command or use HELIOS Admin (
Lists > Active Users).
-
After you have selected the desired products for installation, click the
Installbutton.
The status window (Fig. 4.16) shows the progress of the HELIOS software installation. As soon as the installation is finished, the software is started so the services are immediately available.
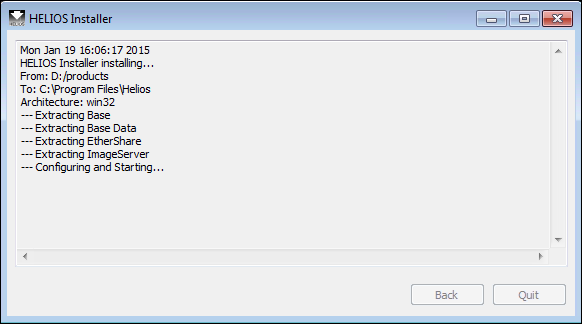
After the installation, an installation log file is written to the
user’s (hidden) temp directory, e.g. (since Windows 7):
C:\Users\<username>\AppData\Local\Temp\helios.installer.log.
It contains the information from the “HELIOS Installer” window (Fig. 4.16).
Upon installation, the HELIOS programs are automatically started. They are generally administered via the HELIOS Admin application.
-
To run HELIOS Admin directly on the server, navigate to the “public\Windows” directory within the HELIOS installation path, and double-click on “HELIOS Admin.exe”.
-
To enable access to HELIOS Admin remotely from a Windows client, navigate to the “Helios” directory, and right-click on the “public” directory. Go to the sharing options, click
Share this folder, and (if desired) change theSharename to something descriptive, e.g. “HELIOS Applications”. See 5.7 “Windows shares & HELIOS volumes” for additional details.
Network clients can now mount that volume via SMB, or, if HELIOS EtherShare is installed on the Windows server, via AFP. However connected, Mac clients can find “HELIOS Admin.app” in the “MacOS” folder, and Windows clients will find “HELIOS Admin.exe” in the “Windows” folder of the volume. Other clients can use the “HELIOS Admin.jar” application in the “Java” folder. Simply double-click the respective HELIOS Admin icon.
Alternatively, you can copy the application to your local hard disk and use it from there.
For a complete reference to HELIOS Admin, refer to 7 “HELIOS Admin”.
4.1.10 Software installation (Virtual machines)
Software installation works as described in the chapters for the installation on UNIX and Windows. However, only certain virtual machine solutions (VMs) are supported.
The HELIOS machine ID is based on the network hardware address and VM-specific information.
For up-to-date information on supported and tested VM solutions, see the HELIOS website www.helios.de/virtualization.
4.2 Upgrade product generations
4.2.1 Upgrade from UB2 to UB64
When upgrading from HELIOS UB2 generation products to the UB64 products, all settings are preserved. For details see Migrating HELIOS UB2 to UB64 on the HELIOS website.
4.2.2 Upgrade from UB+ to UB2
When upgrading from HELIOS UB+ generation products to the UB2 products, all settings are preserved. However, since AD/PDC authentication has changed, it will take some manual configuration. For details see Migrating HELIOS UB+ to UB2 on the HELIOS website.
4.2.3 Upgrade from UB+ CD023 to CD024
A mixed operation of CD023 and CD024 installation is not possible. So all products must be installed from CD023 or all products must be installed from CD024. See also Migrating the HELIOS UB+CD023 to CD024 on the HELIOS website.
4.2.4 Upgrade from UB generation products to UB+
When upgrading from HELIOS UB generation products to the UB+ products, all settings are preserved. A rebuild will automatically be done for all volumes to re-index the SQL desktop database. For details see 13.1.1 “The SQL desktop database” and Migrating HELIOS UB to UB+ on the HELIOS website.
4.2.5 Upgrade from 4th generation products to UB
When upgrading from HELIOS 4th generation products to the UB products, all settings are preserved. See also Migrating HELIOS 4th generation to UB on the HELIOS website.
Users of HELIOS 4th generation or later can skip the next chapter and continue reading with 4.4 “Licenses”.
4.3 Migrate from earlier versions (CD017 or earlier) to UB2 or newer
This section is applicable to sites upgrading from these or earlier versions: EtherShare 2.6, PCShare 3.0, EtherShare OPI 2.1, PDF HandShake 2.0, and PrintPreview 1.1 (see References to HELIOS CDs in 4.1.4 “General remarks”).
4.3.1 Migrate settings
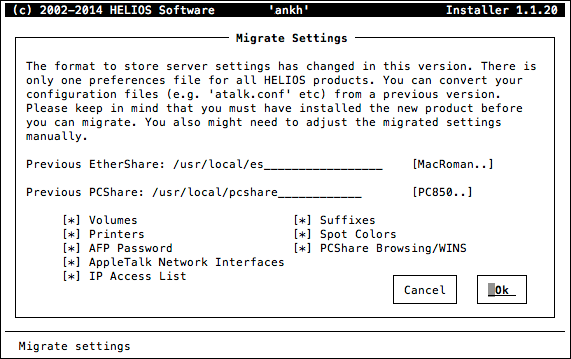
The format to store server settings was changed beginning with the 4th generation version. There is only one preferences file for all HELIOS products. You can convert your configuration files (e.g. “atalk.conf”) from a previous version.
-
Select
Migrate Settingsfrom HELIOS Installer.
- Note:
-
Keep in mind that you must have installed the new product before you can migrate. You may also need to adjust the migrated settings manually.
-
Verify that the paths are correct and select the settings to migrate. Then select
Okand quit HELIOS Installer (Fig. 4.17).- Important:
-
If you are migrating settings from just one product, EtherShare or PCShare, you must erase the other path entry in the respective field (Fig. 4.17)! Otherwise, you will receive an error message.
The Migrate Settings feature calls the HELIOS utility
“migrate”, which is described in 8.4 “migrate”.
-
Now enter the following command to adopt the migrated settings:
# cd /usr/local/helios
# bin/start-helios -i
4.3.2 Previous (CD017 and earlier) and new version settings
The following comparison shows where the various software settings used to be set in previous versions (left column), and where they are set in the new version (right column). See References to HELIOS CDs in 4.1.4 “General remarks”.
| …/conf/afpvolumes | …var/conf/Preferences |
| …/conf/exports | …var/conf/Preferences |
| /etc/printcap | …var/conf/printcap |
| …/PPD & font list | …var/spool/qmeta |
| …/lpr interface files | …var/spool/qmeta |
| …/conf/atalk.conf | …var/conf/Preferences |
All AppleTalk network interfaces are migrated into the
preferences file. The interfaces are stored with the same
syntax (e.g.: if=..., nif=...), but
in the form of a string list in the preferences file. The
settings can be verified by issuing the “prefdump” command,
or by using HELIOS Admin to view the “Versions” file.
The interface settings are stored in:
[Programs][atalkd][if] = active interfaces
[Programs][atalkd][nif] = inactive interfaces
To configure the network interfaces use the “netconf” program, which is described in the HELIOS EtherShare manual (note that OS X uses its own network interface configuration program instead of “netconf”).
As all new printer queues can be administered via HELIOS Admin and new output options are available, we have decided not to migrate PCShare printers to the new preferences storage. Shared printers can be published for PCShare with a single click in HELIOS Admin. Other printer queues must be created using HELIOS Admin.
Only old DOS printer queues using the PCShare DOS “printsrv” must be configured using PCShare Admin.
| …/conf/afppasswd | …var/conf/passwd |
| …/conf/ethers.pcs | …var/conf/ethers.pcs |
| …/conf/ipaccess | …var/conf/ipaccess |
| …/conf/Preferences | …var/conf/Preferences |
A home volume is automatically defined on a user's home directory and is turned on by default. Home volumes can be configured in HELIOS Admin. For a conversion between different character encodings on home volumes refer to the utility script “converthome” in the HELIOS EtherShare manual.
OPI & PDF HandShake server settings are not migrated,
please set them manually in HELIOS Admin (Settings >
PDF HandShake Settings and ImageServer Settings).
These settings are migrated.
4.3.3 Switch back to the old versions (up to CD017 and earlier)
As all old configuration files will stay unchanged in the system it is possible to switch back to the previous versions anytime (see References to HELIOS CDs in 4.1.4 “General remarks”).
-
Deactivate the new HELIOS product version by taking the following steps:
# cd /usr/local/helios
# bin/stop-helios now
# sbin/uninstall -unconfigure
# cd /usr/local/es
# ./install
-
In the “EtherShare Installation Menu” take the steps
1) Install programs and configuration files
2) Install and configure AppleTalk kernel modules
Then quit the “EtherShare Installation Menu”.
Likewise, if you also have PCShare installed:
# cd /usr/local/pcshare
# ./install
-
In the “PCShare Installation Menu” take only step
1) Install programs and configuration files
Then quit the “PCShare Installation Menu”.
- Note:
-
All changes and modifications applied to the new versions are not migrated back into the previous product versions.
4.3.4 Switch back to the new versions
After the new version is installed and running, the old version can remain on the server for the purpose of switching back to the previous versions.
-
To prevent the old versions from loading during a system boot, deactivate the old product versions as start scripts, and start the HELIOS services again:
# cd /usr/local/es
# etc/uninstall
# cd /usr/local/pcshare
# etc/uninstall
# cd /usr/local/helios
# bin/start-helios -i
4.3.5 Migrate a second time
If you have used the previous version or the migration failed it is possible to start the migration again. Every time you do a migration the old version settings will override the new version settings.
4.3.6 Remove the old versions completely
# cd /usr/local/es
# etc/uninstall
# cd ..
# rm -rf es
# cd /usr/local/pcshare
# etc/uninstall
# cd ..
# rm -rf pcshare
# cd /usr/local/helios
# bin/start-helios -i
The font lists and PPD of all old spool queues can be removed because the new ones are in “HELIOSDIR/var/spool/qmeta”.
After all existing ICC profiles have been copied into the “HELIOSDIR/var/ICC-Profiles” volume, the old “ICC-Profiles” volume can be removed.
4.4 Licenses
- Note:
-
For instructions on how to enter HELIOS software licenses on an OS X platform read 4.4.3 “Enter a new license (OS X)”.
4.4.1 Enter a new license
After you have installed a HELIOS software product on the server you must license the program in order to make it work.
-
On the command line of the host machine log in as “root” and enter:
# cd /usr/local/helios
# bin/license
The “License a HELIOS Product” dialog appears (Fig. 4.18).
-
In the “Licensed Products” section select
…New Entryand press RETURN (Fig. 4.19).
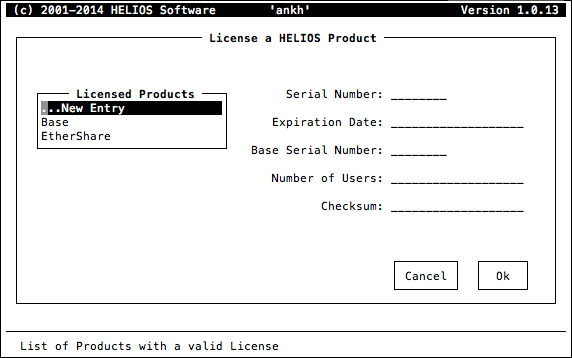
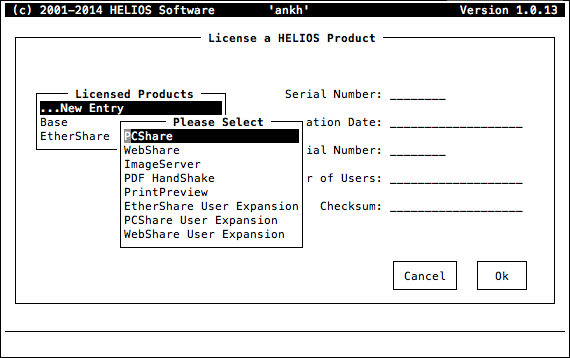
In our example, we license the PCShare software which was installed in HELIOS Installation above in this chapter.
-
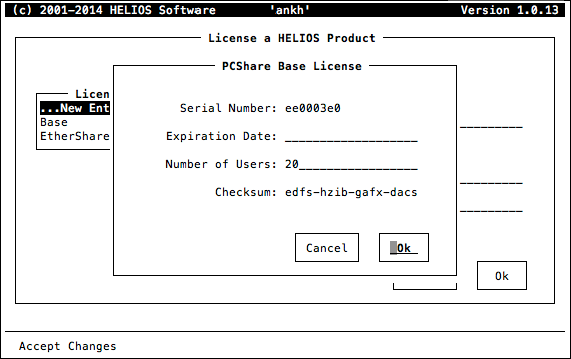
In the “PCShare Base License” dialog window (Fig. 4.20) enter the serial number of the product, the number of users (i.e. the type of license you purchased with the software product) and the checksum which you get from the “Activation Key Reply” form. Then confirm with
Ok.
- Note:
-
What you have to do in “Welcome to HELIOS Base” shows you step-by-step how to receive the “Activation Key Reply” form with the required keys.
-
To leave the “License a HELIOS Product” dialog navigate to
Okand press RETURN. Otherwise the changes you have applied to the server will not take effect.
The HELIOS services must now be stopped and restarted for the new license to take effect. See 4.5 “Start/stop HELIOS services manually”.
4.4.2 Remove a HELIOS license from the server
An already existing HELIOS license cannot be edited. In such cases it must be removed and then replaced by another. To remove a HELIOS software license do the following:
-
In the “License a HELIOS Product” dialog highlight the software license you want to remove and press BACKSPACE or Ctrl+H (see 4.1.6 “Navigating within HELIOS Installer”).
-
To leave the “License a HELIOS Product” dialog navigate to
Okand press RETURN. Otherwise the changes you have applied to the server will not take effect.
4.4.3 Enter a new license (OS X)
HELIOS Services is a GUI application designed for entering HELIOS software licenses, and for easily starting and stopping HELIOS processes.
-
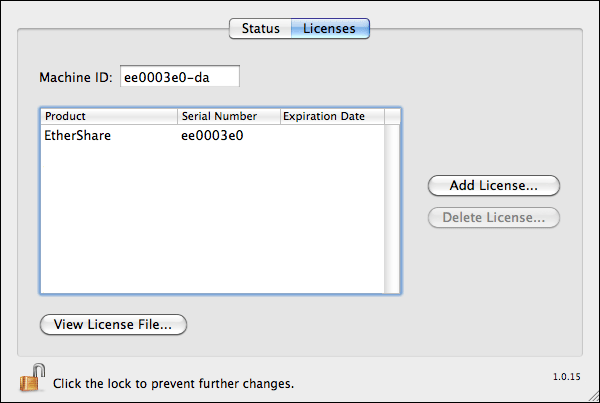
Double-click the “HELIOS Services” icon in the “Applications” folder and select the
Licensestab within the “HELIOS Services” window (Fig. 4.21).
The field Machine ID shows the machine ID of your Mac. In
the other field all HELIOS product licenses
are displayed, with Product name, Serial Number,
and Expiration Date (note that the entry in the
Expiration Date column remains empty if you are
running the software with a full license).
-
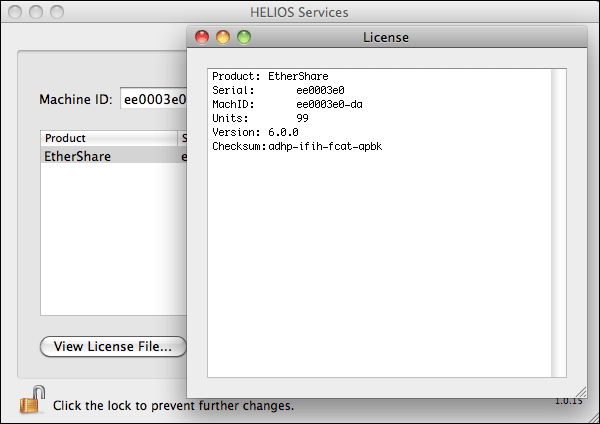
Click
View License File...to see the complete license file (Fig. 4.22).
This may be convenient if you wish to view and extract serial numbers etc. with “copy and paste”.
-
Click
Add License ...to add a new HELIOS product license.
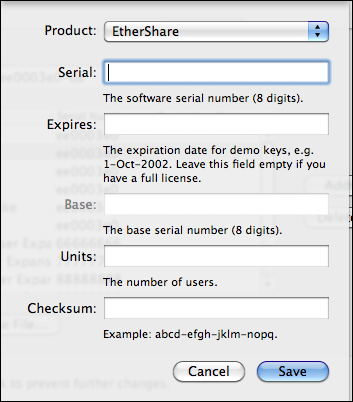
An extra dialog window opens (Fig. 4.23) which lets you
choose the desired product from the pull-down menu Product,
and lets you enter the serial number (Serial), the
number of Units, and the Checksum. As
mentioned before, if you are running a full license of the HELIOS products,
leave the Expires field empty. Otherwise, the expiration
date of the demo or subscription license must be entered in
the Expires field as well.
- Note:
-
All HELIOS products are licensed for use on a single computer system (“server”), which has a unique machine identification (“HELIOS MachID”). The software can only be licensed once for a given machine ID. Compare Fig. 4.21 and Fig. 4.22.
HELIOS services must be stopped and restarted for the new license to take effect. See 4.5 “Start/stop HELIOS services manually”.
4.4.4 License conditions (Windows)
- Note:
-
This chapter is about the HELIOS licensing conditions only. Microsoft’s licensing conditions for their server and client solutions must be obtained separately.
On Windows installations, all HELIOS products are available, except for PCShare. For SMB/CIFS connectivity the Microsoft built-in service is supported.
HELIOS products on Windows offer identical functionalities as on other server platforms. For instructions on how to enter HELIOS software licenses read the chapter 4.4.1 “Enter a new license”.
4.5 Start/stop HELIOS services manually
For instructions on how to start and stop HELIOS services on OS X skip to 4.5.1 “Start/Stop (OS X)” below.
For instructions on how to start and stop HELIOS services on Windows, see 5.1.3 “Starting and stopping the HELIOS software”.
Sometimes it may become necessary to start or stop HELIOS services on the server manually, e.g. after installing updates via HELIOS Update Installer (see also 18 “HELIOS Update Installer”):
-
On the command line of the host machine log in as “root” and enter:
# cd /usr/local/helios
# bin/start-helios
-
To stop all HELIOS processes on the server enter:
# cd /usr/local/helios
# bin/stop-helios now
- Important:
-
Before issuing the “stop-helios” command make sure that all clients are logged-out (e.g. with the “swho” command, see 8.7 “swho”).
4.5.1 Start/Stop (OS X)
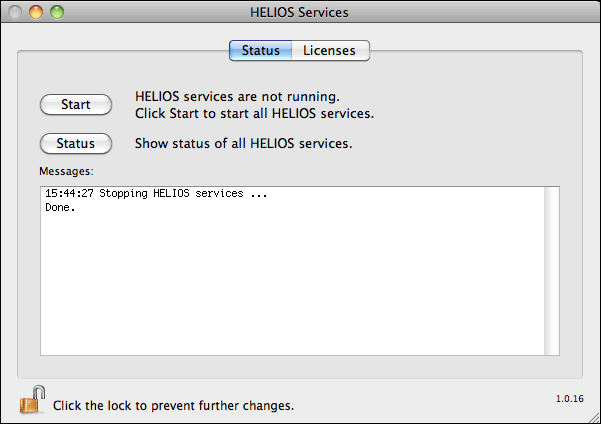
“HELIOS Services” is an OS X GUI application designed for entering HELIOS software licenses, and for easily starting and stopping HELIOS processes.
-
Double-click the “HELIOS Services” icon in the “Applications” folder.
The “HELIOS Services” window appears providing
information on the HELIOS products status when you click
Status.
In order to start the HELIOS software do the following:
-
Click the lock icon (Fig. 4.24) to authenticate. After the authentication, the
Startbutton will become available.
-
Click the
Startbutton within the “HELIOS Services” window.
The Messages box shows the information that the HELIOS
services are being started. When all available services are
running, the display shows Done..
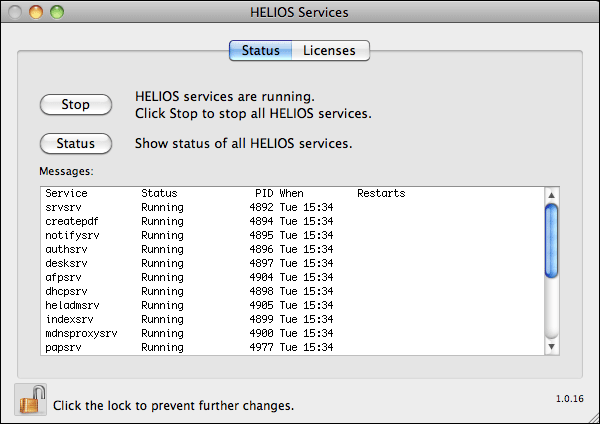
A click on the Status button then reveals a listing of all
HELIOS processes (Fig. 4.25) and gives information about
their name (Service), their Status, their
process ID number (PID), date and time of starting
(When), and – if a process has been started more than
once – the number of Restarts.
In order to stop all HELIOS services on OS X do the following:
-
Click
Stopwithin theStatustab window.
HELIOS Services has a feature that lets you specify a shutdown message and the time span to shutdown.
- Note:
-
This message will not be displayed anymore on newer Mac and Windows clients.
-
Specify the shutdown message in the
Shutdown messagetext box. In theTime to shutdown (minutes)field enter the time after which the services should be stopped (to make the services stop immediately, enter “0”).
The Messages box then displays the information that the
HELIOS services are being stopped (Fig. 4.26).
4.6 HELIOS TCP/IP security overview
HELIOS server applications allow very precise, easy to administer control of access to their services. For example, access to volumes can be limited to members of specific groups (if you are not a member of an authorized group, the volume will not even be listed), and a password can be required to mount the volume. Printers can also be password-protected. HELIOS Admin recognizes four levels of authorization, to allow appropriate delegation of administrative capabilities.
4.6.1 Password security
HELIOS programs use encrypted passwords, so that no cleartext passwords are sent over the network during the login procedure. This feature is called Encrypted Password Transport.
For more information, see 10.1 “The authentication server program”.
4.6.2 Set passwords
During the installation of the HELIOS software on UNIX, the user “demouser” is created. The HELIOS password for both “root” and “demouser” are set to empty. This means a significant lack of security (anybody can log on to the server as user “root” without needing to know the password), and so you should specify a password for “root”.
- Important:
-
For your own security, provide your user accounts with passwords to prevent them from unauthorized access and abuse!
- Note:
-
If this is an upgrade from an installation that utilized HELIOS encrypted passwords, and those settings were migrated to the new version, then normally no further action is needed.
-
Launch HELIOS Admin (see 7.2 “Start HELIOS Admin”) and select
Loginfrom the HELIOS AdminFilemenu. In theUser Namefield enter “root” and leave thePasswordfield empty.
-
Open the
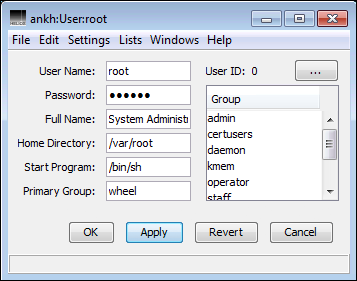
Userstab, select the “root” entry from the list and double-click it.
-
In the
Userconfiguration window for “root” (Fig. 4.27) specify a password for “root” in thePasswordfield and clickOKorApply.
HELIOS Admin will ask you to enter the new password again. This ensures
that no typing mistakes have been made. After clicking OK
the password will be assigned to user “root”.
-
Then set passwords for all other existing users or add new users (passwords defined in HELIOS Admin also update the user’s system password).
- Note:
-
On an OS X machine, the “root” login is disabled by default. Once a “root” password is specified with HELIOS Admin, it is enabled automatically. Also note that if a password is modified via host system tools, our additional password file is not changed. Therefore it makes more sense to administer users with HELIOS Admin or by using the HELIOS utility program “authutil” (see 10.2 “authutil”).
4.6.3 IP access control list
HELIOS offers additional access control by means of IP access lists, based upon the user’s IP address. The default installation creates a single IP access list, that specifies which IP addresses are allowed access to HELIOS resources (volumes, home directories, printers) and services (HELIOS Admin).
All of the above settings are easily configured by means of HELIOS Admin, which allows easy GUI-based server administration from any client on the network. Once the HELIOS software is installed, HELIOS Admin should be used to configure these security options.
Finer IP-based access control can be specified for individual HELIOS resources. For example, each volume can have its own IP access list. This allows certain volumes to be accessible only from within the local network, while others can be made available to remote offices or customers. Or the System Administrator can be authorized to access HELIOS Admin from home. The default IP access list is called ipaccess, and is described in 6.6.1 “HELIOSDIR/var/conf”. To create a resource-specific IP access list, create an “ipaccess” file (see 7.8.6 “IP Access”) with the desired access settings for that resource, and use either HELIOS Admin or the “prefvalue” command to associate it with the appropriate volume, etc. For reference, upon installation, a second access list is created, ipaccess.local, which contains the settings that will allow access only to users on the local network.
| Occurence | Chapter |
|---|---|
| ipaccess | “AFP server preference keys” (see EtherShare manual) |
| ipaccess | “PCShare preference” (see PCShare manual) |
| ipaccess | 19.14 “HELIOS Admin server preference keys” |
| IPAccess | 19.2 “Volume preference keys” |
| ipaccess | 15.7 “LPD” |
| ipaccess.local | 6.6.1 “HELIOSDIR/var/conf” |
| ipaccess | “papsrv” (see EtherShare manual) |
Table 4.1: Overview of IP access preferences and their description
4.6.4 Firewall ports
If your server is protected by a firewall, then access from network clients to HELIOS server services (volumes, printers, Admin, etc.) will be blocked by the firewall, until ports for the respective services are opened in the firewall.
For example, on an OS X based HELIOS server, these ports need to be open:
137       UDP PCShare Browsing
138       UDP PCShare NetBIOS
139       TCP PCShare SMB/CIFS
445       TCP PCShare SMB/CIFS
2005      TCP Create PDF Server (Distiller)
2006      TCP HELIOS Admin
2007      TCP EtherShare print spooler (papsrv)
2009      TCP WebShare Web Server
2010-2015 TCP WebShare File Server
2026      TCP mDNS proxy server registrations
5353      UDP mDNS Server (“Bonjour”)
You will not need any other ports open, unless you enable other HELIOS services (e.g. DHCP server, Remote LPR).
A complete overview about TCP server and client ports used by the HELIOS software is given in C.8 “TCP ports used by HELIOS”.
4.7 After the installation – What now?
-
Read the manuals of the HELIOS software products you have installed.
We recommend that you subscribe to the HELIOS Newsletter, and to
HELIOS Tech Infos to be alerted about updates and new features.
www.helios.de/contact.html
-
To configure the network interfaces use – if necessary – the “netconf” program, which is described in the EtherShare manual (OS X uses its own network interface configuration program).
-
Verify that all HELIOS services are running:
# cd /usr/local/helios
# bin/srvutil status
On OS X, run the HELIOS Services application (Fig. 4.25).
-
Check the system messages file for any HELIOS startup messages. See 7.5.16 “System messages”.
- Note:
-
HELIOS LanTest can be used to test network server volume and local hard disk performance. It is available in the “HELIOS Applications” volume.
-
Verify that user passwords have been set (see 4.6.2 “Set passwords”).
-
Set up users, groups, volumes, printers, ipaccess, etc. We recommend to do this with HELIOS Admin (see 7 “HELIOS Admin”).
4.8 Migration to other platforms
All installed HELIOS products and settings can be transferred
to a new platform by installing the HELIOS products
from CD and moving the HELIOS “var” folder to the new
platform. All server settings including volumes and printers
are transferred to the new platform and are automatically
used on the new system. All volumes and printer spool
directories will then be re-created on the new platform
when start-helios -i is executed.
- Example:
The HELIOS software on Oracle Solaris is subject to be transferred to a Linux platform:
-
Install the HELIOS software from CD on the new platform (in this example Linux).
-
Then enter the command
stop-helioson the new (Linux) platform.
-
Enter the command
stop-helioson the old (here Sun Solaris) platform. Copy the complete “HELIOSDIR/var” directory, which contains all volumes and printer settings, from the old platform to the new platform (Linux).
In doing so the “HELIOSDIR/var” directory on the Linux platform will be replaced with the “HELIOSDIR/var” directory of the Oracle Solaris platform.
-
On the new (Linux) platform, enter the command:
start-helios -i
All existing server settings from the Oracle Solaris platform are now available on the Linux platform.
- Note:
-
Users, groups and volume content are NOT migrated. You can use HELIOS Admin to copy user and group information from the old to the new platform.
4.9 Back up HELIOS settings
It is prudent to save the “HELIOSDIR/var” directory to a backup media at regular intervals, so that if a prior setting needs to be recovered or if the server goes down and you want to quickly migrate settings to a different server, it will be easy to do so. Tape backups are often not readily accessible for such purposes.
4.9.1 Automatic backup of the configuration
The configuration in “var/conf” and “var/spool/qmeta” is automatically saved daily in a “tar” file. This allows restoring old settings, e.g. if the preferences file has accidentally been deleted.
If there is the need to restore the system to a previous configuration, go to “HELIOSDIR/var/adm” and open the desired “tar” archive “configuration.tgz” (today) to “configuration.tgz.6” (seven days ago).
4.10 Data backup
As with all computer systems, it is highly advisable to make regular backups of network volumes to tape or disk. Although modern servers provide comprehensive safety mechanisms in case of system faults, it is never possible to fully exclude loss of data. For this reason, the administrator should regularly archive all volumes of the file server to mass storage. For data backup solutions see www.helios.de/3rd-party.
In addition, the HELIOS Synchronization Service can be used to sync server data for server failover purposes, or to retrieve a prior version of files. This allows a second copy of the server data, synced on a regular basis, to be immediately available upon need. See 7.5.9 “Syncs” for details.