6 PDF HandShake utility programs
6.1 pdfcat
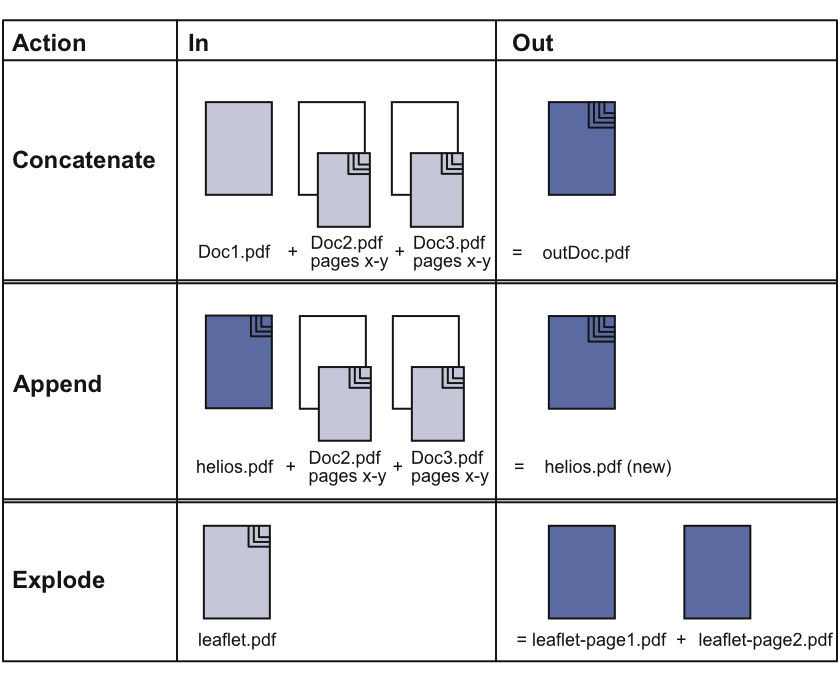
“pdfcat” is a command line tool that allows you to explode or concatenate PDF files on the server. Using “pdfcat” is indispensable if you have a multi-page document that is to be used in an EPSF-only or in an OPI workflow. The OPI server, for instance, will generate a layout file of the first document page only – so if you want to have a layout of document page 2, you must extract the desired page and create a new single-page PDF file. The illustration below shows the three different program modes that are all independent of one another and do exclude each other: The “concatenate” mode merges the selected PDF files into a new one, the “append” mode appends the selected files to an existing one, and the “explode” mode writes the selected pages of an existing document into new single-page files.
Every PDF file contains a list of file infos such as creator, creation date, modification date, and image profiles (optional). Furthermore, a PDF file may contain security settings (optional), a table of contents (TOC) and annotations such as text fields, buttons, etc.
The “pdfcat” program re-arranges PDF files and creates new ones. The file infos, profiles, security settings, TOC, and annotations are handled as follows:
If “pdfcat” creates a new multi-page document – as shown in the first row in the illustration – the new file will have its own creator and creation date. It will not have any profiles, even if the input files were tagged, and it will not have any security settings. Tables of content – if there were any in one of the input files – will not be copied to the new file. However, annotations from the original files will find their way into the newly created document.
If “pdfcat” appends pages and/or documents to an existing PDF file – as shown in the second row in the illustration – the output file (helios.pdf (new)) will contain all the information that was already included in the original file (helios.pdf). File infos, profiles, security settings, TOC, and annotations remain unchanged. Information that had been included in the appended files (Doc2 and Doc3) will – except for the annotations – not make it into the output file; they will be ignored.
If “pdfcat” explodes a document into several single-page documents – as shown in the last row in the illustration – the new documents inherit the file infos, profiles, and security settings from the original file. Tables of content, however, will not be copied to the output files. Please note that “pdfcat” cannot write comments into the Finder Info. Usually, if a PDF file contains profile information, the profiles are listed in the Mac OS 9 Finder Info, or via HELIOS Meta, or in WebShare. The text field may be empty for PDF files you have created with “pdfcat explode”, even though the new files contain profile information. In that case, you can use our Acrobat print plug-in or the ImageServer “HELIOS ICC Tagger” application to make the profiles visible.
Automatic layout generation is not available for PDF files
that have been created with “pdfcat”. You need to use our
“opitouch” or “layout” programs to generate layouts
from the new PDF files, or enter the dt touch -E
command on a shell. Alternatively, the procedure can be
automated by means of the ImageServer Script Server.
- Usage:
pdfcat [-v] -o <outDoc> <inDoc> ...
pdfcat [-v] -a <outDoc> <inDoc> ...
pdfcat [-v] -e <prefix> <inDoc>
pdfcat -h
6.1.1 Options
- -v
This option allows you monitor the “pdfcat” conversion progress.
- -o
Concatenates existing PDF documents (
inDocs...) to a new PDF document (outDoc). With this parameter, you have to specify one output file name and one or more input file names. It is possible to copy only selected pages from the input file to the output file by specifying page ranges. Valid ranges are listed in 6.1.2 “Operands”.- Important:
-
If the name you choose for the output file already exists in the destination directory, the existing file will be replaced!
- -a
Appends one or more PDF documents or parts of them (
inDocs...) to another – already existing – PDF document (outDoc).- -e
Extracts from a given PDF document (
inDoc) either all pages or the pages you select explicitly, and creates new single-page PDF files. With this parameter, you have to specify a prefix for the output files. Page number<nnn>of the input file will then be copied to a new PDF document named<prefix><nnn>.pdf.- -h
Display help file.
- Note:
-
File name specifications may contain a complete UNIX path name that leads to another directory.
6.1.2 Operands
<inDoc> is the path name of a PDF file, optionally
followed by a comma-separated list of page ranges. Valid page
ranges are:
- <a>
Page
<a>only- <a>-<b>
Page
<a>to page<b>- <a>-
Page
<a>to last page- -<b>
First page to page
<b>
The character “$” stands for the last page of a document (the “$” must be escaped on a shell).
If <inDoc> is followed by a list of page ranges, only
the specified pages of <inDoc> will be copied to the
destination file. The default is to copy all pages from
<inDoc>.
- Example 1:
$ pdfcat -o new.pdf doc1.pdf doc2.pdf,2,5-7
Writes all pages of document “doc1.pdf” and the pages 2, 5, 6, 7 of document “doc2.pdf” to the new document “new.pdf”.
- Example 2:
$ pdfcat -o new.pdf doc1.pdf,\$-1
Writes all pages of document “doc1.pdf” in reverse order to a new document called “new.pdf”.
- Example 3:
$ pdfcat -a tmp.pdf doc1.pdf,9-6
Appends the pages 9, 8, 7, 6 (in this order) of document “doc1.pdf” to an existing document called “tmp.pdf”.
- Example 4:
$ pdfcat -e page doc1.pdf,-3
Writes the pages 1, 2, 3 of document “doc1.pdf” to new single-page documents called “page1.pdf”, “page2.pdf”, and “page3.pdf”.
6.2 pdfform
“pdfform” allows you to output form field values of a PDF document.
- Usage:
pdfform [-p <password>] <pdffile>
6.2.1 Option
- -p <password>
Password to open PDF document. Required if
<pdffile>is secured by an “Open Password”.
- Example:
$ pdfform /laura/base11_e.pdf
  Company=HELIOS Software GmbH
  Date=03-11-04
  Priority=Urgent
This PDF document contains three form fields of the type text. The Company field has the value “HELIOS Software GmbH”, the Date field “03-11-04”, and the Priority field has the value “Urgent”.
6.3 pdfinfo
“pdfinfo” has two modes of operation: either print information
about the PDF document <pdffile> or extract objects
from it.
In information mode every output line is of the form:
section: key1=value1, key2=value2, ..., flag1, flag2, ...
Possible sections are General, Security, Profile,
Layer, Plate, OutputIntent, Color,
Font, PageLabel, MediaBox, CropBox,
BleedBox, TrimBox, ArtBox, Rotate,
Transparency, Image and Form.
The output can be restricted with the -o option. Note that PDF text
strings such as title and author information are converted to UTF-8 encoding.
In object extraction mode arbitrary objects with object
number can be extracted from the PDF document pdffile
to standard output.
- Note:
-
The object extraction mode is only meaningful for experts with knowledge of the internals of PDF documents.
- Usage:
pdfinfo [-f <fromPage>][-t <toPage>][-o <sections>][-l <layer>]
        [-m][-v][-p <password>] <pdffile>
pdfinfo [-x <objNo> | -s <objNo> | -d <objNo>][-i <intentNo>]
        [-p <password>] <pdffile>
pdfinfo -h
6.3.1 Options
- -p
Password to open a PDF document. This option is required if
<pdffile>is secured by an “Open Password”.
Information mode:
- -f <from page>
First page number for font and color information. The default is 1.
- -t <to page>
Last page number for font and color information. The default is the last page.
- -o <sections>
Print only information for the specified sections. The default value is
-o All, which prints all available information.- -l <layer>
Select or deselect layers (see D “PDF layers”).
- -m
Use a different output format for values and flags, which is suitable for post-processing.
- -v
Display object numbers of images and forms.
Object extraction mode:
- -x <objNo>
Extract object with number
<objNo>.- -s <objNo>
Extract a stream without decompressing it from object with number
<objNo>.- -d <objNo>
Extract and decompress a stream from object with number
<objNo>.- -i <intentNo>
Extract ICC profile of PDF/X output intent with number
<intentNo>. PDF documents usually have one or no PDF/X output intent, so this number is usually 1.
- Example 1:
The following commands are equivalent:
$ pdfinfo Doc.pdf
$ pdfinfo -o All Doc.pdf
- Example 2:
Getting information about all images in “Doc.pdf”:
$ pdfinfo -o Image Doc.pdf
# pdfinfo 3.5.0
Image: Page=18, BBox=207.6720/371.4596/
264.3224/443.6887, Resolution=278.3387/593.1125, BPP=8,
ColorSpace=DeviceGray, Filters=FlateDecode
Image: Page=18, BBox=225.1510/387.2033/
237.4971/397.1024, Resolution=194.9898/194.9960, BPP=8,
ColorSpace=DeviceRGB, Filters=FlateDecode
- Example 3:
Getting information about transparencies in “Doc_1.pdf”:
$ pdfinfo -o Transparency Doc_1.pdf
# pdfinfo 3.5.0
Transparency: Page=1, Transparencies=no
Transparency: Page=2, Transparencies=yes
Transparency: Page=3, Transparencies=no
6.4 pdfnote
“pdfnote” has three modes of operation: either list all
annotations of a PDF document <pdffile> or extract the
contents entry of one annotation in a PDF document or add
a text annotation to a PDF document.
- Usage:
pdfnote -l [-p <password>] <pdffile>
pdfnote -x <annot> [-n <page>][-p <password>] <pdffile>
pdfnote [-n <page>][-r <location>][-s][-t <title>][-c <contents>]
        [-p <password>] <pdffile>
pdfnote -h
6.4.1 Options
- -p <password>
Password to open PDF document. Required if
<pdffile>is secured by an “Open Password”.- -n <page>
Number of the page where to add the text annotation. The default is
-n 1(first page).- -l
List all annotations of the PDF document.
- -x <annot>
Extract contents entry of annotation
<annot>on selected PDF document page.- -r <location>
The location of the text annotation on the page.
<location>is of the form:<llx>:<lly>:<width>:<height>specifying the lower left x coordinate, lower left y coordinate, width, and height of the text annotation rectangle in points.- -s
Specifies that the annotation should initially be displayed open.
- -t <title>
Title string.
<title>will appear in the annotations title bar.- -c <contents>
Contents of the text annotation. If
-cis not specified, the contents are read from “stdin”.- -h
Help
- Example:
$ pdfnote -r 10:400 -t "Joe" -c "OK" Doc1.pdf
$ pdfnote -r 10:10:200:200 -t "Info" Doc2.pdf < info.txt
6.5 pdftoeps
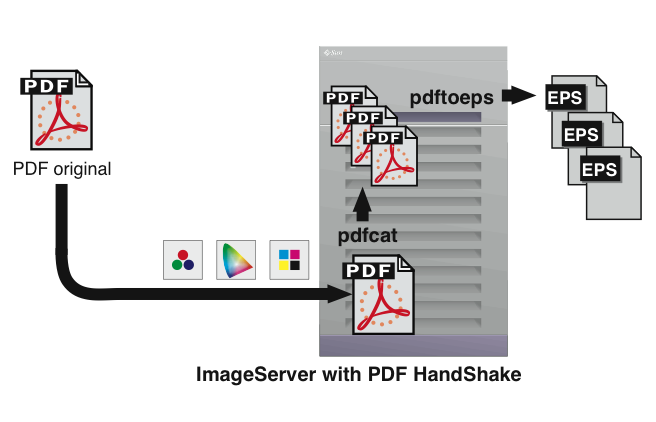
EPSF files can be generated by different applications, e.g. Illustrator or Photoshop, and they can be different in structure. One purpose of “pdftoeps” is to allow you to stick to PDF as a file exchange format and to use the program to generate EPSF files, that are all homogeneous in structure, from the incoming PDF files. This tool is available for ImageServer users only.
If you have an EPSF-only workflow, but receive PDF files from your customers, you may use the “pdftoeps” tool to transform PDF files into EPSF files. It allows you to specify the color space, the resolution, and the type (Mac-EPSF, PC-EPSF) of the output files. An example of the “pdftoeps” tool is given in Fig. 6.1. The illustration shows a situation where “pdfcat” and “pdftoeps” are used to convert a multi-page PDF document into several single-page EPSF files.
We include in our software package 131 original PostScript 3 fonts. They are available automatically after installation and appropriate activation of PDF HandShake on the server. They guarantee high-quality printing, and high-quality font representation on screen and in layout files (for ImageServer). Our fonts are listed in F “The fonts we deliver”.
- Usage:
pdftoeps [options] <pdffiles> ... <destination>
6.5.1 Options
- -v
Displays activity reports during PDF to EPSF transformation.
- -P <password>
Password to open PDF document. Required if
<pdffile>is secured by an “Open Password”.- -m
Produces Mac EPSF files (see G “Glossary” and the option
-pbelow).- -p
Generates cross-platform EPSF files (opposite of option
-mabove). If neither of the two options is specified, the default depends on the location of the selected PDF files and on whether this location is an EtherShare volume. If the volume settings in the respective volume are set to cross-platform EPSF, the resulting files will be cross-platform.- -r <resolution>
Sets resolution in dpi used for the printable preview of EPSF files. This parameter requires a floating point value as e.g. 72.0. If you do not specify
-rthe resolutions of the elements of the PDF input file will be used.- -c <colorspace>
Defines color space used for the printable part of the EPSF file. The parameter requires a string value as e.g. “CMYK”. For valid strings, see Table 6.1 below. If you do not specify
-cthe default from the OPI server will be used.- -R <resolution>
Sets resolution in dpi used for the screen preview of EPSF files. This parameter requires a floating point value as e.g. 72.0. If you do not specify
-Rthe default from the OPI server will be used.- Note:
-
Set the resolution for the composite preview to a reasonable value. Increasing the resolution to an exaggerated extent might lead to VM and RAM overflow.
- -C <colorspace>
Defines color space used for the screen preview of the EPSF file. The parameter requires a string value as e.g. “Grayscale”. For valid strings, see Table 6.1 below. If you do not specify the
-Coption the default color space (RGB) will be used.- -b <pagebox>
Page box to use (
MediaBox,CropBox,BleedBox,TrimBoxorArtBox)- -B
Produces EPS raster layout images.
- -h
Display help file.
All options of the “pdftoeps” tool are optional. However,
you should specify parameters like -m or -p explicitly
whenever you are not sure about the defaults that are currently valid.
After the options, you have to specify one or more files to convert and a destination file (if converting a single file) or a destination directory (if converting several files). The destination can contain a complete UNIX path name.
- Example:
$ pdftoeps -m -c CMYK -C RGB file1 file2 /user/tmp
The “pdftoeps” program recognizes pre-separated PDF documents. It generates DCS files with default (depending on server settings) composite previews which are raster based with a maximum resolution of 150 dpi.
The DCS files are DCS-1 or DCS-2 style multifile images. The plate file suffixes for CMYK will be .C, .M, .Y, and .K. Spot color plate files will be assigned other suffixes, namely letters so far unused in alphabetical order. The suffix does not have any relation to the name of the spot color.
6.6 pdfprint
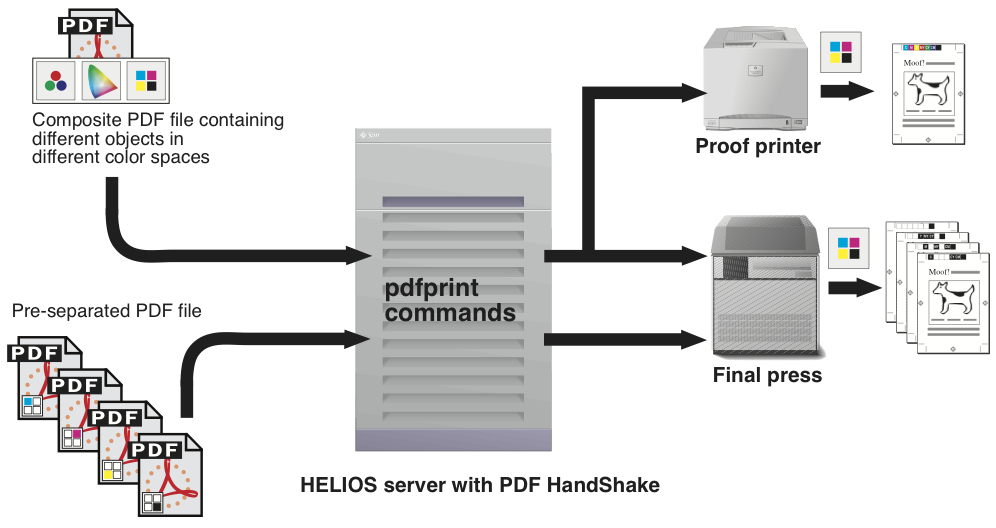
“pdfprint” allows the printing of PDF files directly from the server to a HELIOS printer queue (Fig. 6.2). Features like color matching and proof printing are available for each queue. Pre-separated files cannot be printed composite unless ImageServer is also used. For options and usage information, see 8.1 “pdfprint”.
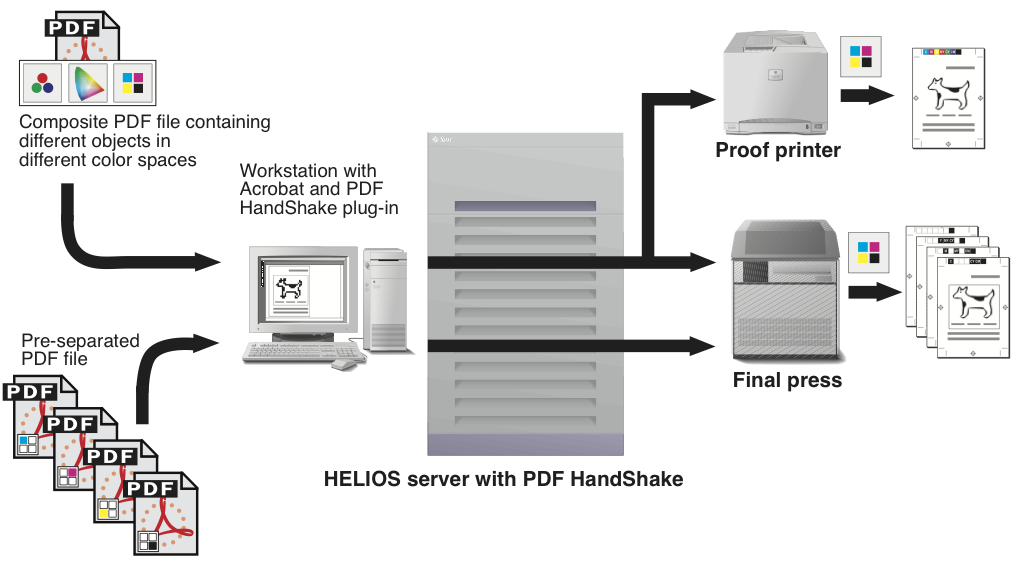
The print plug-in for Acrobat or Adobe Reader, (see 8.2 “Print PDF files using the Acrobat plug-in”) is currently available for Mac computers only. It is the equivalentof the “pdfprint” program and also prints to PDF HandShake printer queues (Fig. 6.3). Again, without ImageServer, pre-separated files can only be printed as separations.
With PDF HandShake and ImageServer, you can use the PDF file format as an input format for the ImageServer layout generation. Moreover, you can use the “PDF HandShake” Acrobat plug-in (or the “pdfprint” command line tool) to export PDF files for further use in an imposition program. Fig. 6.4 shows these two features at a glance.
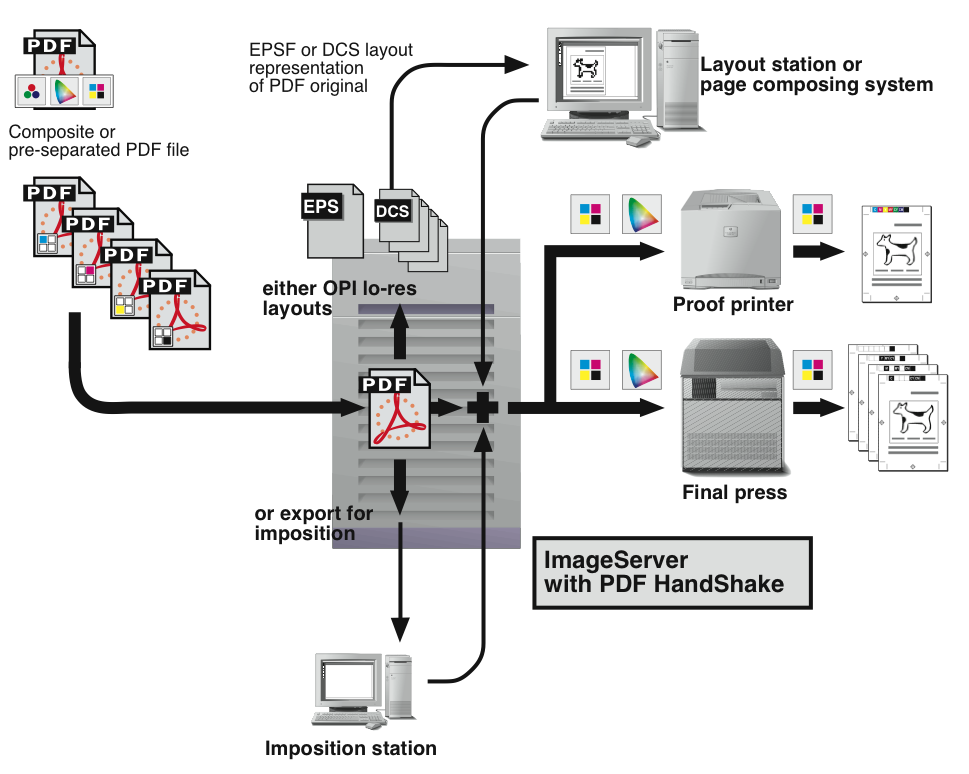
The OPI server uses the first page of a PDF file for layout generation. Further pages are ignored. The file format of the layout representation is EPSF for composite PDF files and DCS for pre-separated PDF files. This allows you to place the layouts into any popular layout application, e.g. QuarkXPress or InDesign, and into any editorial or page composing system.
6.6.1 Options
The options for the “pdfprint” program as well as examples on the usage are described in detail in 8.1.2 “Options”.
6.7 pdfresolve
The “pdfresolve” program allows resolving OPI references in PDF documents. Layout applications like QuarkXPress or InDesign can export their native documents as PDF documents. If the native documents contain OPI references, these can be preserved during the export process, to be used to replace gray-area placeholders with the corresponding high-resolution original images prior to or during the printing process.
OPI 1.3 references contain the path name of the placed image file plus an optional Mac file ID. During OPI reference replacement “pdfresolve” searches for a matching high-resolution or low-resolution image to replace the form. An image search consists of a sequence of search methods: search by path name, search in additional search paths, search by Mac file ID, search in additional search volumes. An image search is complete when a search method succeeds. If a low-resolution image is searched, the found image is used for replacement, regardless whether it is low-resolution or high-resolution. If a high-resolution image is searched and a high-resolution image is found, it is used for replacement. If a high-resolution image is searched and a low-resolution image is found, the OPI reference of the low-resolution image is used for another high-resolution image search. A chain of low-resolution images leading to a high-resolution image must not exceed the length of seven.
Another advantage of “pdfresolve” is that transparencies that have been applied to the layout images in the layout application are preserved during the OPI image replacement process. This tool is available for ImageServer users only.
- Note:
-
OPI references in PDF documents are always embedded in form streams with OPI entries, which are called OPI forms in short. “pdfresolve” replaces OPI 1.3 forms in composite PDF documents, pre-separated PDF documents are not supported. Referenced files must be raster images or PDF documents. Object-based EPSF files are not supported. In PDF documents with nested OPI references only the top level is resolved.
For OPI references to PDF files, only references to the first page of the document are supported.
A description of how to set up hot folder mechanisms for the PDF native OPI workflow can be found in 12 “PDF-native OPI workflow”.
- Usage:
pdfresolve [-lv] -P <printer> [-g <logFile>][-o <key>=<value>]...
           <inDoc> <outDoc>
pdfresolve -h
pdfresolve -P <printer> -h (help info with printer parameters)
6.7.1 Options
- -l
High-resolution images are inserted by default. When this option is set, low-resolution images are inserted instead if they are available.
- -v
Verbose mode. The file names of inserted images are printed.
- -P <printer>
Replace OPI objects using preference settings of printer queue
<printer>. OPI must be active on this printer queue. This option is required.- -g <logFile>
If there are warnings or errors, then generate a log file
<logFile>with their description.- -o <key>=<value>
Set parameter with key
<key>to value<value>.- -h
Display help file.
- -P <printer> -h
Help info with printer parameters.
- Note:
-
Command line options have a higher priority than file specific preference settings, and file specific preference settings have a higher priority than global preference settings which include printer queue preference settings. Command line option keys are case-insensitive, but preference keys are case-sensitive.
6.7.2 Valid parameter keys
- ImageSearchPaths <strlist:"">
The list of additional search paths. The search in additional search paths locates files with matching basenames in these search paths.
- ImageIDsearch <bool:TRUE>
Determines whether images are searched via Mac file ID. The search via file ID first extracts the volume specification from the file ID and then searches a file with matching file ID in the desktop database of the specified volume.
- ImageSearchVolumes <strlist:"">
The list of additional search volumes. The search in additional search volumes uses their desktop databases to locate files with matching basenames, but excludes files in the network trash folder, files with layout suffix and in layouts folders. This search succeeds if and only if there is exactly one matching file.
- CheckImages <bool:TRUE>
If this option is
TRUE, errors are generated for missing referenced images. If this option isFALSE, warnings are generated for missing referenced images and the OPI form is left unchanged.- CheckRaster <bool:TRUE>
If this option is
TRUEand referenced image files do not contain raster data with print quality, errors are generated. If this option isFALSEand referenced image files do not contain raster data with print quality, neither errors nor warnings are generated.
For processing PDF documents which were assembled using object-based EPSF files you need to set this option toFALSE.- RemoveOPI <bool:FALSE>
Determines whether OPI references of replaced raster images are removed. The OPI references of replaced PDF documents are always removed.
- ProfileRepository <str:"ICC-Profiles">
Name of the ICC profile repository volume. If an ICC profile is searched, it is searched here first, then it is searched in the directories listed in the
ProfileSearchPathsparameter.- ProfileSearchPaths <strlist:"">
The list of additional directories where ICC profiles are searched. Its type is
strlist.- CompositeColorspace <str:"CMYK">
Determines output color space of source images with color spaces other than bilevel and grayscale. Grayscale images are affected if and only if they have an ICC profile and use default OPI colorization. Its value must be one of
None,Grayscale,RGB,CMYKorCIELaband must be consistent with the value of theDefaultPrinterProfileparameter, if specified.- DefaultPrinterProfile <str:"">
Determines printer ICC profile for all source images with color spaces other than bilevel and grayscale. Grayscale images are affected if, and only if, they have an ICC profile and use default OPI colorization.
- PrintRenderingIntents
Determines rendering intent used for conversion between any source and printer color space. Its syntax is:
<sourceA>:<printerA>:<intentA>,<sourceB>:<printerB>:<intentB>To: N S B G I R H H C C M D Y C C C C Y From: None 3 3 3 3 3 3 3 3 0 0 3 3 3 3 3 3 3 3 Spot 3 3 3 3 3 3 3 3 0 0 3 3 3 3 3 3 3 3 Bilevel 3 3 3 3 3 3 3 3 0 0 3 3 3 3 3 3 3 3 Grayscale 3 3 3 3 3 3 3 3 0 0 3 3 3 3 3 3 3 3 Index 3 3 3 3 3 3 3 3 0 0 3 3 3 3 3 3 3 3 RGB 3 3 3 3 3 3 3 3 0 0 3 3 3 3 3 3 3 3 HSV 3 3 3 3 3 3 3 3 0 0 3 3 3 3 3 3 3 3 HLS 3 3 3 3 3 3 3 3 0 0 3 3 3 3 3 3 3 3 CMY 3 3 3 3 3 3 3 3 3 3 3 3 3 3 3 3 3 3 CMYK 3 3 3 3 3 3 3 3 3 3 3 3 3 3 3 3 3 3 Multitone 3 3 3 3 3 3 3 3 0 0 3 3 3 3 3 3 3 3 Duotone 3 3 3 3 3 3 3 3 0 0 3 3 3 3 3 3 3 3 YCbCr 3 3 3 3 3 3 3 3 0 0 3 3 3 3 3 3 3 3 CIELab 3 3 3 3 3 3 3 3 0 0 3 3 3 3 3 3 3 3 CIEXYZ 3 3 3 3 3 3 3 3 0 0 3 3 3 3 3 3 3 3 CIELuv 3 3 3 3 3 3 3 3 0 0 3 3 3 3 3 3 3 3 CIEYxy 3 3 3 3 3 3 3 3 0 0 3 3 3 3 3 3 3 3 YCC 3 3 3 3 3 3 3 3 0 0 3 3 3 3 3 3 3 3- DefaultProofProfile <str:"">
Determines proof ICC profile for all source images with color spaces other than bilevel and grayscale. Grayscale images are affected if and only if they have an ICC profile and use default OPI colorization.
- ProofRenderingIntents
Determines rendering intent used for conversion between any printer and proof color space. Its syntax is:
<printerA>:<proofA>:<intentA>,<printerB>:<proofB>,<intentB>To: N S B G I R H H C C M D Y C C C C Y From: None 3 3 3 3 3 3 3 3 3 3 3 3 3 3 3 3 3 3 Spot 3 3 3 3 3 3 3 3 3 3 3 3 3 3 3 3 3 3 Bilevel 3 3 3 3 3 3 3 3 3 3 3 3 3 3 3 3 3 3 Grayscale 3 3 3 3 3 3 3 3 3 3 3 3 3 3 3 3 3 3 Index 3 3 3 3 3 3 3 3 3 3 3 3 3 3 3 3 3 3 RGB 3 3 3 3 3 3 3 3 3 3 3 3 3 3 3 3 3 3 HSV 3 3 3 3 3 3 3 3 3 3 3 3 3 3 3 3 3 3 HLS 3 3 3 3 3 3 3 3 3 3 3 3 3 3 3 3 3 3 CMY 3 3 3 3 3 3 3 3 3 3 3 3 3 3 3 3 3 3 CMYK 3 3 3 3 3 3 3 3 3 3 3 3 3 3 3 3 3 3 Multitone 3 3 3 3 3 3 3 3 3 3 3 3 3 3 3 3 3 3 Duotone 3 3 3 3 3 3 3 3 3 3 3 3 3 3 3 3 3 3 YCbCr 3 3 3 3 3 3 3 3 3 3 3 3 3 3 3 3 3 3 CIELab 3 3 3 3 3 3 3 3 3 3 3 3 3 3 3 3 3 3 CIEXYZ 3 3 3 3 3 3 3 3 3 3 3 3 3 3 3 3 3 3 CIELuv 3 3 3 3 3 3 3 3 3 3 3 3 3 3 3 3 3 3 CIEYxy 3 3 3 3 3 3 3 3 3 3 3 3 3 3 3 3 3 3 YCC 3 3 3 3 3 3 3 3 3 3 3 3 3 3 3 3 3 3- DefaultDevLinkProfile <str:"">
If
DefaultPrinterProfileis not set, this option has no effect. This option specifies a DeviceLink ICC profile whose output color space must match the color space ofDefaultPrinterProfile. If bothDefaultPrinterProfileandDefaultDevLinkProfileare set, all source images whose color space matches the input color space of the DeviceLink ICC profile are matched using the DeviceLink ICC profile.- PreferredCMM <str:"Linotype-Hell">
Determines preferred color matching module.
- RenderingQuality <int:2>
Determines the CMM rendering quality. Its value must be one of
0(normal),1(draft) or2(best).- CheckICCProfiles <bool:TRUE>
Determines whether to generate errors for missing ICC profiles.
- IgnoreUntagged <bool:FALSE>
If
DefaultPrinterProfileis not set orCheckICCProfilesis not active, this option has no effect. Otherwise this option determines whether errors are generated for color source images which are not tagged with an ICC profile and which are not excluded from color matching viaDefaultPrinterProfile.- PureBlack <bool:FALSE>
Determines whether black pixels are excluded from color matching.
- PureWhite <bool:FALSE>
Determines whether white pixels are excluded from color matching.
- PureGrays <bool:FALSE>
Determines whether gray pixels are excluded from color matching.
- PureCMY <bool:FALSE>
This option determines whether pure Cyan, pure Magenta, and pure Yellow pixels are excluded from color matching in CMYK to CMYK conversions. Pure Cyan pixels have 100 percent Cyan and 0 percent for other colors. Pure Magenta pixels and pure Yellow pixels are defined similarly.
- PDFPageBox <crop box>
Determines the page box used in replacement of PDF high-resolution images. Its value must be one of
MediaBox,CropBox,BleedBox,TrimBox, andArtBox.- TagReplacedImages <bool:FALSE>
Determines whether to tag replaced images with an ICC profile where applicable. When this option is active and a printer profile is set, a replaced color image is tagged with the printer or proof profile. When this option is active and no printer profile is set, a replaced color image is tagged with the profile of its source image if and only if no color conversion is necessary.
- IgnoreSpots <bool:FALSE>
Determines whether to ignore all spot colors of source images. If spot colors are not ignored, they are converted to process colors unless the source image has color space CMYK with additional spot color channels and
PreserveDeviceNis active.- CustomColorTinting <bool:TRUE>
Determines whether to generate spot colors for colorized bilevel and grayscale images if the colorization does not require the DeviceN color space. To preserve spot colors when the DeviceN color space is required, both the
CustomColorTintingandPreserveDeviceNoptions must be active.- PreserveDeviceN <bool:FALSE>
Determines whether DeviceN images are generated for source images with color space CMYK and additional spot color channels. If DeviceN images are generated, color matching is disabled.
- ColorAliases <strlist:"">
The list of color name aliases. Color name substitution is applied to process and spot color names from source images and OPI comments. Its syntax is:
<nameA>=<aliasA>,<nameB>=<aliasB>,...- DownSampling <bool:FALSE>
Determines whether downsampling is active. Bilevel images are excluded froom downsampling.
- FixedSampling <bool:FALSE>
If downsampling is not active, this option has no effect. If it is active, this option determines whether upsampling is active.
- FastDownSampling <bool:FALSE>
Determines whether the nearest neighbor algorithm or the mean value algorithm is used for downsampling. The nearest neighbor algorithm is fast and has low quality, the mean value algorithm is slow and has high quality.
- Resolution <double:0.000000>
Determines the resolution for downsampling in dpi. The specified values must be positive.
- ICMethodBilevel, ICMethodGrayscale, ICMethodRGB, ICMethodCMYK, ICMethodCIELab, ICMethodOther <str:"None">
These parameters determine the compression method for images of the corresponding output color space. Their value must be one of
None,Compress,CCITTG4,JPEG,JPEG 2000orFlate.- ICQualityBilevel, ICQualityGrayscale, ICQualityRGB, ICQualityCMYK, ICQualityCIELab, ICQualityOther <double:0.000000>
These parameters determine the quality of JPEG and JPEG 2000 compression for images of the corresponding output color space. Their type is
doublebetween0and100.Valid color space names are:
None,Bilevel,Grayscale,Indexed,RGB,CMYK,Multi,YCbCr,CIELab.Valid rendering intent numbers are:
Perceptual (0)
Relative Colorimetric (1)
Saturation (2)
Absolute Colorimetric (3)
Perceptual with BPC (4)
Relative Colorimetric with BPC (5)
Saturation with BPC (6)
- Note:
-
For a description of how to specify downsampling and output compression features in a printer queue see 12.3.1 “Downsampling and output compression”.
6.7.3 OPI settings for “pdfresolve” via preference
When setting up a dedicated printer queue for the “pdfresolve” workflow (i.e. not printing PostScript) JPEG 2000 may be used. However, for this it is required to set the corresponding preferences manually, e.g.:
# prefvalue -k "Printers/DRUCKER/PostScriptImage/CIELab/CompressPostScript"
               -t str "JPEG 2000"

# prefvalue -k "Printers/DRUCKER/PostScriptImage/CMYK/CompressPostScript"
               -t str "JPEG 2000"

# prefvalue -k "Printers/DRUCKER/PostScriptImage/Grayscale/
               CompressPostScript" -t str "JPEG 2000"

# prefvalue -k "Printers/DRUCKER/PostScriptImage/RGB/CompressPostScript"
               -t str "JPEG 2000"
The CompressPostScript preference is described in the
ImageServer manual in the chapter “OPI-related printer
queue preferences”.
6.8 PDF preflighting with “pdfToolbox”
PDF HandShake includes the callas “pdfToolbox”, a powerful solution for analyzing and preflighting PDF files to ensure that incoming and outgoing PDF files are production compatible. About 800 PDF characteristics are checked, and the results can be displayed in different file formats. Locations in the document that could cause problems are visualized in isolated areas or put out as an ASCII or XML report for automated evaluation. If required, the reports can also be saved as a PDF or HTML file.
The pdfToolbox documentation “callas pdfEngine Reference.pdf” and “callas pdfToolbox CLI.pdf” can be found in the “Documentation” folder in the “HELIOS Applications” volume (Windows: “HELIOS_APPS > Documentation”).
6.8.1 Included sample scripts
We provide the following sample scripts for the HELIOS PDF preflighting functionality:
PDF preflight action script to be applied via a Create PDF Server printer queue. See 11 “Create PDF Server”.
PDF preflight action script to be applied via a Script Server
hot folder. It will use a preflight profile (“*.kfp” or “*.kfpx”)
in the hot folder, if available. This profile will overwrite the
default profile specified in the script Environment
setup. See also the “HELIOS Script Server” chapter in the ImageServer
user manual.
WebShare action script to preflight a PDF document, using callas software’s “pdfToolbox”. See the chapter “WebShare Scripts” in the HELIOS WebShare user manual.
6.8.2 Troubleshooting
Error 1008 Invalid Keycode
This error message is issued if actions are not covered by the pdfToolbox license which is used with the HELIOS software, e.g. if a proof profile that contains so-called “fixups” was used.