9 The standard OPI workflow using PDF files
PDF HandShake is tightly integrated with other HELIOS products. When PDF HandShake is used together with ImageServer, many additional options become available. One option is the use of PDF files in an OPI workflow. Another option, Export for Imposition in Acrobat, is described in 10 “Export for Imposition with ImageServer”.
Placing PDF documents directly into page layouts is not fully supported by many page layout applications. Using PDF HandShake with ImageServer overcomes this limitation, by automatically creating low-resolution EPS “layout” files from the PDF, for placement in a page layout document. At print time, the OPI server replaces each layout image with the original high-resolution PDF page residing on the server.
In addition, layout images (of high-resolution images or PDF documents) can be placed in documents that are saved as PDF. When the resulting PDF file is printed to a HELIOS printer queue with OPI active, once again, the low-resolution layout images will be replaced with the corresponding high-resolution originals.
Using PDF HandShake together with ImageServer enables in-RIP separation workflows using DeviceN color spaces for color objects with arbitrary combinations of CMYK process colors and spot colors.
9.1 Tagging PDF files
PDF files can contain a multitude of objects (images, fonts, line art, etc) in a variety of color spaces (RGB, CMYK, CIE Lab, etc.). In order to successfully print a PDF file, all of the content must, at some point, be converted into the color space of the output device. PDF HandShake does include a high quality CMM (Color Matching Module) for ColorSync ICC based color space transforms. If necessary, PDF HandShake can perform on-the-fly color space transforms to provide proper color matched output for a given device at print time. This on-the-fly conversion has the advantage that the original PDF document is never modified.
In order to achieve optimal color space conversions, it is
important to use the appropriate source ICC profiles (an
output profile is specified for each printer queue). Many
PDF documents do already include ICC profiles, and these
can be used by PDF HandShake. In cases where document
ICC (source) profiles are not included with a PDF file, the
Default RGB Profile and Default CMYK Profile
that have been defined in HELIOS Admin will be used. See
5 “Set up PDF HandShake with HELIOS Admin”.
When printing, these default profiles can be overridden if
desired by means of the PDF HandShake Print dialog,
or via the “pdfprint” command.
When PDF HandShake is used together with ImageServer, the “HELIOS ICC Tagger” program can also be used to tag (i.e. assign or change) source profiles to a PDF document or to image files. If you are not yet familiar with the “HELIOS ICC Tagger” program, you should read the corresponding chapter in the HELIOS ImageServer manual first.
The “HELIOS ICC Tagger” program is located in the “MacOS > OPI Tools” folder in the “HELIOS Applications” volume (Windows: “HELIOS_APPS > Windows”).
If you choose Open Tag Info from the File menu, an empty
window opens so you can drag and drop several files at the
same time into that window. This is shown in
Fig. 9.1.
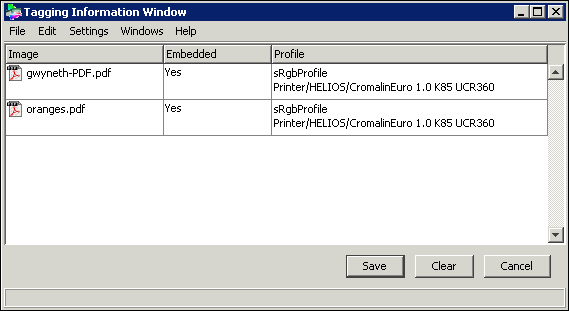
The buttons in the information window serve to either
delete (Clear) all entries or save them into
a text file (Save) for further usage.
Tagging information of an image and the content of the
“!iccinfo.oic” file can also be displayed by selecting the
object via the File > Open menu.
If you wish to create a new ICC info file (for automatic tagging of files), please follow the instructions given in the corresponding chapter of your ImageServer manual. Note that the tagging dialog includes the PDF file format (Fig. 9.2). Unlike “pure” images, such as TIFF or Photoshop files, PDF documents may contain several color spaces. Therefore you should always specify an RGB, a CMYK and a Grayscale profile for the PDF file format.

9.2 About the handling of PDF files (OPI server)
9.2.1 Automatic layout generation
To enable the layout generation for PDF high-resolution files, activate the following options in HELIOS Admin:
Create Layoutsin the volume settings window (OPItab)PDF OPI Layout Generationin PDF HandShake Settings > Layout Settings
If both options are activated, the OPI server will automatically
generate layouts for all PDF files that are saved in the
HELIOS server volume. The specified parameters in the
ImageServer Settings dialog will then be valid for
PDF files as well, e.g.
layout resolution, layout name. See the corresponding chapter in
the HELIOS ImageServer manual for details.
By default, the file format of the PDF layout representations will be EPSF for composite PDF files and DCS for pre-separated PDF files.
The OPI server uses the first page of the PDF documents only to generate layouts. If you have a multi-page document and want to have layouts from several pages, you can use our “pdfcat” tool to split your document into several single-page files. Find more information in 6.1 “pdfcat”.
- Note:
-
You may also use the ImageServer “opitouch” program for the layout generation of PDF documents. “opitouch” is described in the HELIOS ImageServer manual.
PDF files may contain several images, illustrations and text
on one page, meaning that the pages could become very
complex. Depending on the Layout Delay time you have
specified in the OPI Server Settings, and on how complex
the given PDF files are, the generation of layouts can take
some time (in some cases even more than a minute).
9.2.2 PDF-native OPI replacement
This PDF HandShake functionality replaces layout images directly in the PDF document. This is done without the need to convert the PDF document into PostScript first, and then back to PDF. The PDF itself remains unchanged because only the images within the document are replaced. Some more features of PDF OPI resolve are:
Transparencies are preserved
Metadata (e.g. job tickets, XMP) is preserved
It is fast and reliable
- Note:
-
PDF-native OPI resolve requires HELIOS ImageServer to be installed and licensed on the same host.
All settings are configurable by an OPI printer queue:
ICC profiles and output parameters
PDF OPI can be used via command-line tools or “hot folders” to repurpose an InDesign low-resolution PDF job, so that there is no need for multiple exports of an InDesign document for different needs, e.g.:
Optimized for press
Optimized for digital print
Optimized as 144 dpi RGB color matched customer proof
Optimized for archiving with JPEG 2000 image compression
See 12 “PDF-native OPI workflow” for further details.
9.2.3 Resolving OPI comments in PDF files
PDF files can already contain OPI comments. For example, if you design a QuarkXpress document, import some layout images (by reference) into this document, and then print into a PostScript file, the resulting PostScript file contains OPI comments referencing the high-resolution images. The OPI comments can be preserved when distilling the PostScript – depending on the Acrobat Distiller job options you define (see A “Create PDF files using Acrobat Distiller”).
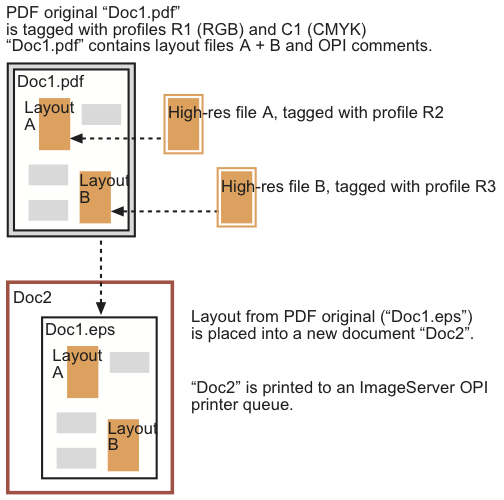
Whenever OPI comments are included in a PDF file, the OPI server tries to resolve these comments. That means that if you place an EPSF layout file (generated from a PDF original) into a layout application and then print your new document, image replacement will possibly be performed recursively: the OPI server replaces the EPSF layout in your document with the PDF original andreplaces the layout files in the PDF document with the respective originals. An example is given in Fig. 9.3 below.
- Note:
-
In the PDF HandShake Acrobat plug-in and “pdfprint” program there are options to switch off OPI image replacement. See
-o noopiin 8.1 “pdfprint” and OPI Settings in 8.2 “Print PDF files using the Acrobat plug-in”.
In the example illustrated below, color matching will also be performed on two different layers. All objects of “Doc1.pdf” that will not be replaced again, will be matched according to the profiles R1 and C1 – depending on the color space of the respective object. The files A and B will be matched according to the image profiles that are tagged to the high-resolution originals (here: profiles R2 and R3).
In certain situations, resolving OPI comments in PDF documents
can cause problems, especially if you send your PDF
documents to another production site. In that case – if the
PDF document contains layout images and OPI comments
pointing to the originals – make sure that you also send these
originals andall the profiles that are needed. Sometimes, it
could be wiser to embed everything in the PDF file and
switch off the option Preserve OPI Comments
in the Distiller (see A “Create PDF files using Acrobat Distiller”).
9.2.4 Pre-separated PDF files and ImageServer
Pre-separated PDF documents are recognized by ImageServer. They are handled as follows:
The “layout” and “pdftoeps” server command line programs generate DCS files with default (depending on the server settings) composite previews which are raster-based. In order to change the screen preview resolution, use the
-Roption (see 6.5 “pdftoeps”). The “layout” program creates single file DCS-style layout images while the “pdftoeps” program creates DCS-1 or DCS-2 style multi-file images. The plate file suffixes for CMYK will be .C, .M, .M, and .K. Spot color plate files will be assigned other suffixes, namely letters so far unused in alphabetical order. The suffix does not have any relation to the name of the spot color.Printing separations of documents containing placed layouts of pre-separated PDF files to an OPI printer queue with image replacement is fully supported for all output devices.
- Note:
-
Composite printing of documents containing placed layouts of pre-separated PDF files to a Print Preview queue will lead to blank picture boxes in the preview.
9.3 OPI layout images of PDF files
9.3.1 PDF shading support
PDF HandShake features full shading support.
9.3.2 Options for the “layout” program
The “layout” program (see the respective chapter in the ImageServer manual) offers some options which relate to OPI layout generation of PDF files.
- -o PDFPageBox <str:"CropBox">
This option can be used to override the default PDF preference PDFPageBox which is described in 14 “Preferences”.
- -o PDFNativeWorkflow <boolean:FALSE>
Enforces the generation of PDF-native workflow compatible layout images from vector-based EPS images, even if TIFF layout images are supposed to be generated, e.g. via a “%t” folder syntax.
- -o ImageProfilePaths <strlist:"">
If PDF input files are not yet tagged with ICC profiles, this parameter can be set for attaching a profile to the RGB, CMYK or Grayscale objects within the document. Each string has the format
<color space>=<Pathname>and defines the ICC profile path name for the given color space. This setting overrides the default profiles in the HELIOS AdminPDF HandShake Settings.- -o PureWhite <boolean:FALSE>
This option can be used to override the default PDF preference PureWhite which is described in 14 “Preferences”.
- -o PureGrays <boolean:FALSE>
This option can be used to override the default PDF preference PureGrays which is described in 14 “Preferences”.
- -o PureBlack <boolean:FALSE>
This option can be used to override the default PDF preference PureBlack which is described in 14 “Preferences”.
- -o PureCMY <boolean:FALSE>
This option can be used to override the default PDF preference PureCMY which is described in 14 “Preferences”.
- -o PureVectorWhite <boolean:FALSE>
This option can be used to override the default PDF preference PureVectorWhite which is described in 14 “Preferences”.
- -o PureVectorGrays <boolean:FALSE>
This option can be used to override the default PDF preference PureVectorGrays which is described in 14 “Preferences”.
- -o PureVectorBlack <boolean:FALSE>
This option can be used to override the default PDF preference PureVectorBlack which is described in 14 “Preferences”.
- -o PureVectorCMY <boolean:FALSE>
This option can be used to override the default PDF preference PureVectorCMY which is described in 14 “Preferences”.
- -o PDFTransparency <boolean:FALSE>
This option can be used to override the default PDF preference PDFTransparency which is described in 14 “Preferences”.
9.3.3 Attributes for “layout” options
The attributes are entered as command line options using
the layout -o Attributes=<attributes>=<value> syntax.
Additional attributes are delimited by commas.
- AntiAlias <boolean:TRUE>
This PDF only attribute smooths the screen preview. It can be used to override the default PDF preference AntiAlias which is described in 14 “Preferences”.
- PageNumber <uint32:1>
This attribute lets you specify a certain page of a PDF document for the layout process.
- TextQuality <str:"high">
Determines the text rendering quality when PDF is converted to raster images. It can be set to override the PDF preference TextQuality which is described in 14.2 “PDF manager preferences”.