3 Proofing via WebShare
PrintPreview allows proofing images, PDFs, and documents in all aspects regarding completeness and accuracy of page elements, correct colors, typography, and font usage. This manual covers the modes of proofing:
Remote soft proofing on a suitable monitor via HELIOS WebShare (see 3.1.5 “WebShare monitor proofing support”)
Remote print proofing via HELIOS WebShare (see 3.1.6 “WebShare print proofing support”)
Proofing via a “Print Preview” printer queue (see 4.1 “Set up PrintPreview with HELIOS Admin”)
3.1 Remote Proofing
Together with HELIOS WebShare, PrintPreview allows remote soft proofs on the monitor and color-matched proof prints from the web browser. Therefore, the images are matched by use of ICC profiles for the proof monitor or printer.
3.1.1 Global ICC profiles
To make ICC profiles available for any user, copy your ICC profiles to the
“.Proof-Profiles/Monitor” and “.Proof-Profiles/Printer” folders in the root
directory of the “WebShare Public” sharepoint. Monitor ICC profiles will be
selectable in the proof window for soft proofs in the Monitor ICC Profile
pop-up menu, printer ICC profiles will be applicable for proof prints in the
Printer ICC Profile pop-up menu on the WebShare proof page.
- Note:
-
For this feature the “WebShare Public” sharepoint must be published.
3.1.2 Proofing images and document pages

-
In the preview image window select
Prooffrom theFile >menu.
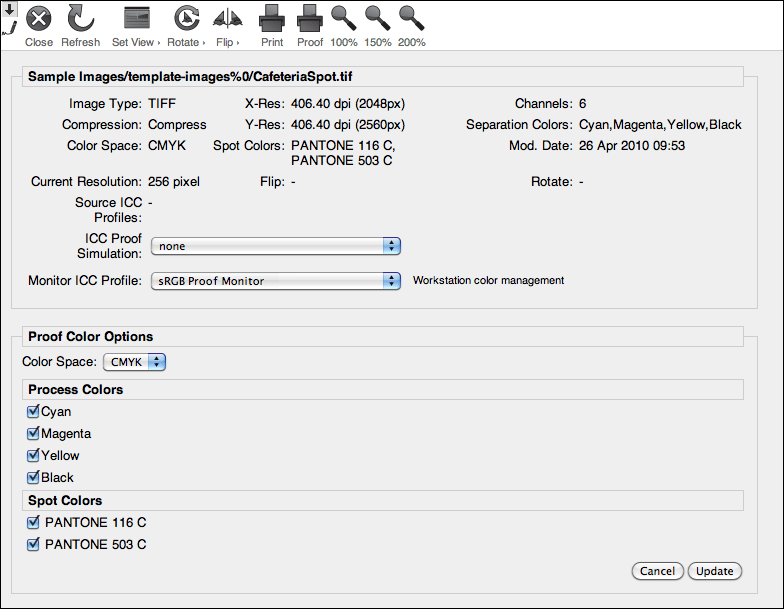
The proof window contains detailed information on the image file (Fig. 3.1).
-
From the
Monitor ICC Profilepop-up menu select a monitor ICC profile (which can be uploaded according to the description in the “Server Preferences” chapter in the HELIOS WebShare manual) to view an accurate ICC color-matched preview for the used monitor.
-
From the
ICC Proof Simulationpop-up menu select a proof simulation profile to view an accurate ICC color matched preview of the specified output. See also 3.1.5 “WebShare monitor proofing support”.
A click on the arrow in the upper left corner allows toggling the toolbar and image information between visible and hidden.
The Set View toolbar icon contains besides items, which are already known
from the preview mode, the predefined zoom levels Zoom 5 to Zoom 9.
In the toolbar, on the right side, you will find
the zoom level icons 100%, 150%, and 200%.
The Print toolbar icon opens the “Print Settings” dialog which basically
offers the same settings as the “Print Settings” dialog in the preview mode (see WebShare manual),
but offers in addition the Printer ICC Profile pop-up menu which allows
selecting a print profile (if you select none, the color management is done
on the workstation, any other selected profile from this pop-up menu makes the color management
server-based), and the Print Image Information checkbox which
includes image information in the printout.
The Proof toolbar icon opens the “Proof Print Settings” dialog which
offers similar settings as the “Print Settings” dialog but lacks the Page Content
checkboxes. In addition, this dialog features the Control Graphic pop-up menu
which allows you to select a control graphic that is added to the proof printout and its position
relative to the printed object, and a text field Title allows editing the
document title. The “Proof Print Settings” dialog is described in detail in 3.1.6 “WebShare print proofing support”.
3.1.3 Proofs of multiple document files
It is possible to open several files at a time in proof view.
-
In the sharepoint, select the files that you wish to proof by checking the corresponding checkbox adjacent to the files. Then select
Prooffrom theFilemenu. If no files are selected, all directory items that are available in the proof view are opened.
The first preview is displayed, and the other(s) can be selected
from a pop-up menu or via the  and
and
 buttons.
3.1.4 Proofs of multiple-page documents
For multiple-page documents the first displayed page is opened in the proof
window by default. You can select the pages to be proofed by entering the
desired page number and pressing the ENTER key or the “Refresh” button of
the toolbar or you can flip the pages forward and backward, similarly to
the page navigation tool in Fig. 3.2. Or you can select
the page that should be proofed by clicking on it in the multi-column preview
and then select File > Proof from the toolbar. You can then flip
through the pages in proof mode as described above.

3.1.5 WebShare monitor proofing support
WebShare monitor proofing can be achieved either via workstation-based or server-based color management:
WebShare supports ICC color-matched proofs for all supported image formats and PDF documents within the separate WebShare proof window. The proofs are PNG true color based and represent the original color or simulate a printing process according to a specified ICC output profile. The Safari Browser on Mac and Windows supports true color images with a tagged ICC profile.
The WebShare server settings (Administration > Server
Preferences) allow specifying a comma-separated list of ICC
profiles for proof simulation. The remote user can then select
the desired output profile within the proof window. The proof
simulation is done on the WebShare File Server. All proofs are
represented by an embedded sRGB v4 profile which allows browser
adjustments to sRGB colors on the remote monitor.
The proof image generation can be customized within the “wspreview.pl” script. This allows e.g. custom rendering intents, BPC (Black Point Compensation) options, pure Black/White/Gray/CMY options, custom ICC printer and monitor profile combinations.
Accurate proofs on a remote monitor:
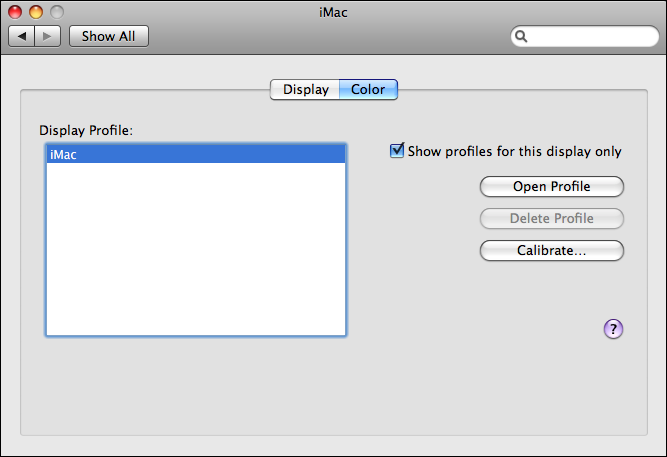
a) Safari on Mac
-
Create a custom monitor profile for the proof monitor and select it from the
Colortab in “System Preferences > Displays” (Fig. 3.3).
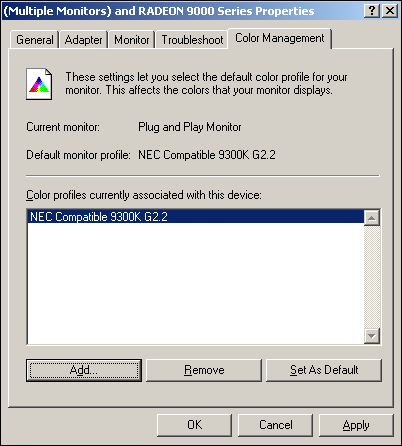
Safari on Windows
-
Create a custom monitor profile for the proof monitor and select this from the
Color Managementtab (Fig. 3.4) in “Settings > Advanced > Color Management”.
b) Color matching using Photoshop
-
Use Photoshop and a calibrated monitor. Drag and drop the image from the WebShare proof window onto the Photoshop program icon (or drag the image to the Desktop and open it with Photoshop).
Photoshop will automatically detect the embedded profile and ask how to proceed. Select the “Use the embedded profile …” option.
c) Non-Safari browsers
-
Use an sRGB color matched monitor.
The browser will display the sRGB v4 matched images and the monitor will present the correct proof.
Accurate proofs from bitmap images:
All Gray/RGB/CMYK images should be tagged with an
ICC source profile that represents the image. Embedded
sRGB EXIF references from digital cameras are detected
and used. CIELab TIFF images are assumed with a D50
white point. Non-tagged RGB images are assumed as
sRGB v2, non-tagged CMYK images are assumed to be
identical with your selected ICC proof profile.
To receive accurate proofs from PDF files:
PDF non-ICC tagged CMYK colors and images are
assumed to be represented according to the ICC output
profile. Untagged RGB colors and images are assumed to
be sRGB. Embedded ICC color spaces with profiles are
converted to the proof output color space. Pure
Whites/Gray/Black vector objects are preserved. Additional
customization of the “wspreview.pl” scripts allows
special rules, e.g. ignoring embedded profiles and using custom
rendering intents.
- Note:
-
Only the WebShare proof window will generate true color PNG-based proofs with embedded ICC sRGB v4 profiles. These proof images have a significantly larger file size compared to the file preview JPEG previews.
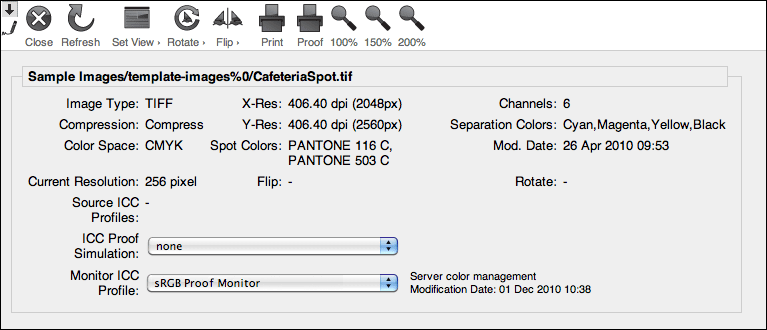
Another possibility is to inform the WebShare File Server about the used proof monitor. This is achieved by uploading an appropriate monitor profile to the server so the document gets already color matched on the server and is sent to the client. This method is more accurate than the workstation-based method because it omits the intermediate step via the standard “sRGB v4” profile.
-
Create an ICC profile that is appropriate for your proof monitor.
-
Open the “My User Preferences” page.
-
Upload the profile to the WebShare File Server using the
Add
Monitor Profile
button.
-
From the
Default Monitor Profilepop-up menu, select this profile as the default profile.
3.1.6 WebShare print proofing support
When clicking the Proof toolbar icon on the WebShare
proof window (see Fig. 3.1),
WebShare offers printing the current proof view on a
local printer (see Fig. 3.5).
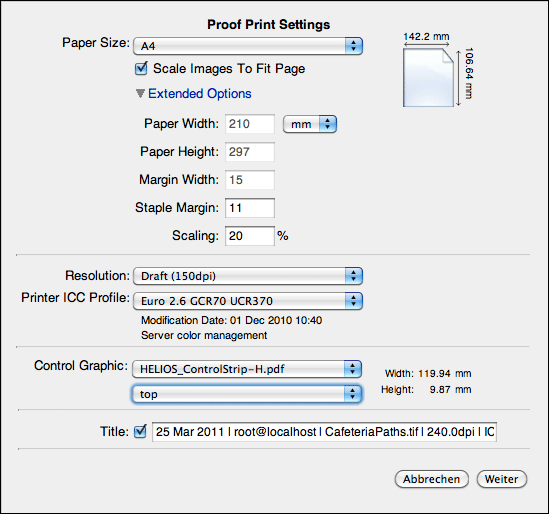
The desired paper format can be used (see 3.1.7 “Paper formats”). The values
Page Width, Page Height, and Margin Width
will be set according to the selected entry. When selecting the Custom...
entry, Page Width, Page Height, and Margin Width
can be entered manually. Staple Margin adds the specified value on top and
to the left in addition to the specified Margin Width. Scaling
defines the scale factor of the printed image. The Scale Image To Fit Page
button computes the largest scaling possible for the selected paper format.
- Note:
-
If you check the
Scale Images To Fit Pageoption, the chosen scaling factor may be overriden.
The desired printing resolution can be selected here. The options Draft,
Good, Excellent and Super Fine as well as custom
values are available (see the “Branding Editor” description in the HELIOS WebShare manual).
An ICC profile for color matching can be selected (“Server color management”). none includes
the server default ICC profile (“Workstation color management”).
A color chart (see 3.1.8 “Proof graphics”) can be selected from this pop-up menu. The proofing sample print control strips “HELIOS_ControlStrip-H.pdf” and “HELIOS_ControlStrip-V.pdf”) are included. In addition, you can specify its position relatively to the printed object.
By default, the Title text field already suggests
the document print information creation date, user, document
name and page, resolution, and modification date. This information
is not printed if you uncheck the option. If a scaling different from 100% is selected,
this information goes also in the title string.
3.1.7 Paper formats
Paper formats can be defined in the “Paper-Formats.txt” file in the
“Proof-Templates” folder of the “WebShare Public” sharepoint. They can be
selected in the Paper Size pop-up menu in the WebShare proof settings.
To add an entry to the Paper Size pop-up menu, just add or edit
a line in the “Paper-Formats.txt” file. WebShare expects one format definition
per line, lines starting with # will be ignored. Each line has the format:
<name>TAB<width><unit>TAB<height><unit>TAB<margin><unit>
<name> can be any string but must not contain tabulators.
<width>, <height> and <margin> can
be unsigned integers or unsigned decimal numbers (“.” or “,” are allowed
for decimal numbers).
<unit> can be “mm” (millimeter),
“cm” (centimeter) or “inch” (inch).
- Note:
-
For this feature the “WebShare Public” sharepoint must be published.
3.1.8 Proof graphics
Color charts and control graphics for proof prints can be saved to
the “Proof-Templates” folder of the “WebShare Public” sharepoint. Then these files
will be selectable in the Control Graphic pop-up menu on the WebShare proof
page and are printed according to the value selected in the
Control Graphic Position pop-up menu. All supported image
formats and PDF documents can be used.
- Note:
-
For this feature the “WebShare Public” sharepoint must be published.
3.1.9 Proofing separation plates and spot colors
WebShare offers support for separation plate proofing, including spot colors:
-
Open the toolbar item
Set Viewand choose theProof Color Optionsentry.
-
Select the desired color space from the
Color Spacepop-up menu.The section “Proof Color Options” lists all process colors and spot colors that are available in the document (Fig. 3.6). A checkbox for each available separation plate allows switching the proof color on or off:
-
Select or deselect the checkbox(es) for the proof color and click the
Updatebutton to make the changes visible.- Note:
-
An entry must be selected in the
ICC Proof Simulationpop-up menu.
3.1.10 Annotations and Color Info feature
The “Annotations” feature allows attaching annotations to all file formats that can be previewed with WebShare. It tracks document versions and allows signing off ready-to-go documents.
The “Color Info” feature is similar to the Photoshop color info and shows the individual primary color and spot color values used in the selected area
Both features are described in the HELIOS WebShare manual, in the “Image and document previews” chapter.