4 The IT Monitor app
4.1 Set up the IT Monitor app

-
Load the free IT Monitor app from Apple's App Store to your iPhone.
-
Open the IT Monitor app.
4.1.1 Add server
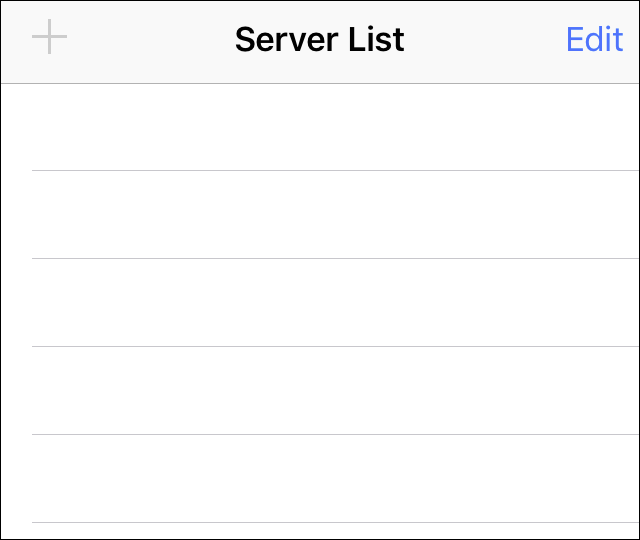
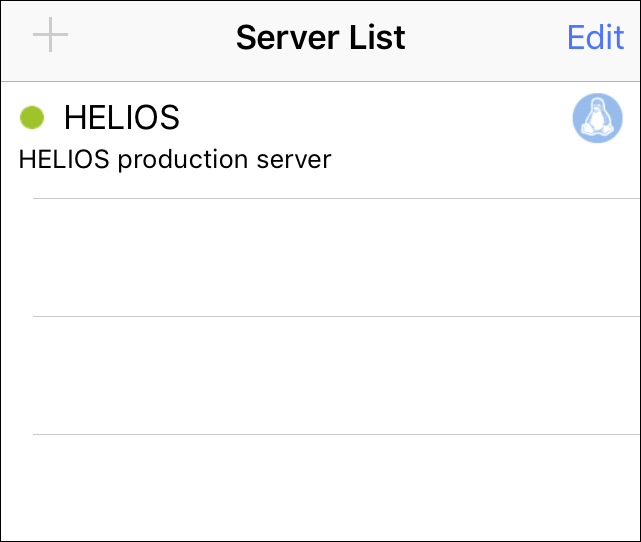
Initially, the “Server List” window is empty (Fig. 4.1).
-
Tap on
 and then on the
  icon.
icon.
-
In the “Server Info” window (Fig. 4.2), fill in all required server settings.
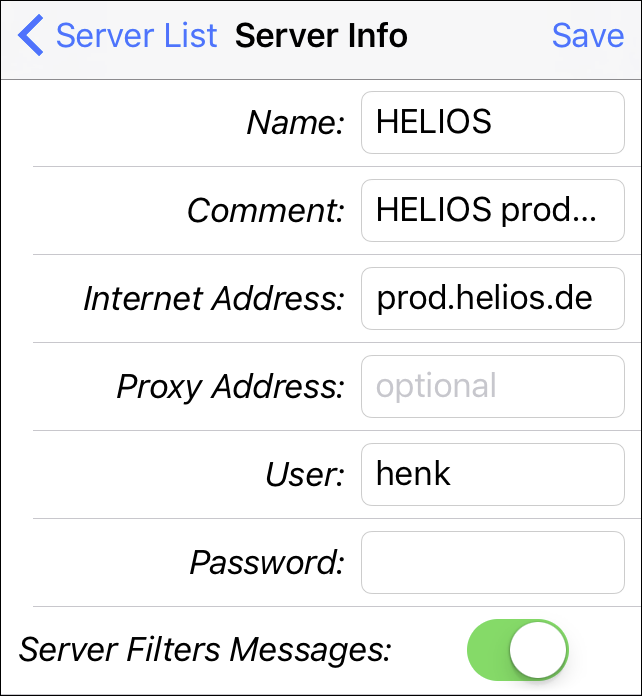
The Server Filters Messages slider allows the user to define whether
the server (“monitorsrv”) should filter the messages before they are transferred
to the IT Monitor app. See 3.1.1 “Filter system messages” for more information.
- Important:
-
If you wish to connect to the specified IT Monitor server via a proxy server,
Internet Addressmust be defined from the proxy server's view, e.g. a network internal host name or IP address may be necessary. If the server host name is used, make sure that the proxy server can resolve this host name. Otherwise an error (Error while resolving “<proxy name>: Unknown host”) is issued upon verification! In this case, specify the host's IP address.
-
In the “SEND NOTIFICATIONS” section select in which manner “monitorsrv” should issue notifications (Fig. 4.3). The default behavior is
Always.
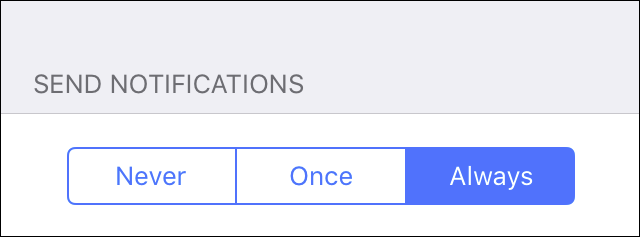
| Never | No notification is issued upon alarm messages |
| Once | A notification is issued after the first alarm message. Subsequent alarms will not issue further notifications (until the IT Monitor app is started) |
| Always | A notification is issued upon each alarm message |
-
Tap on
 to accept all settings you entered
in the “Server Info” window, and back in the “Server List” window tap on
to accept all settings you entered
in the “Server Info” window, and back in the “Server List” window tap on
 .
.
Now the new server entry is scheduled in the server list. The icon to the right indicates the server platform (see Fig. 4.8).
The complete list of iPhone server configuration settings can easily be transferred to other iPhones. This could be advantageous if e.g. the manager wants to distribute monitoring tasks to their employees, without the need for the employees to set up and configure the server list again on each of their iPhones.
-
In the “Server List” window, change into the edit mode and tap on
in the bottom menu.
-
Tap on
Copy(Fig. 4.4).

-
Paste the copied information into your iPhone e-mail program (e.g. “Mail”) and send it to the desired iPhone clients.
The recipients only need to copy the mail body from their iPhone, navigate
to the “Server List” window, change into the edit mode, tap on
in the bottom menu, and then on Paste.
The server list has now successfully been transferred from one iPhone to others.
- Important:
-
For security reasons, the password for each server still needs to be entered in the
Passwordfield before using the posted configuration!
4.1.2 Remove server from the list
-
In the “Server List” window, change into the edit mode and tap on
.
-
Then tap on the
 icon adjacent to the
server that you want to delete from the list, and confirm the deletion
by tapping on
icon adjacent to the
server that you want to delete from the list, and confirm the deletion
by tapping on  .
.
4.1.3 Specify limits
-
Tap on
and then on the desired server entry.
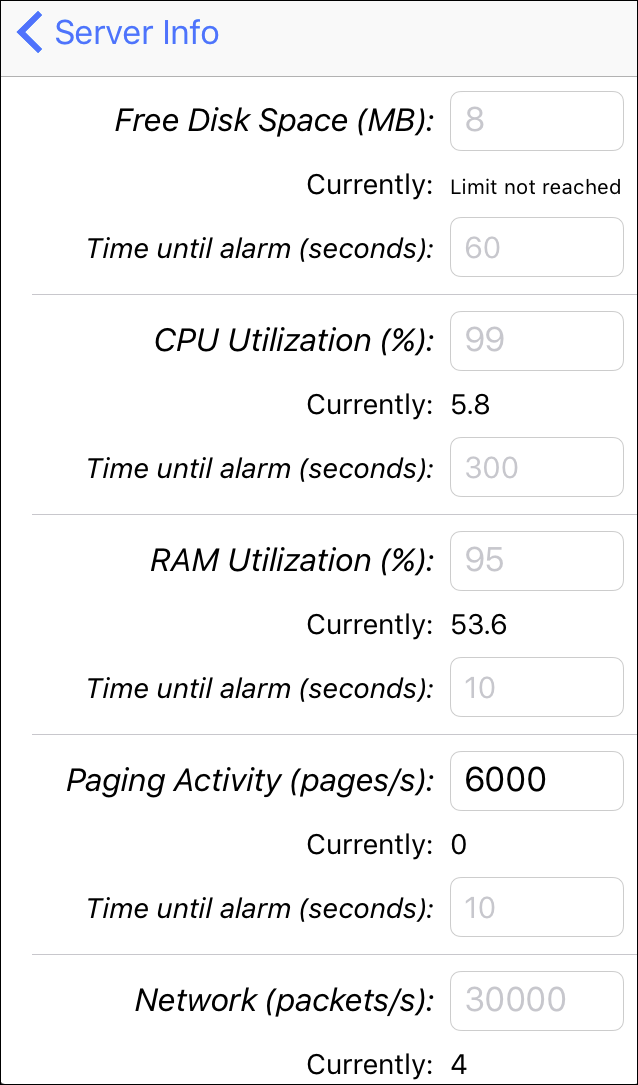
The “SERVER SETTINGS” section allows defining general and file system (volume) limits that build the base for alarms and messages.
Free Disk Space (MB)
Allows defining the minimum free disk space limit below which an
alarm is issued after the time span specified in the Time until
alarm (seconds) entry. This defines the default value for all mounted
file systems. Different values can be specified for individual file
systems, by scrolling down to the “File System Limits” screen.
The corresponding “monitorsrv” preference is MinDiskFreeSpace
(default is 8 MB). The time until alarm is controlled
by the MinDiskFreeSpaceDur preference (default is 1 minute).
CPU Utilization (%)
Allows defining the maximum CPU utilization limit above which
an alarm is issued after the time span specified in the Time
until alarm (seconds) entry. This value specifies the percentage (1-99
%) of the total amount of available CPU.
The corresponding “monitorsrv” preference is MaxProcessorUsage
(default is 99 %). The time until alarm is controlled
by the MaxProcessorUsageDur preference (default is 5 minutes).
RAM Utilization (%)
Allows defining the maximum RAM utilization limit above which
an alarm is issued after the time span specified in the Time
until alarm (seconds) entry.
The corresponding “monitorsrv” preference is MaxMemoryUsage
(default is 95 %). The time until alarm is controlled
by the MaxProcessorUsageDur preference (default is 10 seconds).
Paging Activity (pages/s)
Allows defining the maximum number of pages limit above which
an alarm is issued after the time span specified in the Time
until alarm (seconds) entry.
The corresponding “monitorsrv” preference is MaxMemoryPages
(default is 2000/s). The time until alarm is controlled
by the MaxMemoryPagesDur preference (default is 10 seconds).
Network (packets/s)
Allows defining the maximum number of network packets limit above
which an alarm is issued after the time span specified in the Time
until alarm (seconds) entry.
The corresponding “monitorsrv” preference is MaxNetworkPackets
(default is 30000/s). The time until alarm is controlled
by the MaxNetworkPacketsDur preference (default is 1 minute).
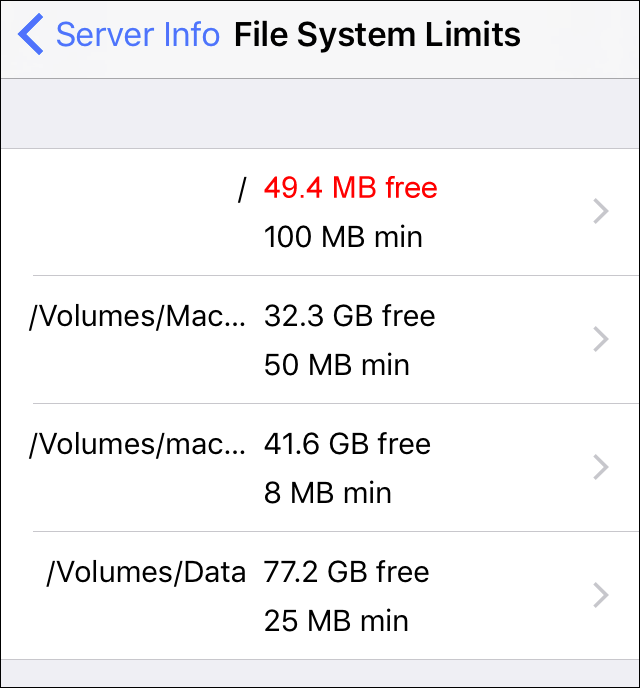
Scrolling down, all file system and HELIOS volume limits are displayed (Fig. 4.6).
“File System Limits” shows, for each file system, the minimum free disk space limit defined, and the current free storage space.
-
Tap on a list entry to change the
Min Free Space (MB)setting for the corresponding file system.
In addition, this window lists all shared HELIOS volumes including their Mac and Windows export name.
In the example in Fig. 4.6, the free storage space for each file system on “HELIOS” should not fall short of 100 MB. The currently free disk storage space for the “/” directory is tinted in red because it has fallen below the limit.
4.1.4 Add service
Available services are listed in the chapter 4.3 “IT Monitor observed services”.
-
Tap on
and then on the desired server entry.
-
Scroll down to the “Server Settings” section and tap on
Services.
-
Tap on
to create a new service, or tap on an
existing service entry to edit an existing service (Fig. 4.7
left).
- Note:
-
If the service uses a non-default port it is necessary to specify the proper port number in the
Hostentry field, e.g.helios.de:1234
The Options field allows specifying options for a self-defined
script, which are used by that script, e.g. pages=5. However,
entries in this field are not used by sample scripts that were automatically
installed.
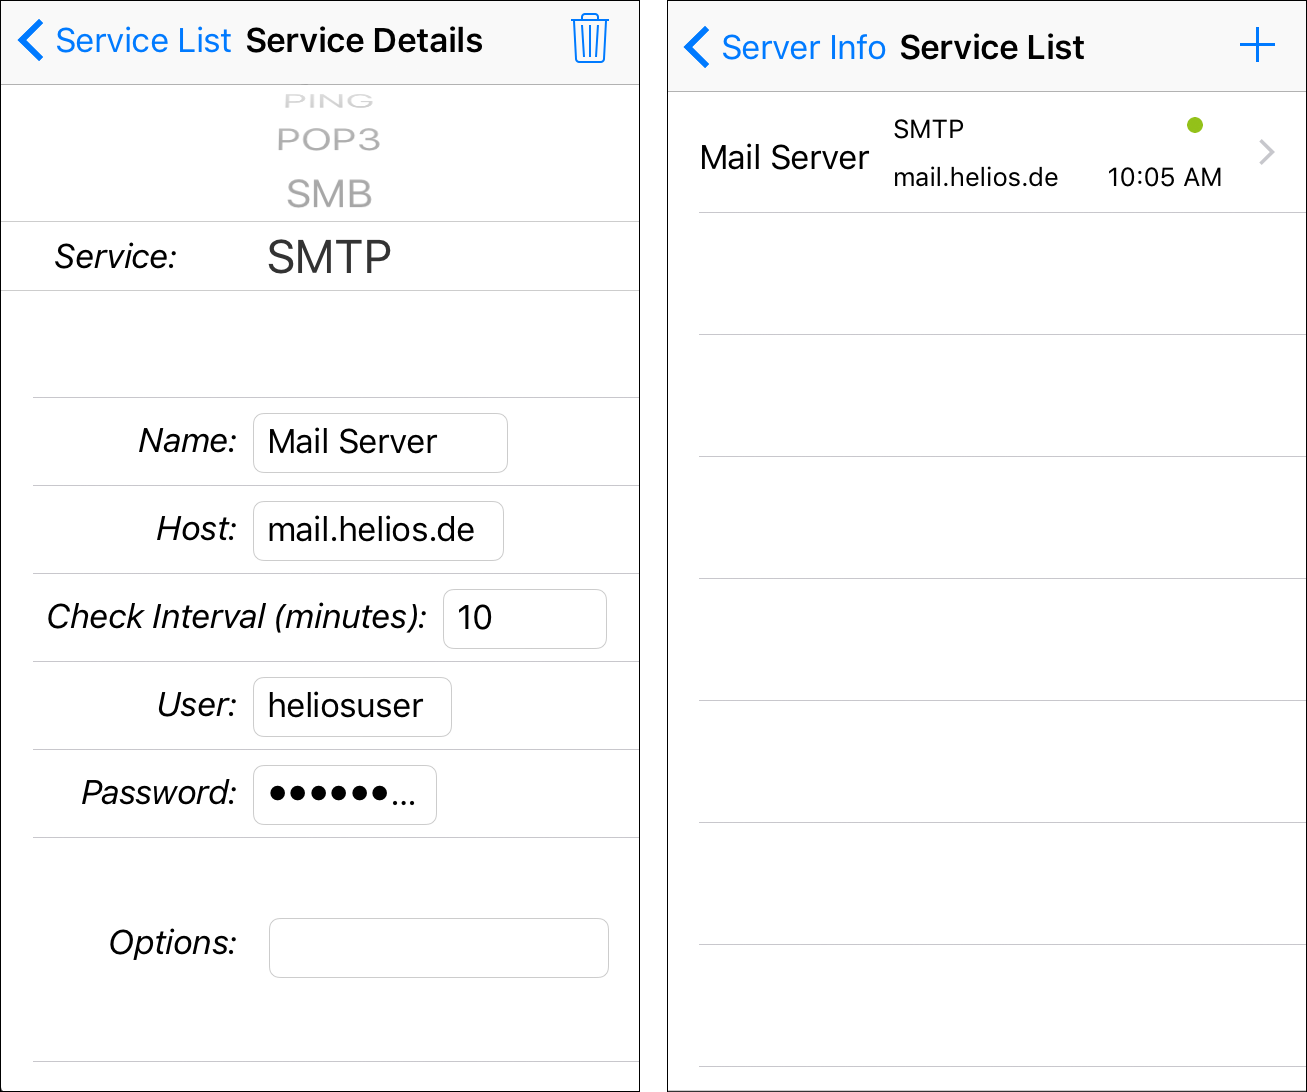
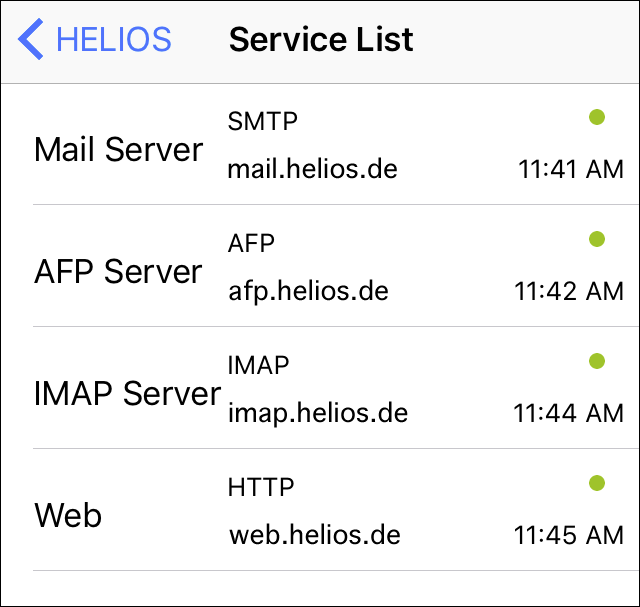
Now the new server entry is scheduled in the “Service List” (see Fig. 4.7 right).
-
Tap on
and then on the desired server entry.
-
Tap on the service that you wish to remove.
-
In the “Service Details” window tap on the
 icon.
icon.
The service is immediately removed from the list and the “Service List” overview is displayed (now without the just deleted service).
4.1.5 Set up e-mail list
Each user that is on this list with their e-mail address will receive a notification in case an alarm message is issued by IT Monitor Server.
-
Tap on
and then on the desired server entry.
-
Scroll down to the “Server Settings” section and tap on
Email Listto specify one or more e-mail addresses that should be notified in case of an alarm message.
4.2 Using the IT Monitor app
4.2.1 Server status overview
The “Server List” window gives an overview of all servers that have been configured to be handled by the IT Monitor app (Fig. 4.8). The status icon adjacent to the server name can display three different colors:
 |
(Green) | OK (all services up; no alarms) |
 |
(Yellow) | Cannot connect to host or host is not answering |
 |
(Red) | Failure of the monitored service or other alarms pending |
-
Tap on
 to refresh the display information.
-
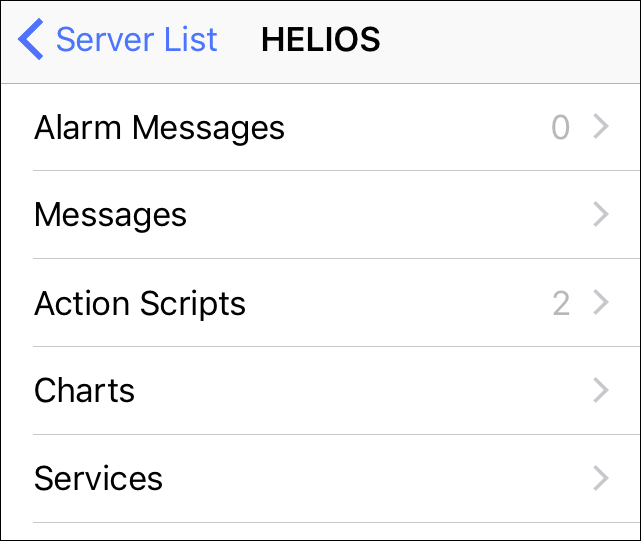
Tap on a server entry to get a summary of all charts, services, scripts, and messages that are issued by this particular server (Fig. 4.9).
-
Tap on
 to return to the “Server List” window.
- Note:
-
By default, all host users with server login credentials are permitted access. However, this might not always be desired. The Users preference (see 8 “Preferences”) allows creating a list of users who are permitted to monitor the server. All other users are not allowed even if they know the correct server password. There is an exception from this rule: “root” and members of the “SysAdm” and “ITMAdm” groups can always log in and can also do administration via their iPhones, i.e. change server settings that affect all users. For example, specifying the CPU load limit from which an alarm should be set.
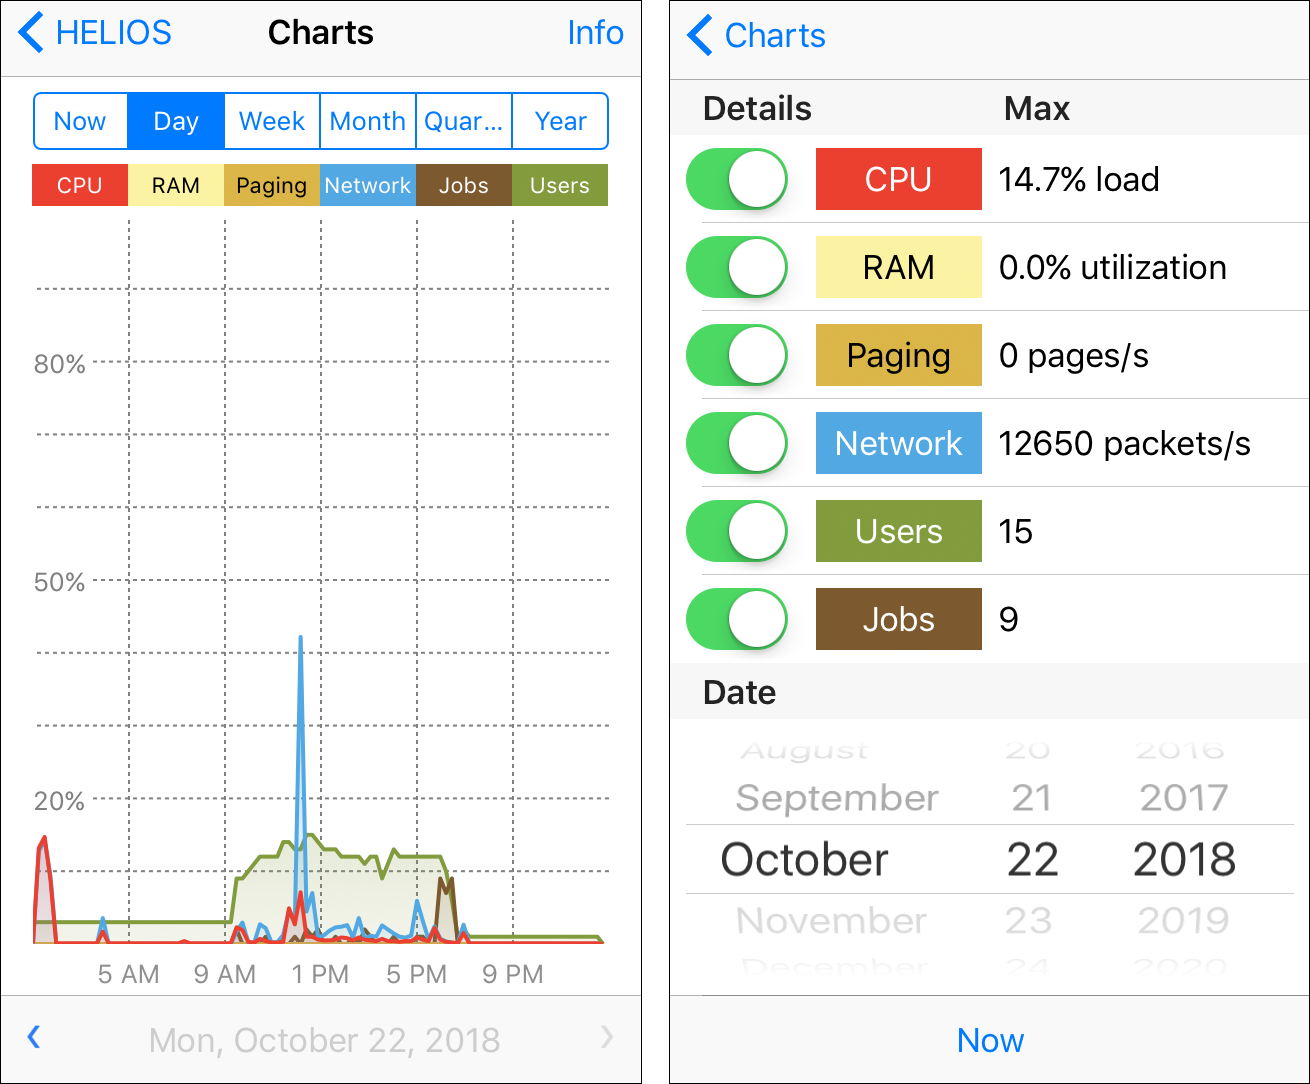
4.2.2 Charts
Displays the load of CPU, RAM, Paging, Network, Jobs and Users usage on this server (see Fig. 4.10 left).
-
Tap on
to update the charts.
Zoom into a chart:
-
Rotate the iPhone by 90 degrees to get into the landscape view. In this view, touch the screen with two fingers and slide them apart to “stretch” the chart.
Move a day/week/month/quarter/year forward or backward:
-
Tap on
 to move one day back, or
 to move one day forward.
See charts in detail:
-
Tap on
 in the upper right to display the
peak values in the monitored period (see “Max” column in Fig. 4.10
right).
in the upper right to display the
peak values in the monitored period (see “Max” column in Fig. 4.10
right).
A particular day may also be specified in the “Date” section.
All chart filters:
Now |
The past half an hour | CPU |
CPU usage chart |
Day |
Current day | RAM |
Amount of RAM used |
Week |
Current week | Paging |
Number of Pages/sec |
Month |
Current month | Network |
Number of Packets/sec over the net |
Quarter |
Current quarter | Users |
Number of logged-in users |
Year |
Current year | Jobs |
Number of Jobs/sec |
-
Tap on the buttons (
Now…Year) to filter the charts by the desired timespan.
-
Set the sliders (
CPU…Jobs) in the “Details” column to filter the charts by the desired type. By default, all charts are concurrently displayed (Fig. 4.10).
4.2.3 Services
Displays all defined server services (Fig. 4.11). See 4.3 “IT Monitor observed services” for further details on the IT Monitor server supported services.
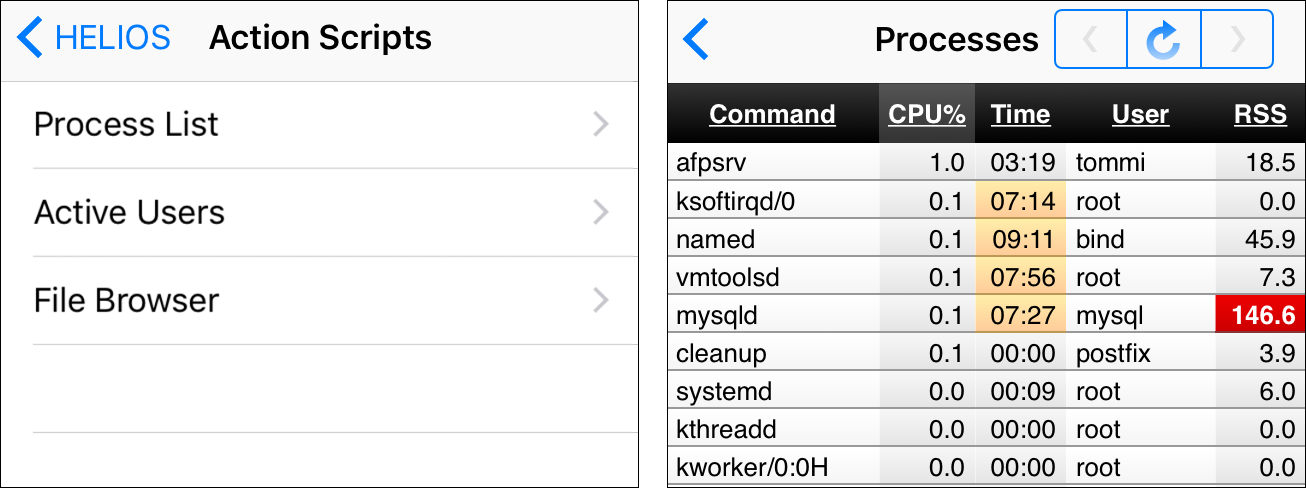
4.2.4 Action Scripts
Displays all configured action scripts on the server (Fig. 4.12 left). Section 4.4 “Server actions” gives details on the IT Monitor server supported actions. The example below (Fig. 4.12 right) shows the output of the process list action script, where entries highlighted red and orange indicate different warning levels whose thresholds are defined, and can be adjusted, in the script.
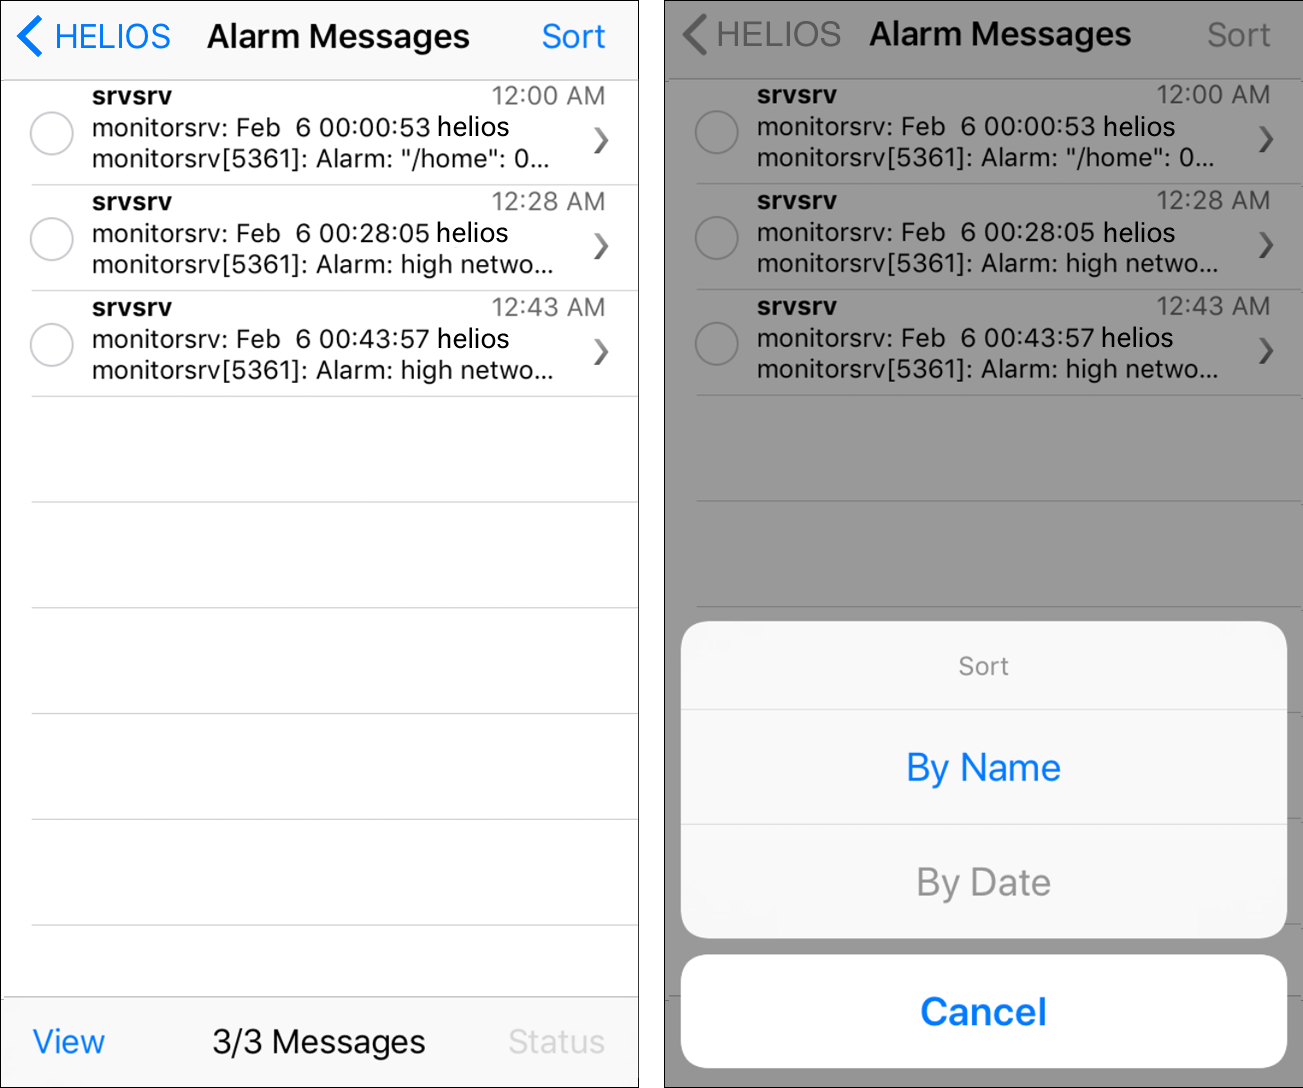
4.2.5 Messages
The IT Monitor app filters all messages by their type or time of issue, and sorts them into “Alarm Messages” or “Today”, “Yesterday”, and “This Week”.
The following figure shows the Alarm Messages for
the server “HELIOS” (Fig. 4.13 left).
If the list is longer than the screen can display, a tap on the lower toolbar
scrolls the list down to its end. Likewise, a tap on the status bar (where
the time is displayed) makes the list jump to its beginning. A tap on the
server name (in our example  ) takes the
user back to the messages overview.
) takes the
user back to the messages overview.
Displays all messages of the day, beginning at 12 a.m.
Displays all messages of the past day.
Displays all messages of the current week, beginning with Monday at 12 a.m.
Tapping on  opens a menu which allows the user
to select the sort order (Fig. 4.13 right).
Messages can be sorted by either date or name.
opens a menu which allows the user
to select the sort order (Fig. 4.13 right).
Messages can be sorted by either date or name.
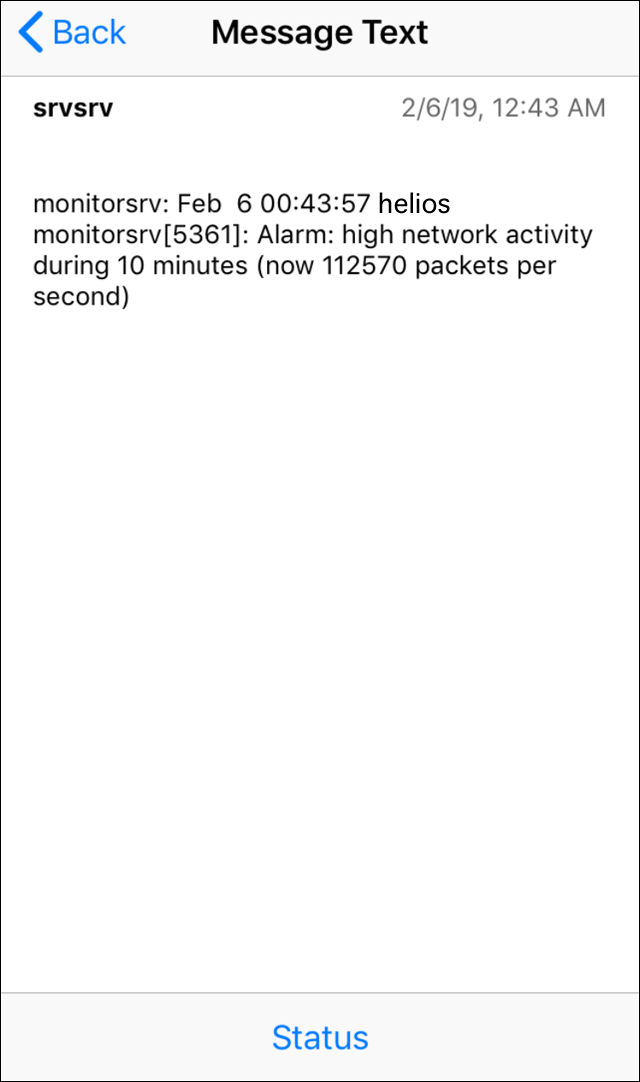
If a message is displayed truncated in the messages list, it is larger
than the designated space. The whole message is opened by tapping
on the corresponding  icon (see Fig. 4.14).
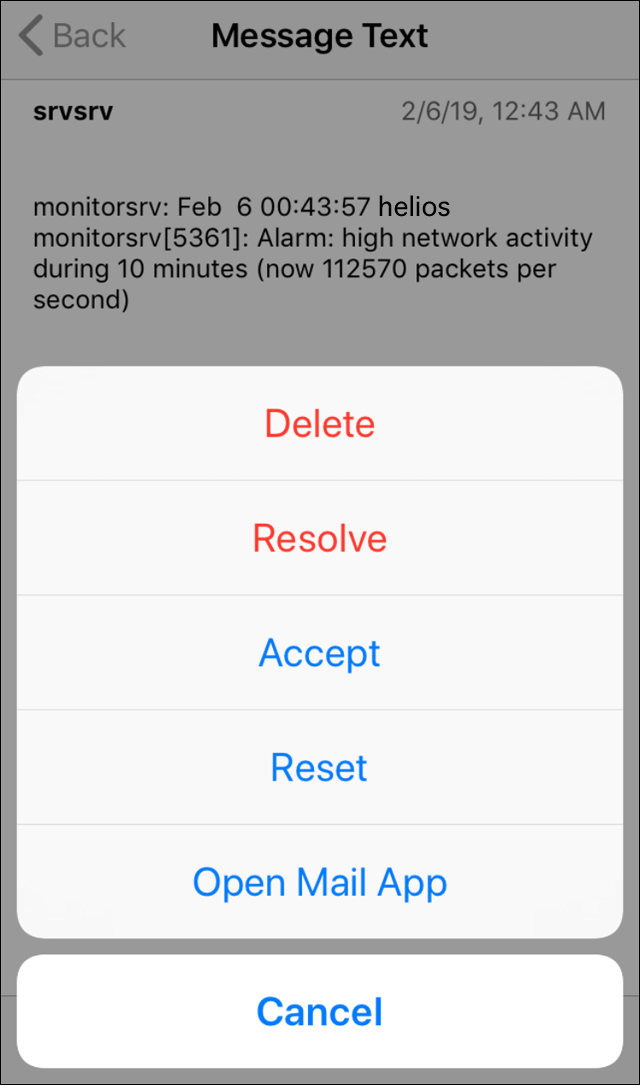
Tapping on ![]() allows the user to either
delete, resolve, accept, or reset
the message. In addition, the message text can also be sent by e-mail,
using the
allows the user to either
delete, resolve, accept, or reset
the message. In addition, the message text can also be sent by e-mail,
using the Open Mail App entry (see Fig. 4.15).
It may also be searched for particular services (e.g. “monitorsrv”):
-
Enter your search term into the search field which is located above the first message. (The search field becomes visible when tapping on the status bar.)
Matching results are already displayed as the search term (Fig. 4.16 left) is being entered.
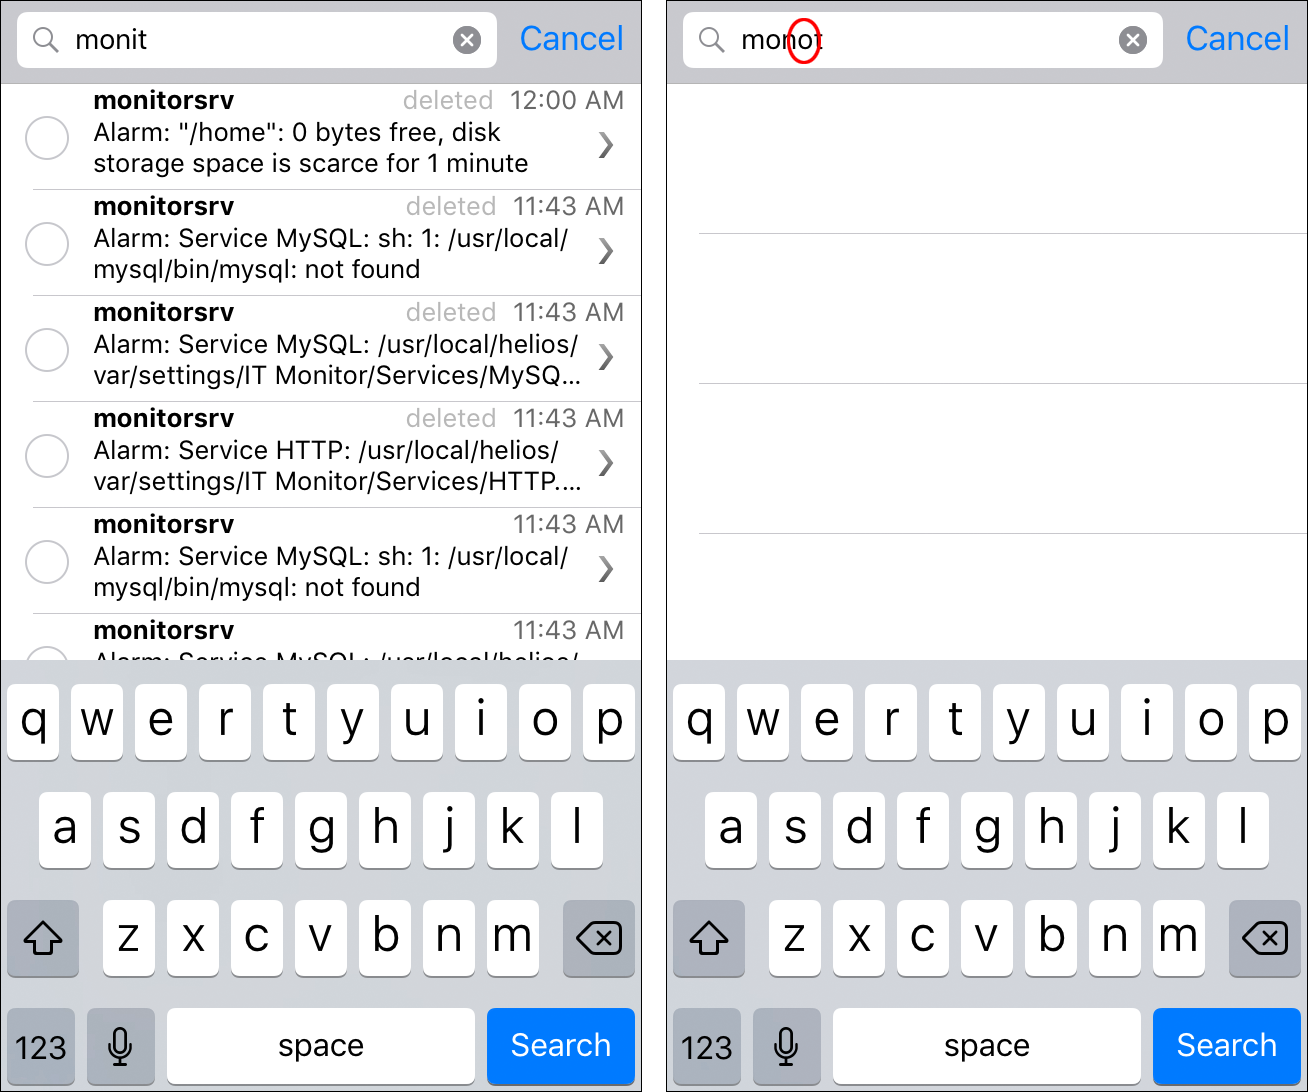
If no matches are found, e.g. because there was a typo in the the search term, the list remains empty (Fig. 4.16 right).
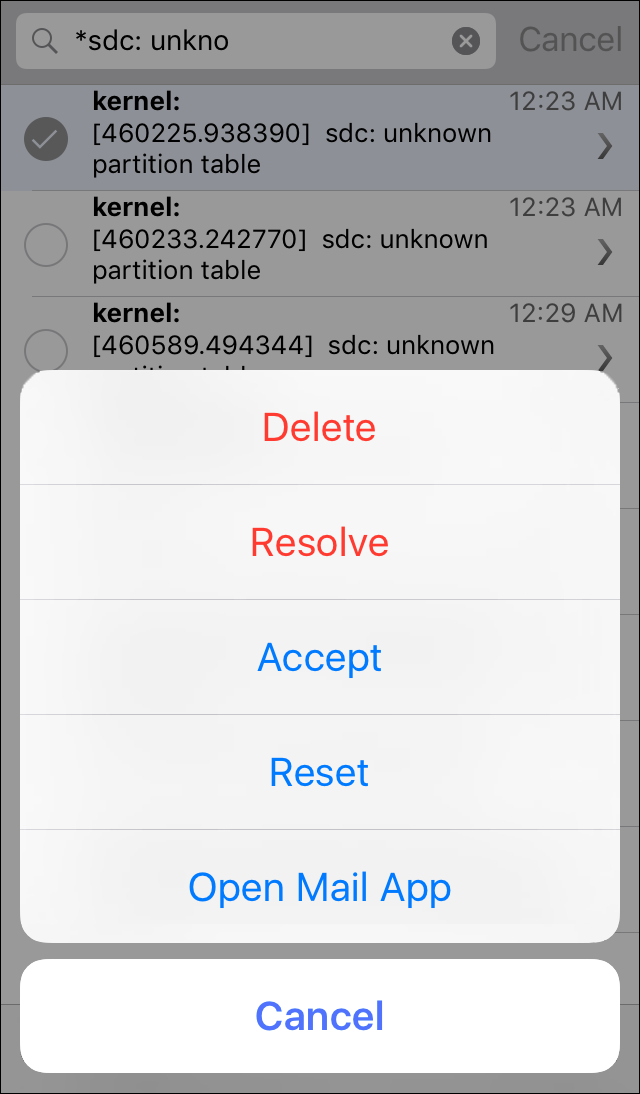
Generally, the search is executed in the message title. If a certain
content is searched within the message body, an asterisk
character (*) that precedes the search text must be used
(see Fig. 4.17). An exclamation mark (!) that precedes
the search text negates it, i.e. all entries but the negated search
text are returned. Asterisk and exclamation mark can also be combined.
For example, the search text !*packet lists all content
that does not contain the term “packet”.
- Note:
-
Multiple words are treated as a phrase (no quotes required).
The virtual keyboard can be hidden by tapping on  .
.

Single entries can be selected by tapping on them. Tapping on
![]() allows the user to choose whether to
delete or accept the selected entries, or decide whether a solution for
the problem has already been found (Fig. 4.18).
A tap on
allows the user to choose whether to
delete or accept the selected entries, or decide whether a solution for
the problem has already been found (Fig. 4.18).
A tap on Open Mail App opens an e-mail client program
which allows you to send the content of one or more selected messages.
4.3 IT Monitor observed services
The services listed below are supported by the IT Monitor server (the corresponding scripts are stored in “HELIOSDIR/var/settings/IT Monitor/Services”):
- AFP
(User credentials: not required)
Checks if the AFP service is available.- DNS
(User credentials: not required)
Connects to a Domain Name Server and resolves the given fully qualified domain name.- FTP
(User credentials: required)
Performs an FTP login with the given user credentials.- HTTP
(User credentials: not required)
Retrieves the start page from an HTTP server and checks the result status code.- IMAP
(User credentials: optional)
Performs an IMAP login if user credentials are given, otherwise retrieves IMAP capability list.- LDAP
(User credentials: required)
Connects to an LDAP server and performs the “WhoAmI” command.- LPD
(User credentials: not required)
Connects to an LPD server and checks the status of the Hold queue.- MS SQL
(User credentials: not required)
Connects to a Microsoft SQL server and checks its reply.- MySQL
(User credentials: not required)
The check uses the “mysql” command line utility to connect to a MySQL server and retrieves the database overview list.- PING
(User credentials: not required)
Checks if the given host responds to an ICMP ping.- POP3
(User credentials: optional)
Performs a POP3 login if user credentials are given, otherwise checks greeting message.- SMB
(User credentials: not required)
Connects to an SMB/CIFS server, sends a “Negotiate Protocol” request and checks the reply.- SMTP
(User credentials: not required)
Connects to an SMTP server and checks the greeting message.
- Note:
-
“monitorsrv” needs not be installed on the server running the observed services.
Own custom services (see 6.2 “Custom scripts for monitoring services”) can also be set up, which will be available in the “Service Details” window after being copied to the “var/settings/IT Monitor/Services” folder.
4.4 Server actions
A collection of sample action scripts is supplied with IT Monitor Server. Located in “var/settings/IT Monitor/Actions/Samples”, the scripts are automatically copied to “var/settings/IT Monitor/Actions” during the installation in order to become available in the “Actions” window. Own custom action scripts (see 6.1 “Custom action scripts”) can also be set up, which will be available in the “Actions” window after being copied to “var/settings/IT Monitor/Actions”.
The following server sample actions are included with the HELIOS IT Monitor Server software:
4.4.1 Server process list
- Note:
-
The complete column headers can only be displayed if the iPhone is operated in landscape view mode.
- Name
Process List (Fig. 4.19)
- Function
Server process listing
- Use
The sorting order can be changed by tapping once on the respective column header. A double-tap on the column header zooms and centers the respective column:
PIDProcess ID CommandProcess name CPU%Processor load TimeProcessing time in seconds since process started UserLogged-in user who started process RSSResident Set Size; the currently used memory in MB SProcess status, e.g.: S=Sleeping
W=Waiting
R=RunningFor a complete list see the “ps” manpage of your server OS. The manpage is available by calling man psin a shell.

- Note:
-
Depending on the limits specified in the “Process List” action script, the
CPU%(CPU usage),Time(CPU time), andRSS(amount of used memory) values can appear highlighted in orange (warn level 1) or red (warn level 2). Threshold values can be changed in the “index.pl” file of the action script.
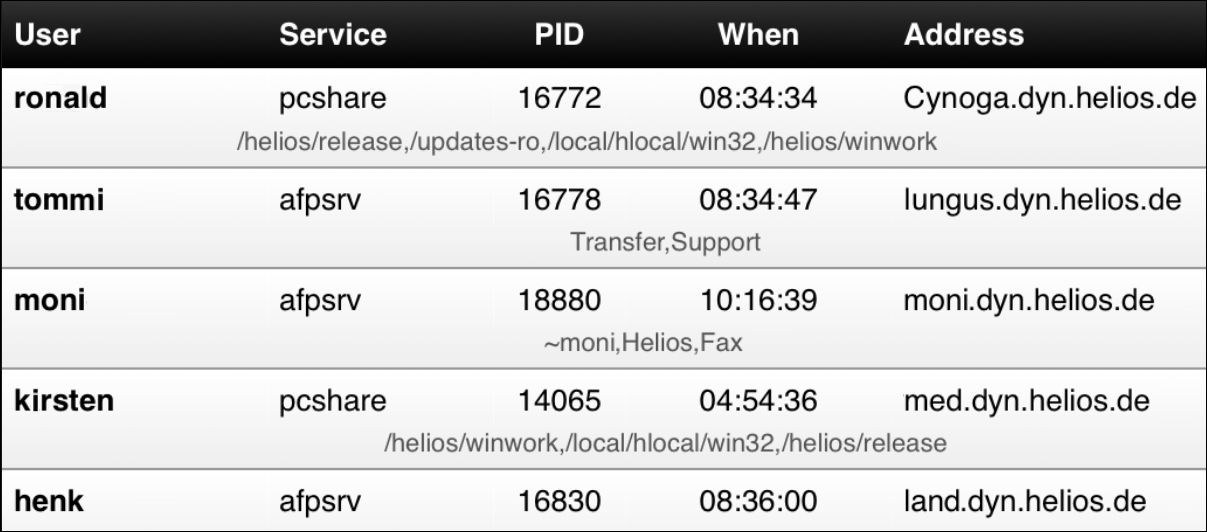
4.4.2 Server users list
- Note:
-
The complete column headers of some scripts can only be displayed if the iPhone is operated in landscape view mode.
- Name
Active Users (Fig. 4.20)
- Function
Active users and uptime listing
- Use
Shows all users that are currently using HELIOS services; also displays the server uptime
UserLogged-in user who started process ServiceHELIOS service the user has logged on to PIDProcess ID WhenTime that the user logged on to the HELIOS service AddressAddress of the host the user has logged on from
4.4.3 Server file browser
- Name
File Browser (Fig. 4.21)
- Function
Server file listing
- Use
Allows listing the server files in a specified folder, and viewing document formats that are supported by iOS
