HELIOS Print Preview 1.1 User manual |
||||
The above-mentioned updates are indispensable for running Print Preview. They will be installed automatically if you install EtherShare and/or PDF Handshake from our current CD. In case you have installed the products from a previous CD (e.g. CD 013) you have to install these updates from a later CD-ROM separately. For advice on update installations, please refer to paragraph Future updates in chapter 4.2 below.
- CD-ROM drive on the UNIX server
- about 1 MB hard disk space for the Print Preview software on the server
- for a reasonable performance, at least 20 MB RAM per active print preview queue are recommended
- "enough" disk space in the Print Preview spool directory on the server
- Note that generating a 72 dpi preview of one A4 page, with the composite result and four separation plates, will need about 4 MB temporary disk space. This value is based on the following equation: 72 x 72 (dpi) x 11 x 8.5 (inches) x 4 (number of separation plates) x 2 (for the composite preview) x 1 (number of pages) = 3.9 MB disk space. The value may be even higher, depending on the number of pages you print, on the page size, and on the resolution you have chosen. The new preview file will require the same disk space (another 3.9 MB) at the most - depending on whether or not you have specified a mode of compression.
- Client computers running Mac OS 7.0 or newer (system 7.5 or newer is recommended)
- Adobe Acrobat Exchange or Reader
(the Reader 4.0 can be installed from our CD-ROM)Note: For installing Print Preview, you have to be able to log in as "root" on your server.
This chapter describes a standard installation and gives short explanations, if necessary. Please remember that all activities you have to perform are marked by an "instruction" arrow in the left margin. For a quick installation, you may proceed directly from one instruction to the other and skip the explanations in between.
The server installation is executed by two separated programs. The first program ("install.sh") must be started from the CD-ROM. It lets you select the product you want to install and copies all related files and the product specific installation program to the local disk of your UNIX computer. Then, the product specific installation program (here: "install") is started automatically from the local disk and guides you through the installation procedure.
If you install Print Preview from our current CD015 or a future CD-ROM, all available updates are installed automatically during the installation procedure. Else, if the software is already installed on your system, you have to add future updates from the respective CDs manually, as described below:
Updates are contained in the /updates directory on our CDs. Detailed information about the updates are given in the /support/techinfo directory, in the uxxxx.txt text files.
For update installations, use our update installer. The tool is able to find and install all updates that are required for a particular software product.
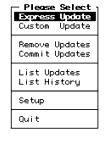
Mount the CD-ROM, open the "Networking Products Installer CD-ROM" menu as described in chapter 4.3.2, select item Install Updates, and click Express Update in the "Please Select" menu (compare figure 3). Then, choose from another new menu the product you want to update.
The installer will find all updates that are required for the specific product and will perform the installation.
EtherShare 2.6 and PDF Handshake 1.1 must be installed on your server and should have been tested successfully (see also chapter 4.1 System requirements).
Note: The Print Preview installation does not change or affect your individual EtherShare, EtherShare OPI, or PDF Handshake configuration.
Print Preview can be activated without a license (in demo mode), or with a full license (regular activation key). The demo mode is only sensible for testing purposes, because a HELIOS demo banner will automatically be printed across every preview. Note that licensing Print Preview with a regular activation key is impossible if your base product PDF Handshake is running in demo mode or with a time-limited license. If you run both products in demo mode and use the PDF Handshake print program for printing, your previews will contain two demo banners - one for PDF Handshake and one for Print Preview.
Moreover, if PDF Handshake and Print Preview run in demo mode, access to the fonts is restricted. See paragraph Unexpected fonts in a preview file in chapter 7 Troubleshooting for more details.
If you want to make use of Print Preview without restrictions you have to make sure that your PDF Handshake software is fully licensed and you have to enter your individual software activation key during the Print Preview installation procedure on your UNIX computer. In case you have no activation key at hand, please follow the instructions given in paragraphs License information and What you have to do in chapter Welcome to Print Preview 1.1 at the beginning of this manual.
During the installation, you are guided by menu-driven programs. Most questions in these programs have a default answer which is given in brackets. You can accept this default by simply pressing ENTER or type an alternative answer. If there is nothing within the brackets, the system will expect an entry from you.
Important: The following example describes the installation on a Sun computer. Slight deviations may occur - depending on your system type and configuration.
Before starting the installation of Print Preview, you should stop all EtherShare activities. Tell all EtherShare users to log off from the server and make sure that there are no active print jobs. During the installation, the installation program will stop EtherShare - and, if necessary, EtherShare OPI.
Then place the CD-ROM in the CD drive of your UNIX computer and enter the mount and install commands which may be different for different UNIX systems. The correct commands for your specific computer are stated in the booklet we enclose to our CD-ROM.
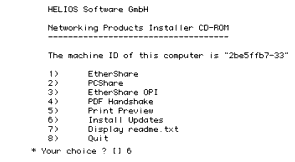
As soon as you have entered the last command, the "Networking Products Installer CD-ROM" menu will appear (see figure 4).
The program will now display a list of the currently available disk space. This list can help you find an adequate directory for Print Preview.
Select the directory you want to install the product in (the default directory is /usr/local/ppv) and then start the installation procedure:
Important: The next command will - if you choose y (yes) - stop EtherShare on your server.
Starting the installation will stop the base product EtherShare currently running on the system. If there are users connected to the system, make sure these users log out first.
Now, specify the location of your EtherShare base product (the program suggests the directory it has detected, e.g. /usr/local/es).
You have now proceeded to the menu that leads you through the product specific installation procedure (compare figure 5). The first two menu items deal with the installation. The third item serves to uninstall Print Preview (see also chapter 4.3.3 Uninstalling Print Preview) and Display README file may be selected if you want to check the latest information about the product.
Enter the data given on your "Activation Key Reply" form (see figure 0-1 in chapter Welcome to Print Preview 1.1):
Note: If you skip the above procedure the program will run in demo mode. See chapter 4.3.1 for details about keys. If you do not enter a valid Activation Key you can use the newly installed HELIOS product for 3 hours in demo mode only.
The installation program will check whether your license is valid. If it is not, e.g. because of a typing error, you have to repeat the licensing procedure. The prompt for a correct license is as follows:
You have successfully installed and licensed your Print Preview copy and may either choose item 4 from the menu to read the last minute info file, or quit the Print Preview installation program as shown below.
Once you have finished the installation from our CD-ROM, you can, at any time, start the product specific "install" program from your server. This program may be used to install and to uninstall Print Preview.
In case you want to remove Print Preview and replace it by your old PDF Handshake installation again, you have to proceed as follows:
First, open EtherShare Admin and remove the preview queues you have created. These queues will not be deleted automatically.
Make sure that all EtherShare - and OPI - users are logged out from the server and that there are no active print jobs (List > Active users in the EtherShare Admin).
After that, the script stops EtherShare on your server and then re-creates your old EtherShare/PDF Handshake version by removing "viewif" from the EtherShare directory. The moment you quit the "Print Preview Installation Menu", EtherShare will be started again on your server.
After de-installation, the Print Preview connection will no longer be available in the printer settings dialog (it will be displayed gray), meaning that you cannot set up a new preview queue. Note that existing preview queues that have not yet been deleted, will still be accessible. You can open the preview files from these queues and you can even select the queues for printing. In the latter case, however, nothing will happen. The print jobs will not be executed and there will be an error message in the system messages file (that can be opened by choosing Lists and System Messages from the Admin menu).
| © 2002 HELIOS Software GmbH |