4 Proofing PostScript print jobs
4.1 Set up PrintPreview with HELIOS Admin
4.1.1 Set up a preview queue

-
Start HELIOS Admin.
-
From the
Printerstab selectFile > New.
-
In the
Connectionpop-up menu selectPrint Preview.
In the “New Printer” window you can specify settings for the
Print Preview connection. Fig. 4.1 shows suitable settings
that may be used for a typical “preview-then-print” workflow.
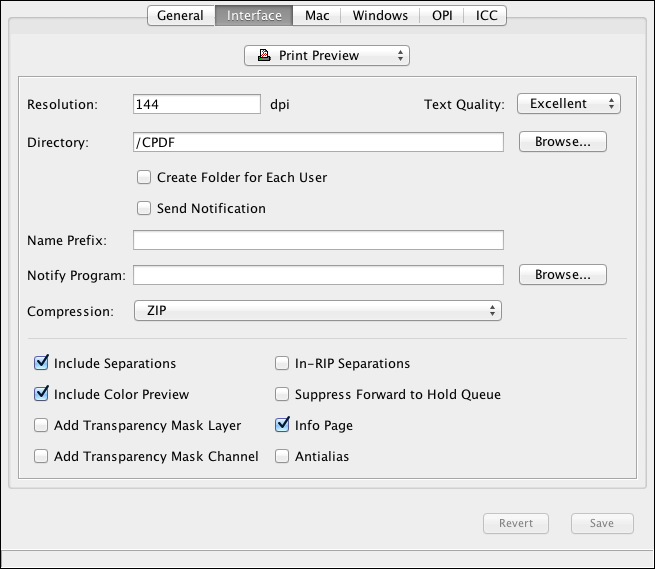
72 dpi is an adequate value for preview files. It is the standard monitor resolution and is therefore best suited for monitor proofs. If you intend to use the preview files for other purposes later, e.g. if you intend to scale or print them, you may specify a higher resolution here. Note that the resolution has a great influence on the temporary disk space that is needed in the spool directory when generating the preview files. Doubling the resolution (e.g. from 72 to 144 dpi) would quadruple the temporary disk space requirements.
The text quality in a preview queue is improved by applying a special font rendering technology.
This preference
allows switching between Excellent, which improves the
text quality and is the default setting, and Standard,
which has the advantage of faster rendering.
The path to the place where PrintPreview stores the
previews. A directory must be specified in order to use the
Create Folder for Each User, Name Prefix, and Notify
Program options.
If this option is specified a subfolder for each print job “owner” is
created in the path, specified by Directory, where the print
jobs are stored.
If the Send Notification checkbox is activated, the “Print Preview”
interface reports events to all listening services.
- Note:
-
Note that with the option
Send Notificationactivated, layouts are generated if the target volume is configured to create layouts.
Name Prefix lets you tag a prefix to your print job name. This
serves to identify the files that are coming from this specific
queue (in case you have several Print Preview queues that
print to the same destination).
The Notify Program option lets you enter a path that leads to
a specific host program. This program will be started automatically after printing has been
finished successfully. See pdfnotifyprog in 5 “Preferences”.
The Compression pop-up menu allows you
to choose from several compression formats: Zip, JPEG
and JPEG 2000. For details on the JPEG and
JPEG2000 quality see the jpegquality
preference in 5 “Preferences”. We recommend specifying a compression
because otherwise the program will need about twice as much temporary
disk space during preview generation, and will create large preview
files as well. Zip is a lossless compression method
and may therefore be the best choice. The maximum size of a new PDF
file will be identical to the temporary disk space needed for its
generation in case you do not activate any kind of compression.
This option will include all separation plates in the preview file. In case you printed composite, the separation plates of the process colors are calculated by PrintPreview and added to the preview file.
This option will include the composite preview in the preview file. In case you have printed separations, the composite preview is calculated by PrintPreview and added to the preview file.
If you check both Include Separations and Include Color
Preview, your preview file will contain a set of separations
preview pages for each document page you have printed
(and additional preview pages for a print job with spot
colors).
If this option is selected, PrintPreview places a transparency mask in an optional PDF layer so the mask can
cross-fade the composite view. Of course this option makes only sense if a composite view is generated at all.
Therefore this option can only be selected if the Include Color Preview option is activated.
Otherwise it will be grayed out. See 4.2 “Verifying PDF transparencies” for details.
If this option is selected, PrintPreview will place a transparency mask in its own separation in the PDF output. See 4.2 “Verifying PDF transparencies” for details.
This option makes the Print Preview queue behave like an
in-RIP capable device. You may already define in the application
program to print in-RIP separations or define the output
color space by initializing the Print Preview queue according to the instructions given in
A.4 “Using in-RIP separation with PrintPreview”. This option can remain active,
irrespective of whether or not you print in-RIP.
If this option is active, the jobs will stay in the preview
queue until somebody moves (or removes) them manually.
The option must be checked if you do not specify a Hold
Queue. Otherwise, the jobs will – after preview generation –
disappear completely. In case you wish to activate automatic forwarding,
you must specify a Hold Queue and uncheck
Suppress Forward to Hold Queue
(find more details and examples in 4.5 “Possible workflows”).
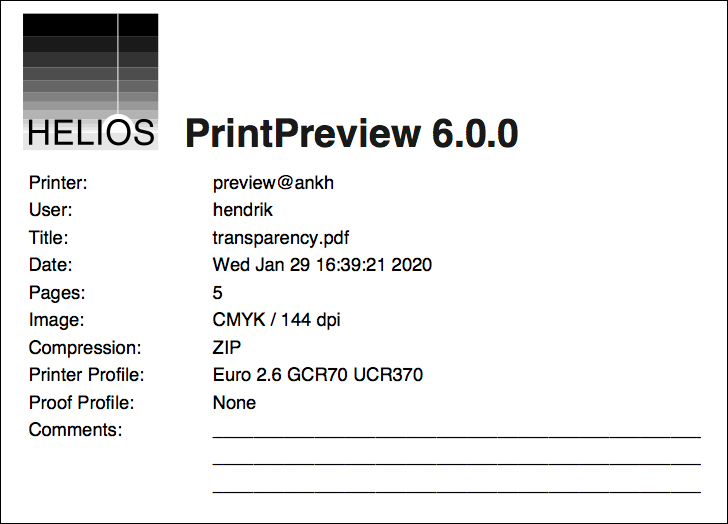
With this option specified, an info page is added to the PDF preview file which is generated by PrintPreview (Fig. 4.2).
Antialias should remain checked if the preview files are
intended for viewing on a monitor. Antialias smoothes the
contours of the elements in the preview files and thus
makes them more legible on a monitor. Antialiasing will
slightly increase the period of time the software needs to
generate a preview file. Note that the Antialias option
needs about 4 times more memory.
4.1.2 Save settings and assign a PPD file
As soon as you press the Save button in the printer settings
dialog, the new preview queue will be established and it
will automatically inherit the PPD file and
the printer fonts
of the queue you have specified as Hold Queue. This is very
useful, e.g. if your Hold Queue is the printer queue you use
for production, because it guarantees that PrintPreview uses
the same PPD file information and the same fonts, that will
later be used for printing, for preview generation.
If you have not specified a Hold Queue, HELIOS Admin will
prompt a message, asking you to select a PPD file for the
new preview queue.
The correct PPD file has a great influence on whether the
preview and
the final printout are identical. If you move the
print job from your Hold Queue to a printer queue that uses a
different PPD file the result on the output side may differ
from what you have seen in the preview. The following
illustration (Fig. 4.3) shows an example environment with
several printer queues that use different PPD files.
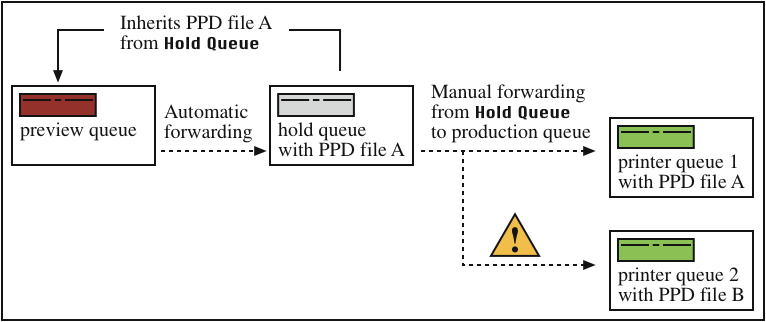
In an environment like that illustrated in Fig. 4.3, you should create a separate preview queue for each printer queue you have – or more precisely, for each PPD file that is in use on one or more printer queues.
To assign a new or different PPD file to any of your queues
use the Select PPD option in the printer configuration menu.
This procedure is described in the HELIOS Base manual.
HELIOS Admin also allows displaying the currently selected PPD file. This can be useful, e.g. if you want to check whether a certain hold queue and the desired printer queue use the same PPD file information.
-
To check the used PPD, open the printer configuration window and click the
Edit PPD "<Name of PPD>"button. The exact file name of the PPD file is given in the line “NickName”.
4.1.3 Define OPI settings for a preview queue
For a description about how to define OPI settings for a
Print Preview connection printer queue see the respective
chapters in the ImageServer and PDF HandShake manuals.
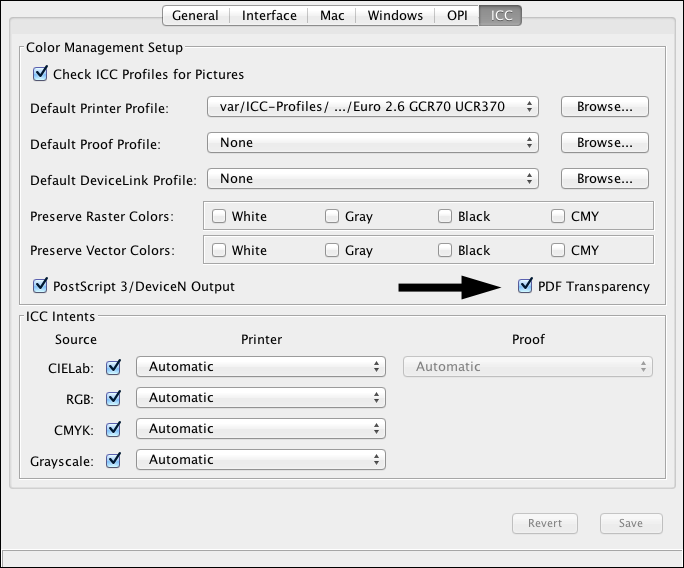
4.1.4 Define ICC settings for a preview queue
Activating Check ICC Profiles for Pictures will induce the
OPI server to check whether all image profiles that have
been tagged to any of the image files are available. The server will automatically stop the print job
if a single profile is missing and issue a corresponding error message. If this
option is not active, OPI will execute all print jobs and use
standard profiles for color matching, whenever the correct
profile is missing, unless the input color space is the same as
the output color space, e.g. Image CMYK = Printer CMYK.
The Default Printer Profile item lets you
choose the
correct profile for your output
device and, at the same time, serves to switch on color matching for this printer queue.
The pop-up menu contains four different options:
None
switches color matching off.sRGB_IEC61966-2-1
may be selected if you want to “print” to a slide-recorder or if you use the “print to file” option or HELIOS PDF HandShake to convert your documents into PDF.Lab D65
is best-suited if you want to select a device-independent output color space, e.g. if you send your documents to different production sites.Composite – Preserve colors
No color matching for composite print jobs; all colors are preserved.
The Browse... button opens a dialog that lets you select a specific profile
This item will only be available if you have selected a default printer profile. Here you can select the correct profile for your proof printer.
This pop-up menu allows you to specify a default DeviceLink profile for color matching. DeviceLink profiles have a higher priority than standard ICC profiles, i.e. standard ICC profiles are overridden by DeviceLink profiles.
4.1.5 About hold queues
For a description about how to configure hold queues see the HELIOS Base manual.
4.2 Verifying PDF transparencies
By the composite view of a PDF document you cannot tell exactly if a transparent area is really made of PDF transparencies or if it is represented by a flattened image which resembles a transparent look. Many PostScript RIPs are not able to handle PDF transparencies. Transparencies are generated e.g. by applications such as Apple’s “Keynote”.
To check whether or not a document contains PDF transparencies and where they are located, HELIOS PrintPreview’s transparency options allow verifying a PDF document for transparencies when being printed to a HELIOS Print Preview queue. For this to work, some preferences must be set in HELIOS Admin:
-
In HELIOS Admin select the
Printerstab and highlight the preview queue in the list you wish to print to. Then go to thePrintermenu and select theSettingsentry.
-
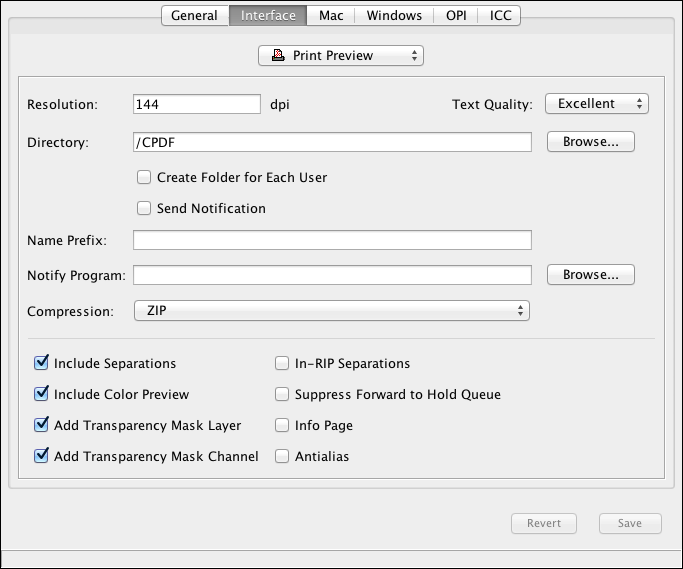
In the
Interfacetab (Fig. 4.4) activate the optionAdd Transparency Mask LayerorAdd Transparency Mask Channel. Also activate thePDF Transparencycheckbox in theICCtab of the correspondingPrint Previewqueue (see arrow in Fig. 4.5).
Add Transparency Mask Layer will place a transparency mask
in an optional PDF layer so that the mask can cross-fade the
composite view. This option only makes sense if a composite view
is generated at all. Therefore the HELIOS Admin
option Add Transparency Mask Layer can only be selected
if Include Color Preview is activated.
Add Transparency Mask Channel will create an additional
channel in the set of separations which displays all PDF
objects that contain transparencies.
Now the PDF document can be printed to the selected Print
Preview queue, e.g. with the HELIOS “pdfprint” tool. In
the following example -P specifies the Print Preview queue
name (“preview”), -p the output page format (“pdf” = PDF page
size) and transparency.pdf the PDF document name.
Find a detailed description of “pdfprint” in the PDF HandShake manual.
- Example:
$ pdfprint -P preview -p pdf transparency.pdf
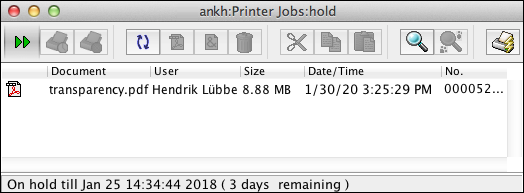
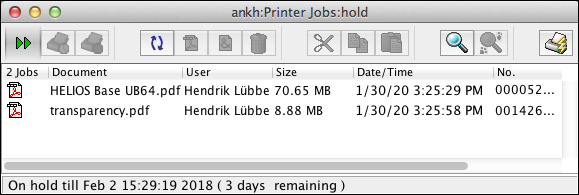
After the print job has been processed it ends up in the hold queue (Fig. 4.6).
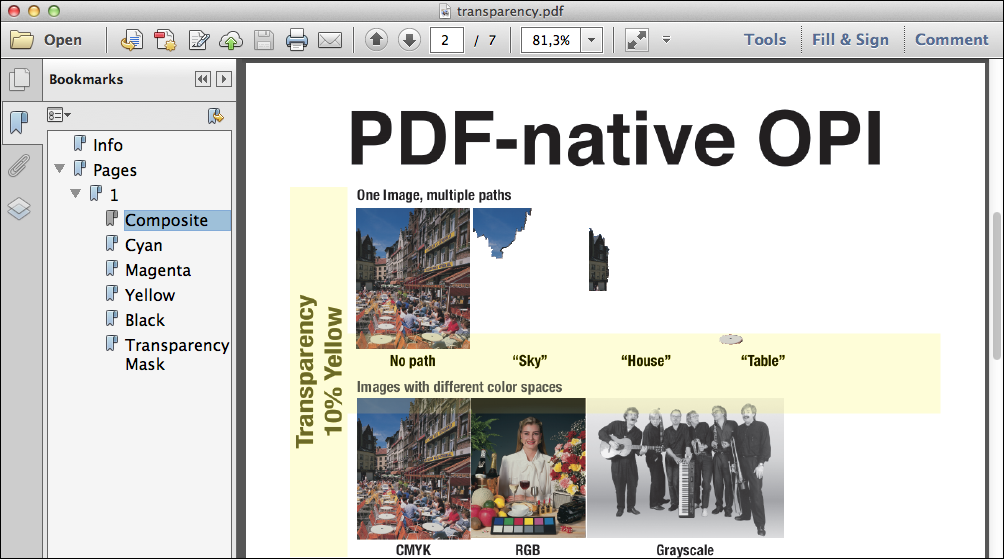
Acrobat displays the document’s composite view (Fig. 4.7). There are two ways to highlight all included PDF transparencies; as a mask in its own layer or in its own separation.
-
In Acrobat, choose the “Layers” tab and activate the “Transparency Mask” checkbox.
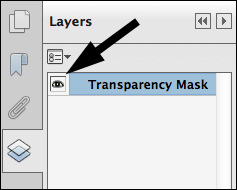
A mouse click in the field adjacent to the “Transparency Mask” entry (see arrow in Fig. 4.8) makes the transparency mask layer visible in the document, overlaying the composite view (Fig. 4.9).
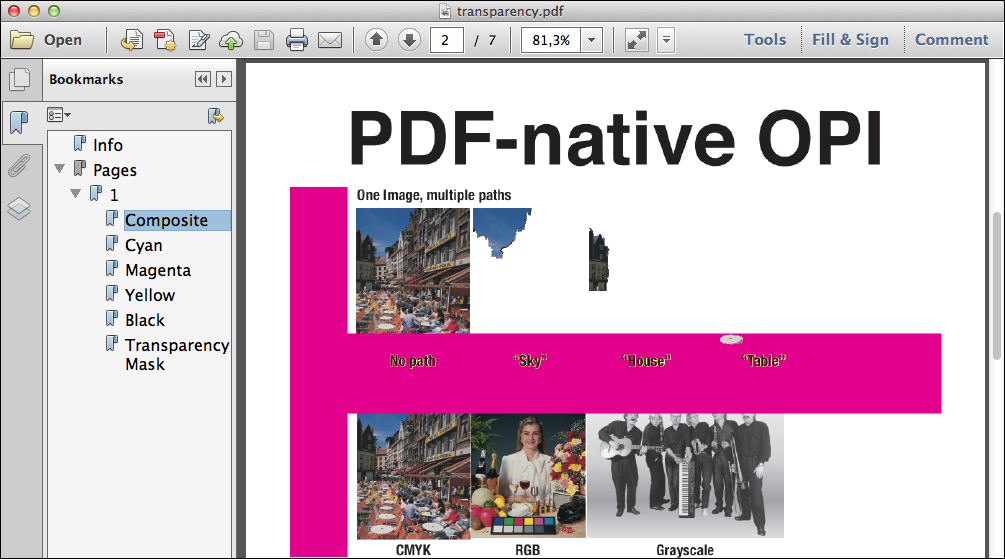
It is also possible to display the transparency mask in its own separation.
-
Select the “Bookmarks” tab and click on the “Transparency Mask” separation icon (Fig. 4.10).

4.3 Checking the print preview
4.3.1 Access to preview files
-
Double-click a preview queue in the
Printerstab to open the job window, and to monitor the progress of the preview generation (Fig. 4.11).
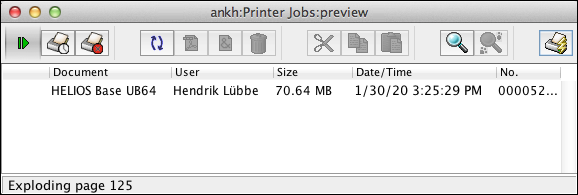
In case automatic forwarding to the hold queue has been specified, the print job will disappear from the preview queue after the preview generation and shows up in the hold queue again.
-
Double-click the hold queue in the
Printerstab to access the preview file in the job window (Fig. 4.12). The PDF icon in front of the file name indicates that preview generation has been successful.
- Note:
-
If
Suppress Forward to Hold Queueis checked, the jobs remain stuck in the preview queue. There, preview generation will only be performed for the first job in line. Additional jobs will have to wait.
-
Double-clicking a job’s PDF icon in the hold or preview queue automatically starts a PDF viewing application, which must be installed on your system (you may also highlight the job and choose
File > Save As...from the Admin menu to save the PDF file for future use).
- Important:
-
For security reasons, the access rights to preview files are restricted: Preview files are accessible for the owner of the print job or member of the printer administration group, or as “root”. Otherwise, access will be denied!
The first page of a preview file is the info page (if included), which presents important information about the file, e.g. generation time, resolution, compression, ICC profiles used (see Fig. 4.2). The last three lines serve as a placeholder for your individual comments. If you are using Adobe Acrobat you can use the “TouchUp” text tool to enter a comment.
In Acrobat’s “Bookmarks” section, the table of contents lists the document pages you have printed. There may be subpages if your preview file contains the composite result and the separations. The page numbers in the table of contents are copied from the document you have printed – you will find e.g. 1, 2, 3 if you have printed pages 1 to 3. In case your application does not forward page counts correctly, PrintPreview will generate new page numbers for the table of contents.
Following the info page are the composite preview and the separations, for each document page.
You can also use the Acrobat thumbnails for file navigation.
4.4 PrintPreview's default behavior in particular situations
From an application, you can print either composite or separations. In a preview file, however, you can have both, the composite preview and the separation plates – independent of whether you have printed composite or separations. This means that PrintPreview has to derive one of the previews on its own: If you have printed separations, the composite preview has to be calculated by PrintPreview, and if you have printed composite, the separation plates have to be calculated by PrintPreview. For these calculations, PrintPreview must rely on the information that is sent by the application. If the information is not ADSC-compliant, the calculations may fail and this may lead to corrupt (or missing) composite or separation previews in a preview file. This does not affect real printing.
See A “How applications cooperate with PrintPreview” for more information on this issue.
Warnings, e.g. about corrupt separations, are added to the print job accounting file which can – as usual – be opened by a double-click on the job (not on the PDF icon!).
As with any other queue, specific initializations or trailers are recognized. See your Base documentation for details about how to define them.
PrintPreview usually recognizes the page size of the document that is printed and uses the same size for the preview file. If this is impossible because the application does not forward the correct page size, the default is A4.
PrintPreview usually generates only one preview for each document page you have printed, even if you have specified a higher number of copies in the print dialog. If you move the job from the preview or hold queue to a “real-printing” queue after checking the preview, the number of copies will be recognized again, meaning that if you have specified e.g. 4 copies you will get 4 printouts of each document page.
- Note:
-
If your preview file already contains more than one preview of each document page this indicates that your application prints each page several times instead of printing it once.
4.5 Possible workflows
4.5.1 Check previews on a monitor in a production environment
In a production environment, you may want to set up a “preview-then-print” configuration that is as efficient as possible, meaning that printing can be started very easily after checking the previews on screen.
-
Create a new preview queue and select the printer queue you use for production from the
Hold Queuepop-up menu in theGeneraltab.
Suppress Forward to Hold Queue must be turned off in the
settings dialog. Antialias and
a Resolution of 72 dpi are recommended
because these settings considerably improve the legibility of the preview
on a monitor.
-
Save the settings in the “Printers” window. The preview queue will now inherit the PPD file from the
Hold Queueyou specified. This guarantees that the parameters used for preview generation are identical to those used for production.
-
To activate color matching in your preview queue, open the
ICCtab. Choose theDefault Printer Profilethat is also used on your printer queue (the one that describes your final output device), and select your monitor profile asDefault Proof Profile.
If you wish to check the preview file on different monitors,
you should select the standard sRGB_IEC61966-2-1
profile as Default Proof Profile. This will turn out to be a
pretty good compromise.
ImageServer users may specify OPI settings in the upper part of the dialog. The configuration should be identical to the one chosen in the printer queue.
-
Set the printer queue you have chosen as
Hold QueuetoSpool Only. This allows you to check the preview files before printing is started.
-
Open the document you want to print and select the new preview queue for printing.
-
Open the preview queue’s job window to monitor the progress of preview generation (Fig. 4.11). Then, open the printer queue’s job window. The new PDF preview files will be forwarded to this queue automatically. To check the previews, double-click the respective PDF icons.
-
Finally, after you have checked all jobs that are currently displayed in the printer queue’s job window, you can set this queue to
Spool & Printand start the production.
Additional settings for backup purposes:
Usually, print jobs disappear after they have been printed. If you want to have them available for reproduction you should set up a hold queue for your printer queue, e.g. one that is called “hold”.
For a description about how to define settings for a hold queue see the respective chapter in the Base manual.
-
Open the printer settings dialog for your printer queue and select the hold queue from the
Hold Queuepop-up menu
With this configuration, print jobs will automatically proceed from preview queue to printer queue to hold queue. From the hold queue’s job window, you can drag them to the printer queue again to restart production.
4.5.2 Let customers preview PDFs – for output on a proof printer
This workflow is recommended if you do not check the previews on a monitor before starting production, but let the customer preview the PDF files, e.g. via HELIOS WebShare. The customer may also print them from their Acrobat application and then check the printouts.
In this example, assume that the customer’s proof printer is a color printer.
-
Create a hold queue, e.g. one that is called “hold”. Set the hold time to 0 days and 0 hours, i.e. “on hold forever”. Select for the hold queue the same PPD file that will later be used for the printer queue.
-
Create a preview queue and select the hold queue from the
Hold Queuepop-up menu.
Antialias should be unchecked;
antialiasing makes documents
more legible on a monitor, but it is not suited for
printed previews.
150 dpi is a proper value for Resolution,
because it guarantees good output results on a color printer.
We strongly recommend to specify a
Compression. Otherwise, with a resolution of 150 dpi, preview
generation will need much disk space. Moreover, compressed preview
files are smaller and can be exchanged more easily.
-
Save the settings in the
Printerstab. The preview queue will now inherit the PPD file from the hold queue.
- Note:
-
Whenever you gather preview files in a hold queue, keep in mind that you have to forward them to a printer queue later. The hold and printer queue must use the same PPD file. Otherwise, the printouts may differ from the previews (Fig. 4.3).
-
Now, set up color matching on the preview queue.
The Default Printer Profile
must be the same profile that is specified on the queue you will
later use for production.
The Default Proof Profile
should be the profile of the color printer (or of any other proof
printer that your customer may use).
ImageServer users may specify OPI settings in the upper
section of the OPI settings dialog,
if required. The configuration should be identical to the one
on the printer queue you will later use for production.
-
Open the document you want to print and select the new preview queue for printing.
-
Open the preview queue’s job window to monitor the progress of preview generation. Then, open the hold queue’s job window. The new PDF preview file will be forwarded to this queue automatically. To save a particular preview file into a directory, highlight the file in the job window and select
File > Save As...from the Admin menu.
-
Finally, open the directory that contains the PDF files and send them to your customer, e.g. via e-mail or WebShare. Tell your customer to print the files to the color printer and to check the printouts.
Alternative settings for preparing the file exchange:
In the Print Preview printer queue setup in HELIOS Admin,
the item Directory can be specified to save the files to a
directory accessible to users via EtherShare, PCShare or
WebShare. Further processing can be automated via the
Notify Program option or using Script Server (see ImageServer manual).
4.5.3 Sending previews to a non-PostScript proof printer (or final printer)
Usually, PDF HandShake and PrintPreview only support PostScript printers, meaning that printing requires a PostScript device on the output side. With PrintPreview, you can bypass this requirement because printing to a preview queue means printing into a PDF file. The newly created PDF files can be printed again from any Acrobat application on any platform; and Acrobat supports different devices, especially non-PostScript printers. The following example describes how you can produce high-quality color printouts on a non-PostScript inkjet printer. This workflow is meant for customers who have a proof printer – or for customers who want to use their inkjet printer as final output device. In the latter case, see 4.5.4 “ Inkjet printer as final output device” at the end of this chapter.
-
Create a preview queue as described in 4.1.1 “Set up a preview queue”.
Include Separations
should be turned off because printing separations on an inkjet
color printer would not make any sense.
Antialias should be turned
off as well; antialiasing makes documents more legible on a
monitor, but it is not meant for printing.
According to our tests, 360 dpi is a proper value for Resolution.
The default resolution of 72 dpi is meant for monitor
display only, it is not suited for high-quality printouts.
- Note:
-
We strongly recommend to specify a
Compression. Otherwise, with a resolution of 360 dpi, preview generation would need much disk space.
-
Save the “Printers” settings and select a PPD file. We have tested this workflow with the “Acrobat Distiller” and the “Apple Color LaserWriter 12/600” PPD file. Both PPD files produce correct results. So you should specify one of them, even though you do not print to a PostScript device in the end.
-
Now, set up color matching on the preview queue.
The Default Printer
Profile must be the same profile that is specified in the
queue you will later use for production.
The Default Proof Profile
should either be a generic RGB profile (e.g. from the OS X
system software) or an RGB profile which came with the inkjet
printer you use for proof purposes. Make sure that the proof
profile is an RGB profile.
ImageServer users may specify OPI settings in the upper
section of the OPI settings dialog, if required.
-
Open the document you wish to print and print composite to the new preview queue.
-
After preview generation, open the preview file from the hold queue’s job window.
-
Select the inkjet printer as default printer, and print the PDF preview file from your Acrobat or Adobe Reader application.
-
After checking the proof printout from your inkjet printer, you can move the job to your production queue.
4.5.4 Inkjet printer as final output device
In case the inkjet printer is your production device, you
should choose a suitable profile, e.g. the profile which came
with the inkjet printer, as Default Printer Profile on your
preview queue. A Default Proof Profile is not required. All
other settings and steps are identical to those described
above.
4.5.5 DeviceN proofing
You can obtain a correct proof using PrintPreview, using host-based separations:
-
Create a PDF 1.3 (or higher) file from your composite PostScript job resolved by ImageServer (easily done via the PDF HandShake “Create PDF Server” feature). Then print a host-based separation of the PDF file using PDF HandShake (via Acrobat plug-in, Hot Folder or “pdfprint” tool) into a Print Preview queue.
PrintPreview will recombine the separations into a color matched composite preview, plus the set of grayscale separations for all needed colors. These separations include all information including correct overprinting and knockouting, correct spot colors derived from DeviceN PostScript, and existing trapping and color information. If you approve the results, you can generate the final output:
-
Print the PDF document with in-RIP separations to your final output device, using PDF HandShake.