12 EtherShare utility programs
The following programs are created automatically in the “HELIOSDIR/bin” and “HELIOSDIR/sbin” directories during the EtherShare installation:
12.1 atechoping
You may use the AppleTalk echo diagnosis program “atechoping” to test the network for services, and thus see if the EtherShare base system is communicating with other AppleShare nodes. When you run this program on the host, you should get one response line for the host’s loopback channel and one for each Mac that is switched on and connected to the same network segment. If no Mac computers are connected you should only get a single response line for the host’s loopback channel.
- Example:
$ cd /usr/local/helios
$ bin/atechoping
got packet from 21.27, skt 4, type 4
got packet from 29.216, skt 4, type 4
got packet from 20.128, skt 4, type 4
got packet from 20.218, skt 4, type 4
got packet from 20.229, skt 4, type 4
got packet from 25.62, skt 4, type 4
got packet from 26.143, skt 4, type 4
got packet from 24.30, skt 4, type 4
got packet from 21.214, skt 4, type 4
got packet from 20.143, skt 4, type 4
got packet from 21.39, skt 4, type 4
got packet from 20.230, skt 4, type 4
got packet from 27.54, skt 4, type 4
got packet from 20.249, skt 4, type 4
got packet from 20.144, skt 4, type 4
Each line shows the net node, socket, and echo type.
You can also enter atechoping <nn>, where <nn> is the
network number, to echo test other networks. Other
EtherShare hosts also return a one-line message.
12.2 poll
The HELIOS “poll” program is a command line utility for network checks (compare 12.3 “vpoll”). It can be executed automatically in the background, e.g. if you include the “poll” command into a batch program. “poll” returns one message line for each AppleTalk service (entity) on any network that answers within a second response time. This includes one response line for the HELIOS servers “atalkd”, “afpsrv”, “termsrv”, “timesrv”, “admsrv”, and “mailsrv” for each EtherShare host that can be found and for each registration (if the services are registered in several zones). In addition, each “papsrv” print spool will have a message line.
Each line shows the network number, node number, socket number, object name, object type and zone name.
Please note that:
“poll” can be specified with command line parameters as follows:
$ poll 'name:type@zone'
You can use “=” as a wildcard for “name”, “type”, and “zone”.
“poll” has a limited buffer – only 3 to 4 pages of information can be displayed at a time – for large networks, you may need to use wildcards to limit the range of services which are polled.
- Example:
poll "=:Laser=@*"lists all services whose type starts with “Laser”. The “*” represents “this zone”, thus the zone you are currently a member of.
“poll” may display entities multiple times – depending on the route an “echo” took; this is normal.
The following example shows the responses you may get when using the “poll” program:
$ cd /usr/local/helios
$ bin/poll
20 168   2 690c0d3e        EtherShare *
20 143 253 p610             AFPServer *
20 143 238 printpreview-SpoolerLaserWriter *
20 143 245 p610-PrintToDisk-SpoolerLaserWriter *
20 143 246 p610-lw8500-spoolerLaserWriter *
20 143 248 p610-color-spoolerLaserWriter *
20 143 243 p610             MailServer *
20 143   2 0025f98a        EtherShare *
20 128   2 DEMO_002614cb   EtherShare *
20 251   2 DEMO_00205420   EtherShare *
41 142 251 HELIOS EtherShare PublicAFPServer *
41 142 253 proxy           AdminServer *
20 143 229 p610             UNIXTerminal *
20 143 231 p610             AdminServer *
20 196   2 6906eae9        EtherShare *
20 241   2 807de1b8        EtherShare *
20 211   2 2bbf260c        EtherShare *
20 230   2 7758302e        EtherShare *
20 144   2 726041aa        EtherShare *
20 249   2 80024a74        EtherShare *
20 250   2 56010ee6        EtherShare *
20 229   2 2be5ffb7        EtherShare *
20 141   2 0c027a2f        EtherShare *
- Note:
-
“poll” outputs all names in the default AppleTalk client encoding, e.g. MacRoman. To display UTF-8 names use “uniconv” for the conversion, e.g.:
$ bin/poll | bin/uniconv MacRoman UTF8
12.3 vpoll
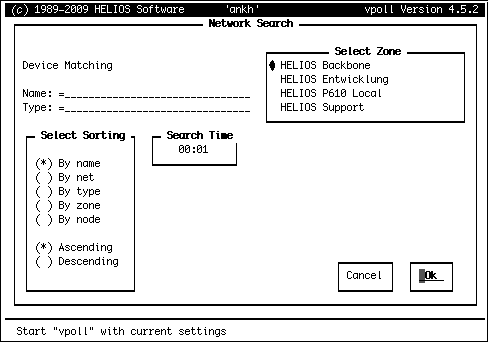
The “vpoll” application can be used to get a more detailed view of the available AppleTalk devices on the network. It is a very sophisticated program that can be used for different purposes – not only for verifying the installation. “vpoll” is an interactive program that allows setting several parameters before starting the network check. In addition, it allows monitoring how fast the different devices in your network respond to the network check.

-
To start the program enter:
$ cd /usr/local/helios
$ bin/vpoll
Fig. 12.1 shows the startup screen of the program with the default settings.
Note that “vpoll” provides the information online but also allows saving the data in a file. Use “CTRL-W” for that purpose. If you enter “CTRL-W”, e.g. in the “Device List” window, you will be queried for a “Logfile Name” where current settings and lists should be saved as ASCII. Subsequent saves will be appended to the log file. After finishing and restarting “vpoll”, the first “CTRL-W” you enter will induce the program to query for a “Logfile Name” again.
The following keys are relevant for using “vpoll”:
TAB key: navigate within a “vpoll” dialog
“+” and “-”: (un)select items from a list
ARROW keys: navigate within a list of items
ESC key: quit the current dialog
Whenever a user changes any parameters (as shown in
Fig. 12.2), the new settings will be
saved for this specific user. You can use the Name
and Type lines to limit the network check to specific
devices. The “=” is used as a wildcard.
Please note that the bottom line gives short descriptions of the currently selected item (Fig. 12.2).
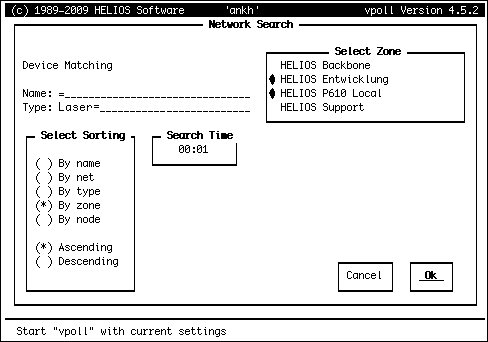
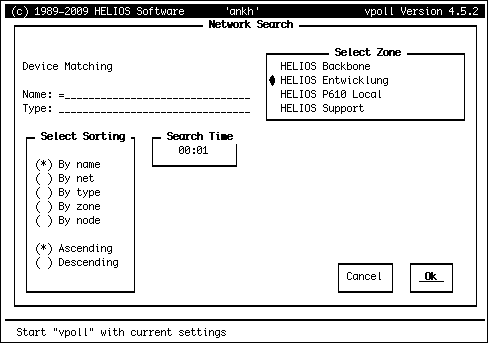
In Fig. 12.3, we have set up a network check for all devices in zone “HELIOS Entwicklung”.
-
To start the network search, proceed to the
Okbutton (using the TAB key) and then press RETURN.
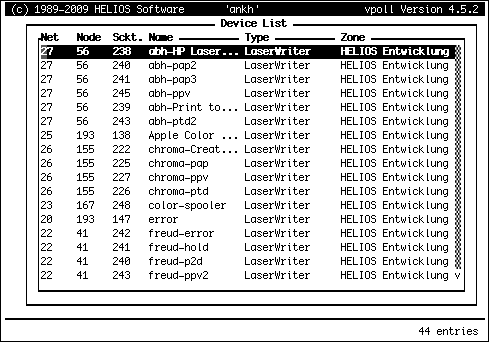
You will get a device list like that shown in Fig. 12.4.
All devices of the zone “HELIOS Entwicklung” are listed –
they are sorted by name. The device list includes the
network number (Net), the node number
(Node), the socket number (Sckt.)
and the Name, Type, and Zone
of the respective device. Usually, any combination of
Net, Node and Sckt.
should be unique. It is possible, however, that a combination
appears several times; in that case the zones are different.
-
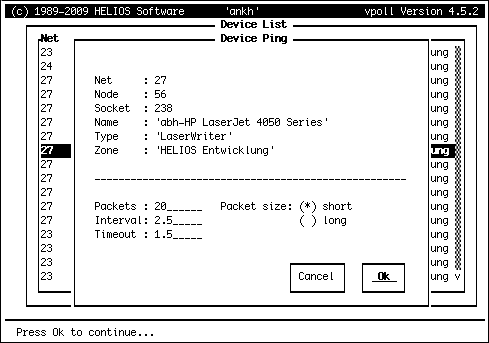
Scroll through the device list and press RETURN to open the “Device Ping” dialog for a specific device.
In the “Device Ping” dialog you can again set individual parameters for a device check, namely: the number of packets, the packet size, the poll interval, and a value for timeout.
The device check will start the moment you select the Ok
button in the “Device Ping” dialog (see Fig. 12.5
and Fig. 12.6).
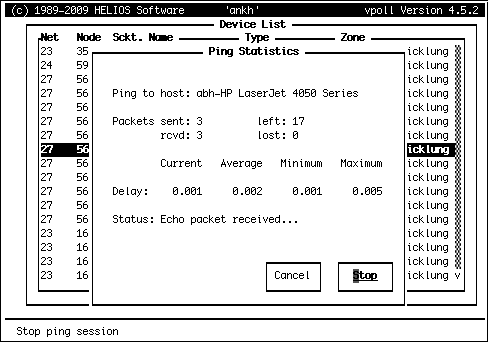
You can stop and restart the ping statistics at any time; the
behavior of the respective button (the Stop button
in Fig. 12.6) will change,
depending on the status.
-
Use the
Cancelbutton (or the ESC key) to close the current dialog. TheCancelbutton in the “Network Search” dialog (see Fig. 12.1) will quit the “vpoll” program.
12.4 zones
The “zones” program can be used to list the names of all zones that can be found on the network, and to quickly find out the current AppleTalk default zone.
Since the “zones” program uses the EtherShare AppleTalk protocol modules, which reference the “Preferences” file for configuration details, mistakes in this file will cause you to see less zones than those shown on the Mac clients. For example, if you get the zone name(s) wrong for a router, “zones” will not show any zones which exist on the other side of the router. Mistakes in “Preferences” will affect “vpoll”, “poll” and “atechoping”, too, for the same reason.
- Usage:
zones [-l]
12.4.1 Option
- -l
Shows only local zones.
In the following example, you see all zones and an “*” in front of the current default zone “HELIOS I”:
- Example:
$ cd /usr/local/helios
$ bin/zones
* HELIOS I
  HELIOS II
  HELIOS Support
- Note:
-
“zones” outputs all names in the default AppleTalk client encoding, e.g. MacRoman. To display UTF-8 names use “uniconv” for the conversion, e.g.:
$ bin/zones | bin/uniconv MacRoman UTF8
12.5 restart-pap
The shell script “HELIOSDIR/sbin/restart-pap” is used internally by EtherShare to enable – via “srvutil” (see the HELIOS Base manual) – printer configuration changes to come into effect immediately, without restarting the entire HELIOS system.
12.6 rmtrash
The “rmtrash”
command allows
emptying a particular network trash can that is specified with the
<path_to_volume> parameter.
- Note:
-
You should be logged-in as “root” when calling “rmtrash” from the command line, and the volume should not be mounted.
“rmtrash” can also be called from HELIOS Admin, with the
respective volume highlighted in the Volumes list and then
choosing Empty Trash... from the Volume
menu. This method is recommended.
- Usage:
rmtrash [-f] <path_to_volume>
12.6.1 Option
- -f
Deletes the whole “Network Trash Folder” in the volume. With
-fnot specified, only the files in the “Network Trash Folder” are deleted.
- Example:
# cd /usr/local/helios
# sbin/rmtrash /home/macuser
12.7 kconfig
The “kconfig” utility is used during the EtherShare installation/deinstallation in order to install AppleTalk kernel modules or to remove them, respectively.
- Important:
-
Make sure that EtherShare is not running, i.e. stop EtherShare before using the “kconfig” command!
# cd /usr/local/helios
# bin/srvutil stop afpsrv now
# kconfig install
# kconfig uninstall
12.8 convertvol
Converts
a volume from
its current file name encoding as given in the “Preferences” file
to a new encoding as defined with the -C parameter. In doing so,
however, the entry in the “Preferences” file is not affected, so
you have to set the volume preferences manually. The changes are recorded in
the volume in “convert.log”.
The options are simply passed through to the “rebuild” program (see the respective chapter in the HELIOS Base manual).
- Usage:
convertvol [-p] [-s] [-v] -C [oldes|utf8] [-U charset] <path_to_volume>
12.8.1 Options
- -p
Output the converted file names
- -s
Scan desktop only (scan is on if you specify
-s)- -v
Verbose for diagnostics (verbose is on if you specify
-v)- -C
Volume encoding can be converted to another character set
- -U
New character set
- Example:
If the volume in “/support/temp” is encoded in old-style EtherShare “:Hex” syntax it can be converted as follows:
# convertvol -C MacRoman /support/temp
- Note:
-
We recommend to convert old-style “:Hex” volumes using EtherShare Admin (see EtherShare 2.6 manual). This is straightforward by switching off
Unicode/UTF8, selecting the desired character set from theAFP Charsetpop-up menu, and saving the volume settings anew.
12.9 converthome
“converthome” converts an old style EtherShare home directory to a UTF-8 based volume using the current charset of the home directory specified in the “Preferences” file as default. However, the entry in the “Preferences” file is not affected, so you have to set the volume preferences manually. The changes are recorded in the volume in “convert.log”.
You may overwrite the default charset by using the -U
option. The passed home directory must not be in use when
issuing converthome, even when calling for scan only.
- Usage:
converthome -v -s [-U charset] <path_to_homedir>
converthome -h (show help)
12.9.1 Options
- -v
Verbose for diagnostics (verbose is on if you specify
-v)- -s
Scan desktop only (scan is on if you specify
-s)
- Example:
# converthome -U SJIS /home/macuser
12.10 netconf
The HELIOS “netconf” utility offers a very convenient user interface for network configuration.
It is described in detail in 4.3.4 “Manual network configuration”. By means of example manual network configurations, the usage of “netconf” is explained step-by-step.
12.11 The HELIOS Meta plug-in
The “HELIOS Meta” plug-in allows adding and editing file comments on Mac OS X. These comments work cross-platform, i.e. they can also be added and edited:
from Mac OS 9 clients
from any web client, directly in a HELIOS WebShare sharepoint
from Windows clients via the “HELIOS Meta” feature in HELIOS PCShare
| Mac OS | By HELIOS Meta plug-in | By operating system |
|---|---|---|
| Mac OS 9 |  |
|
| Mac OS X 10.4/10.5 | |
|
| Mac OS X 10.6/10.7 | |
Table 12.1: How file comments are added and edited
12.11.1 Installation
-
Mount the “HELIOS Applications” volume and open “MacOS > EtherShare Tools”.
-
Open the “HELIOS Meta” folder and double-click the “HELIOS Meta.dmg” disk image.
-
Then double-click the “HELIOS_Meta_Installer.pkg” package file and follow the instructions in the installation menu.
On Mac OS X 10.4/10.5, the plug-in is installed as “HELIOS Meta.bundle” in “/Library/Contextual Menu Items”. On Mac OS X 10.6 or newer, the plug-in is installed as “HELIOS Meta.service” in “/Library/Services”.
-
Now log out from Mac OS X and log in anew.
The “HELIOS Meta” plug-in is now ready to use.
12.11.2 Adding, viewing, and editing file comments from within Mac OS X
-
To add a file comment to a file or folder, click on the file or folder name while holding down the CTRL key and select the
More > Edit comment(Mac OS X 10.4/5),Services > Edit comment(Mac OS X 10.6) orEdit comment(Mac OS X 10.7) item from the pop-up menu.
-
In the “HELIOS Meta” window highlight the file or folder that you wish to add a comment to, make a double-click in the “Comment” column (Fig. 12.7) and enter your comment. Then click with the mouse outside the editable field, e.g. on the file name, and close the dialog window. In the same way, existing comments can be edited.

12.11.3 Adding, viewing, and editing file comments from within Mac OS 9
-
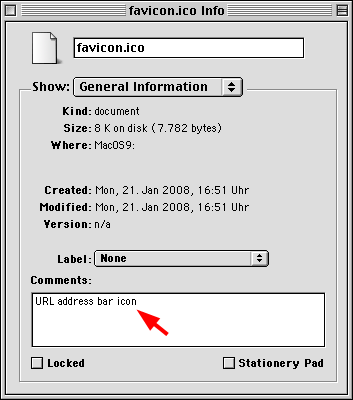
In the Mac OS 9 Finder highlight the desired file or folder and open “File > Get Info > General Information” (Fig. 12.8) to edit the comment.
12.12 LanTest
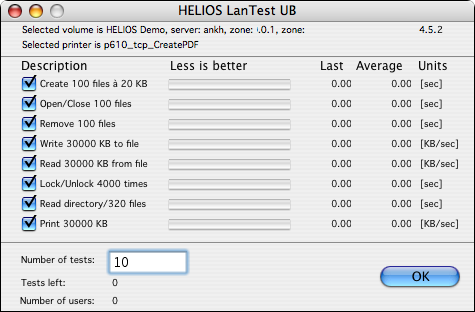
HELIOS LanTest is a tool for testing and measuring the performance of file system and print system services. It offers detailed evaluations for file and record locking on file server volumes, as well as for many typical file system operations. LanTest results can be used to find bottlenecks, for troubleshooting, or just for maintenance purposes.
The LanTest tool is available in the “HELIOS Applications” volume in MacOS > EtherShare Tools > HELIOS LanTest.
-
Start the LanTest version that is appropriate for your client Mac OS. The LanTest dialog window (Fig. 12.9) opens. From the
Filemenu chooseSelect Test Volume...and click theOpenbutton.
-
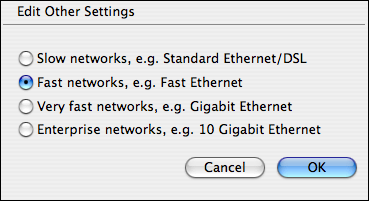
Before you start examining the performance state the network type:
From the
Filemenu choosePreferencesand select the net type you are connected to (Fig. 12.10). Depending on the network specified in this window, LanTest determines the test load, i.e. the size of test files that are processed at a time.
This makes sense because Fast Ethernet (100 Mbit/s) networks have a higher data throughput than the standard Ethernet (10 Mbit/s). Gigabit Ethernet reaches a data throughput of up to 1 Gbit/s (1000 Mbit/s), and 10 Gigabit Ethernet up to 10 Gbit/s (10000 Mbit/s).
12.13 File System Test
HELIOS File System Test is a professional tool for network administrators, software vendors, and 3rd party developers to test file server compatibility. It allows every Mac user to easily determine if their file server is fully compatible with Mac OS X clients.
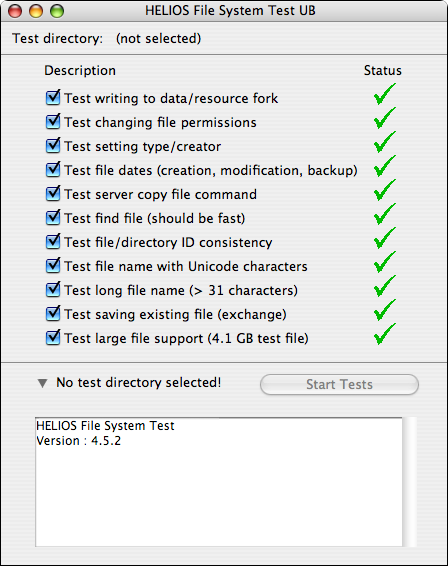
The File System Test tool is in the “HELIOS Applications” volume in MacOS > EtherShare Tools > HELIOS File System Test. After double-clicking on the program icon the File System Test dialog window (Fig. 12.11) opens.
From the File menu choose Open Test Directory...
and select the tests you wish to run by means of the checkboxes in
front of each test item line.
12.13.1 Test explanations
Test routines are explained on the “HELIOS File System Test” web page:
www.helios.de Go to Support > Utilities for Free Download > HELIOS File System Test