HELIOS EtherShare OPI 2.1 User manual |
||||
The following list gives details about the hardware and software you need for successfully working with EtherShare OPI 2.1.
Important: Please note that EtherShare OPI 2.1 requires HELIOS EtherShare networking software, version 2.6 and the respective system requirements.
- Ethernet, Fast Ethernet, or FDDI
- multiple network segments for image processing, layout, and output devices recommended (Image processing requires high-resolution originals and produces a lot of network traffic when the images are loaded from or sent to the server. We, therefore, recommend to perform image processing on special computers that are equipped with a very fast network connection - e.g.
Fast Ethernet).
- One of the following UNIX systems:
- EtherShare 2.6 installed and running on the host
- CD-ROM drive
- about 6 MB hard disk space for the OPI software and additional 33 MB for the ICC profiles we deliver for color matching
- at least 32 MB RAM on the server, 64 MB RAM recommendet; additionally 2 MB RAM per OPI process, 2 MB per print device
- at least one network adapter installed and activated
Note: For installing EtherShare OPI, you have to be able to log in as "root" on your host.
- Computer running Mac OS and an OPI-compatible application like QuarkXPress or PageMaker
- one of the above mentioned computers with applications that support the EPSF format
Note: Layout applications that are not OPI-compatible can - nervertheless - print to OPI printer queues. In this case, OPI does not affect the print job and the printout will deliver the expected results.
This chapter describes the steps that are indispensable for a standard installation and gives short explanations, if necessary. Please remember that all activities you have to perform are marked by an "instruction" arrow in the left margin. For a quick installation, you may proceed directly from one instruction to the other and skip the explanations in between.
The server installation is executed by two separated programs. The first program ("install.sh") must be started from the CD-ROM. It lets you select the product you want to install and copies all related files and the product specific installation program to the local disk of your UNIX computer. Then, the product specific installation program (here:
"opi-install") is started automatically from the local disk and guides you through the installation procedure.
If you want to connect Windows PCs to your network and use the OPI services, you have to install PCShare 3.0.
Last-minute updates are contained in subdirectories of
the "updates" directory on our CD-ROM, each with a
description file ("desc.txt") and installation instructions ("readme.txt"). The "updates" directory contains an index ("index.txt").
Check "index.txt" and "desc.txt" to see whether any of the updates applies to your particular host type and network environment. If so, install the updates by taking the following steps: mount the CD-ROM, open the Networking Products Installer CD-ROM menu (compare Fig. 2 in chapter 4.3 "Installing EtherShare OPI 2.1"), and select item
Install Updates.
You cannot start the EtherShare OPI software without an activation key. The key has to be entered during the installation procedure on your host computer. In case you have no activation key at hand, please follow the instructions given in paragraphs License information and What you have to do in chapter "Welcome to EtherShare OPI 2.1" at the beginning of this manual.
Important: The old EtherShare OPI 2.0 activation key will not activate program version 2.1.
Note: The OPI installation does not change or affect your individual EtherShare configuration.
An upgrade installation of EtherShare OPI does not require any particular precautions. There is no need to delete existing files from your old OPI directory.
During the installation, you are guided by menu-driven programs. Most questions in these programs have a default answer which is given in brackets. You can accept this default by simply pressing ENTER or type an alternative answer. If there is nothing within the brackets, the system will expect an entry from you.
Important: Please note that if you quit the installation before having finished the complete procedure, you will have to delete the files you have already copied to the OPI directory on your host and then start the installation again.
Important: The following installation example describes the steps that are to be taken on a Sun SPARC computer. Slight deviations may occur - depending on your system type and configuration.
Before starting the installation of EtherShare OPI 2.1, you should stop all EtherShare activities on the server. Make sure that all EtherShare users are logged-out and there are no active print jobs. During the installation EtherShare will be stopped automatically by the installation program.
Then place the CD-ROM in the CD-ROM drive of your UNIX computer and enter the mount and install commands which may be different for different UNIX systems. The correct commands for your specific computer are stated in the booklet we enclose to our CD-ROM.
As soon as you have entered the last command, the Networking Products Installer CD-ROM menu will appear (see Fig. 2).
Select the version you want to install. (This prompt is skipped automatically, if there is only one program version available on that CD-ROM.)
The program will now display a list of the currently available disk space. This list can help you find an adequate directory for EtherShare OPI.
Select the directory you want to install EtherShare OPI in (the default directory is /usr/local/opi) and then start the installation procedure.
The installation program now removes old updates and copies the OPI program files to the directory you have selected.
EtherShare OPI is based on the EtherShare software. The OPI installation program, therefore, has to add several files to the EtherShare directory. You have to specify this directory correctly in case you do not use the default directory
/usr/local/es.
The installation program may also want to copy specific files to your PCShare directory. If you are using PCShare, please enter y (yes) and specify the directory in case you do not use the default directory as shown above.
Important: At this point, the installation program automatically stops EtherShare on your server.
You have now proceeded to the menu that leads you through the product specific installation procedure (compare Fig. 3). The first two menu items deal with the installation. The third item serves to uninstall OPI (see also chapter 4.4 "Uninstalling EtherShare OPI 2.1") and Display README file may be selected if you want to check the latest information about the installation program.
Select Install programs and configuration files from the above menu to integrate the OPI modules into your EtherShare program.
The ICC profiles on our CD-ROM need at least 33 MB disk space. The installation program again displays a list of the available disk space and sets a default directory for the profiles volume. You can accept or replace the default entry. Please do also consider the disk space requirements of your existing profiles (if you have any).
Important: The prompt is skipped if you already have an "ICC-Profiles" volume on your server. In that case, the installation program will open this volume and replace the existing profiles in the HELIOS folder by the new profiles from our CD-ROM.
Important: You may not delete the "ICC-Profiles" volume later, even if you do not use it for color matching explicitly. Some OPI processes use the profiles stored on this volume. So, deleting the volume would disable OPI (see also chapter 5.6 "About how OPI 2.1 applies color matching").
Now, you have to license your HELIOS product.
Select Enter activation key to license Helios programs from the EtherShare OPI Installation Menu.
The installation program displays a brief explanation about the HELIOS licensing scheme. These information are also included in this documentation, namely in chapter "Welcome to EtherShare OPI 2.1" at the beginning of this manual.
Enter the data given on your "Activation Key Reply" form (see Fig. 0-1 in chapter "Welcome to EtherShare OPI 2.1"). If you do have a demo license instead of a full license, you have to enter the agreed expiration date.
Important: If you receive any error messages instead of the
License is valid ... promt, you have to check your entry again and repeat the licensing procedure if necessary.Note: If you skip the above procedure the program will run in demo mode. See chapter 4.3.1 for details about keys. If you do not enter a valid Activation Key you can use the newly installed HELIOS product for 3 hours in demo mode only.
You have successfully installed and licensed your EtherShare OPI copy and may either choose item 4 to read the last minute info file, or quit the OPI installation program as shown below.
Important: Here, EtherShare will be started again by the installation program. The OPI services will be available as well, because the "opi-install" program has modified the server configuration, so that the OPI server will always be started automatically on starting EtherShare.
You are now back to the top level, the Networking Products Installer CD-ROM menu. Select Quit to finally finish the installation procedure.
Note: Copies of all OPI files from the CD-ROM, including the "opi-install" script, are kept as backups in the
"/usr/local/opi" directory. You may delete this directory after a successful installation or use it to start the "opi-install" script again, if necessary. For re-installing EtherShare OPI, however, you will have to mount the CD-ROM as well because the ICC profiles are only available on the CD-ROM.Once you have finished the installation from our CD-ROM (compare Fig. 2 and the respective explanations), you can, at any time, start the "opi-install" program from your server. This program may be used to install and to uninstall OPI.
Item 1 (Install programs ...) from the EtherShare OPI Installation Menu (compare Fig. 3) serves to expand your old EtherShare installation by EtherShare OPI.
In case you want to remove OPI and replace it by your old EtherShare installation again, you have to proceed as follows:
After that, the script stops EtherShare on your server and then re-creates your old EtherShare version by using the files bearing the ".noopi" extension. These backup files have been created automatically during the OPI installation and contain the old version of your EtherShare installation. The moment you quit the EtherShare OPI Installation Menu, EtherShare will be started again on your server.
To verify your installation, make sure that you are still logged-in as root and that you have restarted EtherShare on your server as described at the end of chapter 4.3.2 "The installation procedure". Then, you have to check whether the OPI process is running.
Enter the ps command ("ps -ef", "ps -e", or "ps ax" - depending on your UNIX system) to prompt a listing of all the processes currently running on your server.
In the above example, the OPI process (opisrv) in the listing indicates that the installation has been successful.
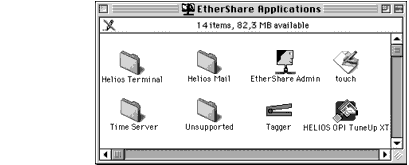
For a second check, you may start one of your Macintosh clients and mount the "EtherShare Applications" volume that has been created when installing EtherShare.
- the "Tagger" (described in chapter 7.4 "Tagging images with ICC profiles")
- the "touch" program (for details see chapter 7.5 "Refreshing layouts using the "touch" program")
- the "HELIOS OPI TuneUp XT" (see chapter 7.8 "Using QuarkXPress with EtherShare OPI 2.1")
Fig. 7 shows the contents of the "EtherShare Applications" volume after installing EtherShare OPI 2.1:
Note: For those who have updated an earlier EtherShare OPI version: Please note that the "OPI Setup" tool has been removed from the "EtherShare Applications" volume. See chapter 8.2 "Differences between program versions 1.x and 2.1" for details.
| © 2002 HELIOS Software GmbH |