HELIOS Base UB for Windows User manual |
||||
1 Introduction
This addendum addresses HELIOS users who install the software on a Windows platform. It provides a description of installation and operational tasks which are different from those on UNIX, Mac OS X or Linux platforms, which are described in detail in the HELIOS Base UB manual.
The HELIOS products EtherShare UB and PCShare UB are not available for Windows:
WebShare UB, ImageServer UB, PDF HandShake UB and PrintPreview UB are available for Windows.
The default HELIOS installation path on Windows used in the examples in this manual is "C:\Program Files\Helios".
1.1 System requirements
The following list gives details about the hardware and software needed for the HELIOS Base software to successfully work:
- Pentium II compatible CPU (or newer) running:
- CD-ROM drive
- 200 MB in the "\Program Files" file system, in addition to the individual disk storage requirements of each of the jobs/users
- At least 128 MB available RAM within Windows, additional memory depends on jobs/users
Note: Available RAM means the free memory according to the value stated in the "Physical Memory" section of the Performance tab of the Windows Task Manager.
- At least one supported network adapter installed and activated
- ActiveState Perl 5.8.x (www.activestate.com)
Perl is used for all scripts (start-helios/stop-helios, HELIOS Script Server scripts, HELIOS action scripts, etc.) and must therefore be downloaded and installed first- Sun Java (optional)
Java 2 platform, Standard edition
Java 1.4.2 or newer runtimeNote: Java is required for the WebShare WebObjects Server or for the HELIOS Admin client.All installed firewalls must be turned off for the initial HELIOS installation (see 2.10 "Windows firewall problems").
On Windows machines, the machine ID is provided by a USB-dongle, which you have received from your HELIOS dealer. 3-hour demo mode and demo keys work without a USB-dongle (see 1.2.1 "HELIOS USB machine ID device").
1.2 Installation
1.2.1 HELIOS USB machine ID device
A USB-dongle provides the machine ID on Windows computers. When the dongle is plugged in for the first time, a driver must be installed. The driver is located on the HELIOS CD-ROM, in the "windows\usbdriver" directory.
Plug the HELIOS USB-dongle into a free USB port on the Windows computer.
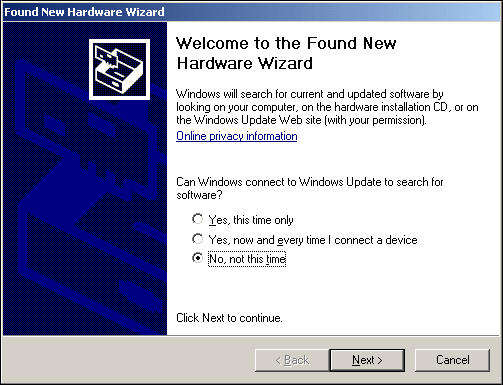
Windows will recognize it as a new hardware component and open the "Found New Hardware Wizard" (Fig. 1).
Select the No, not this time radio button because you want Windows to search for the driver on the HELIOS CD-ROM. Continue with Next >.
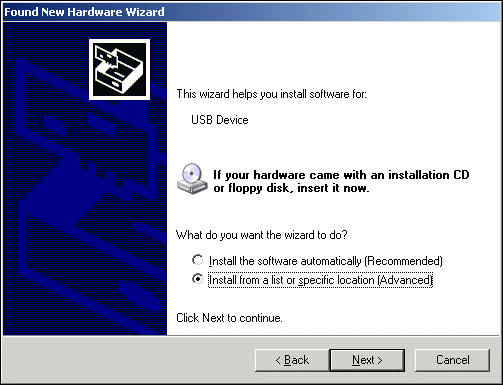
Place the HELIOS CD-ROM into the CD-ROM drive of your Windows computer and select the Install from a list or specific location (Advanced) radio button and click Next > (Fig. 2).
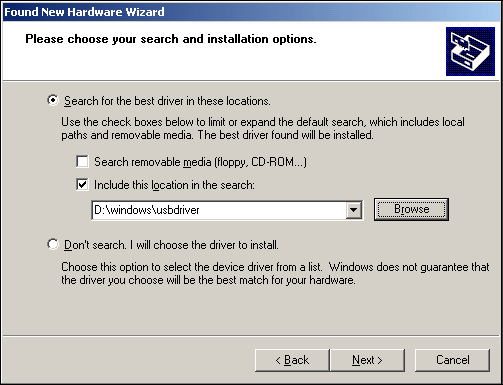
Navigate to the correct installation search path <CD_drive>:\windows\usbdriver and continue with Next > (Fig. 3).
Note: A warning appears that the driver is not digitally signed. You can ignore this warning and continue with Yes.
The Wizard shows that the installation has been completed.
If the Windows Device Manager (Control Panel > System > select Hardware tab, click on Device Manager) lists the entry HELIOS MachID USB Devices the installation of the USB driver was successful (Fig. 4).
1.2.2 Installing the HELIOS software
Insert the HELIOS CD-ROM in the into the CD-ROM drive of your Windows computer and start the installation by double-clicking the "HELIOS Installer.exe" icon in the "windows" subfolder.
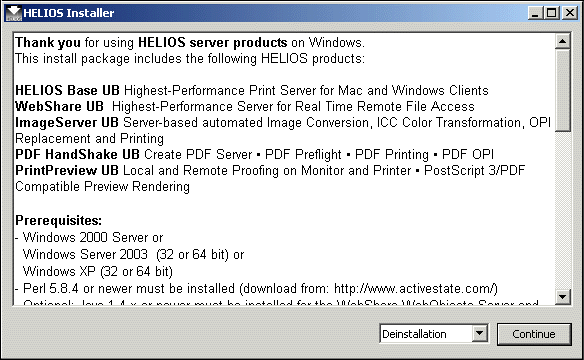
The HELIOS Installer window welcomes you.
The introductory dialog gives an overview of the installable HELIOS products and their main features.
Make sure that Installation is selected on the pull-down menu and click Continue to proceed.
The License Agreement window opens.
Read the content carefully and - if you agree to the terms and conditions - activate the Accept License radio button and click Continue.
Note: The "license" file is also available on the HELIOS
CD-ROM.If you do not agree, leave the Do Not Accept License radio button as is and close the window. The installation of the HELIOS software will then be aborted.
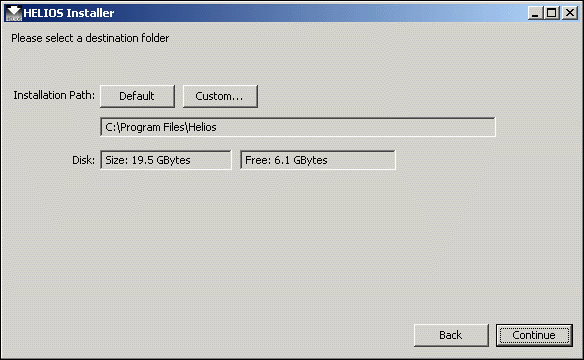
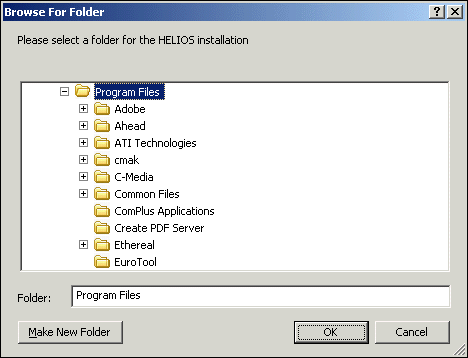
Specify the location where you wish to install the HELIOS products (Fig. 5), or click Custom..., which brings up the Windows file selector (Fig. 6). Then click Continue.
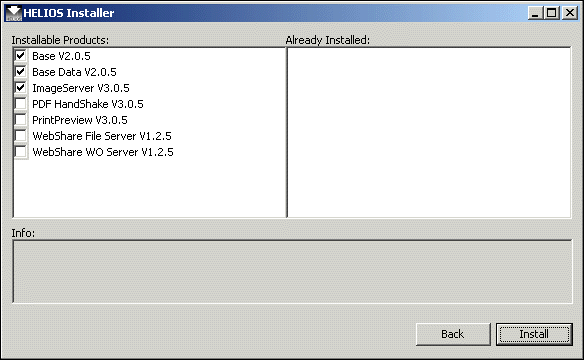
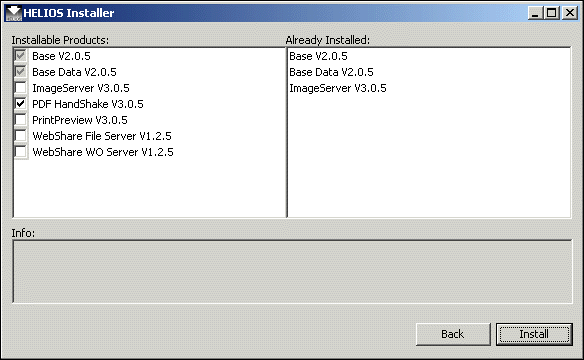
The Installable Products section shows all available HELIOS software products. If there are already HELIOS software products installed on the server they are listed in the Already Installed: section. Otherwise this section is empty (Fig. 7 and 8).
In the Installable Products section click the checkbox for the product you wish to install (see Fig. 8).
Fig. 7 shows a "fresh" installation of Base (with Base Data) and ImageServer, where no HELIOS product software was installed before. Fig. 8 shows that Base (with Base Data) and ImageServer are already installed, and PDF HandShake is about to be installed.
Important: Starting the installation will stop all HELIOS services running on the server. Therefore, please make sure that all HELIOS users log off before you install new products. To verify the HELIOS user status you can use the "swho" command described in the Base manual, or use HELIOS Admin (Lists > Active Users).After you have selected the desired products for installation, click the Install button.
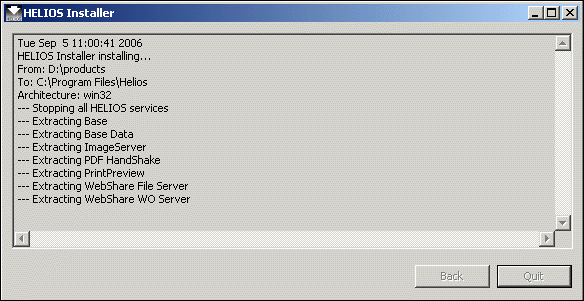
The status window (Fig. 9) shows the progress of the HELIOS software installation. As soon as the installation has finished, the software is started so the services are immediately available.
After the installation, an installation log file is written to the user's temp directory:
(Documents and Settings\<user_name>\Local Settings\Temp\helios.installer.log). It contains the information from the HELIOS Installer window (Fig. 9).1.2.3 Configuring the HELIOS software
Upon installation, the HELIOS programs are automatically started. They are generally administered via the HELIOS Admin application.
To run HELIOS Admin directly on the server, navigate to the "Helios\public\Windows" directory, and double-click on "HELIOS Admin.exe" (Java 1.4.2 or newer runtime is required).
To run HELIOS Admin remotely from a client, it is necessary to share the Helios\public directory. Navigate to the "Helios" directory, and right-click on the "public" directory. Select Sharing and Security..., and the Sharing tab. Click Share this folder, and (if desired) change the Share name to something descriptive, e.g. "HELIOS_Apps". See 2.7 "Windows shares & HELIOS volumes" for additional details.
Network clients can now mount that volume via SMB, or, if the Windows server is running SFM (Services for Macintosh), via AFP. However connected, Mac clients can find "HELIOS Admin.app" in the "MacOS" folder, and Windows clients will find "HELIOS Admin.exe" in the "Windows" folder of the volume. Other clients can use the "HELIOS Admin.jar" application in the "Java" folder. Simply double-click the respective HELIOS Admin icon. Alternatively, you can copy the application to your local hard disk.
For a complete reference to HELIOS Admin, refer to the chapter "HELIOS Admin" of the HELIOS Base UB user manual, and to 2.11 "HELIOS Admin notes" of this Addendum.
1.2.4 Removing the HELIOS software
To uninstall the HELIOS software products from a Windows platform, do the following:
Insert the HELIOS CD-ROM in the into the CD-ROM drive of your Windows computer.
Double-click the "HELIOS Installer.exe" icon in the "windows" subfolder.
Below the introductory dialog, make sure that Deinstallation is selected on the pull-down menu (see Fig. 10) and click Continue to proceed.
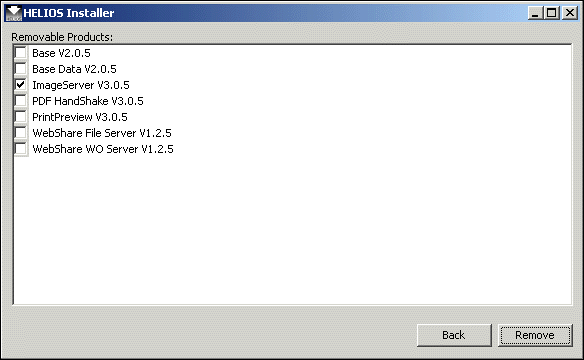
Select one or more HELIOS products from the list which you wish to remove (Fig. 11).
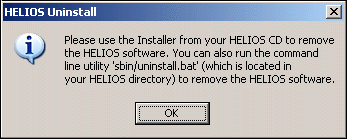
Note: The HELIOS software is listed in the Windows Add or Remove Programs dialog because it is handled in the Windows registry. However, it is not possible to have Windows remove the HELIOS software. Any attempt will leads to the following message (Fig. 12):
1.3 Licenses
Note: This chapter is about the HELIOS licensing conditions only. Microsoft's licensing conditions for their server and client solutions must be obtained separately.
For instructions on how to enter HELIOS software licenses read the chapter "Licenses" in the HELIOS Base manual.HELIOS Base UB for Windows includes the HELIOS Advanced Print Server and provides the foundation for all HELIOS products. All HELIOS products on Windows require a HELIOS Base UB installation and license.
User expansions can be added to HELIOS Base UB for Windows and are valid for HELIOS Base and all add-on products (ImageServer, PDF HandShake and PrintPreview). The user licenses are based on different users per day, the same as on all HELIOS server platforms. License details are described in the file "license.txt" on the HELIOS CD-ROM.
Supported example product combinations:
- HELIOS Base UB on Windows
- PDF HandShake UB
- Optional: ImageServer UB for Script Server hot folder workflows
A WebShare standalone server without any add-on product does not need a HELIOS Base license. Additional add-ons like ImageServer UB require a HELIOS Base UB for Windows license.
Dedicated WebShare WebObjects Server
- WebShare UB file server
- HELIOS Base UB installation (no license needed with WebShare)
- WebShare WebObjects Server (no license needed with WebShare)
Note: WebShare has its own user licenses. Additional WebShare users can be added with user expansions licensed for the WebShare product.WebShare Document Preview Server
- HELIOS Base UB on Windows
- HELIOS ImageServer UB
- HELIOS WebShare UB
- Optional: PDF HandShake for PDF previews
Supported software installation and license requirements for HELIOS products on Windows:
HELIOS Base UB on Windows is needed for all HELIOS add-on products.
WebShare UB can be used stand-alone but additional add-on products always require a HELIOS Base UB for Windows license.
Base UB for Windows user expansions are valid for Base UB and all add-on products (ImageServer, PDF HandShake, PrintPreview). WebShare user expansions are independent of Base UB for Windows user expansions.
| © 2006 HELIOS Software GmbH |