HELIOS Base UB User manual |
||||
HELIOS Admin is a client application which allows easy administration of the HELIOS software. Due to its Java based design it can be used cross-platform on Windows, Mac OS X, Linux and UNIX clients.
In terms of functionality, HELIOS Admin resembles its predecessors, EtherShare Admin and PCShare Admin, which on their part are only suited for the Macintosh and Windows environment respectively.
- Cross-platform administration
- All necessary configurations can be made in a GUI
- Administration over the Internet (HTTP)
- No terminal application such as vi, etc. required
This chapter describes the use of the application HELIOS Admin by the system administrator or other designated persons in order to perform configuration from any connected client in a convenient and secure way. It can also be used to set up regular users, groups, and printers on the server. In a multi-host environment, you can make several HELIOS Admin connections simultaneously, to copy certain configuration data between two or more hosts.
HELIOS Admin is also available to other, regular HELIOS users, to allow them to inspect the current configuration and printer queues. But only designated persons can make changes (see Security - who can use HELIOS Admin? below).
In order to use HELIOS Admin, the HELIOS Admin server must already be running on the host you want to configure. This service is started automatically when the system is booted. The HELIOS Admin server communicates with HELIOS Admin via a HTTP connection which allows managing multiple servers remotely.
Other chapters in this manual describe how administrative work, which is required to configure and maintain the HELIOS system, can be carried out directly on the host, e.g. via preferences. However, most of these tasks can be carried out much easier using HELIOS Admin from one of the client workstations.
The HELIOS Admin application offers a high degree of convenience to the system administrator. The user environment allows the host configuration to be represented graphically with lists and windows. Using HELIOS Admin from any workstation, server users, groups, volumes, printers, and all server settings can be installed. You can also interrogate each PostScript printer for available resident fonts and install downloadable fonts to the server.
Information about which windows are open (and about their positions and sizes) are stored in the preferences file ".heladmin.prefs" which is located in the home directory of the logged-in user. This allows you to arrange windows according to your individual taste, and have the arrangement retained between sessions.
HELIOS Admin accesses and modifies the "Preferences" configuration file just as if the changes were made manually. However, HELIOS Admin and the HELIOS Admin server have built-in safety checks to avoid conflicting or invalid configuration settings.
HELIOS Admin has the additional advantage that almost all changes are immediately effective, without having to restart the affected service.
Applying any changes e.g. to Extension Mappings via HELIOS Admin does not require a new file server login.
- Any new extension mappings will be available immediately.
- Any new HELIOS volumes will be available immediately.
- Any changes to HELIOS volumes, e.g. setting "Groups" membership, will be available immediately.
- Any changes to HELIOS volumes, e.g. removing, changing mount points, switching characteristics to "Read Only", or changes in "Groups" membership may result in side effects for connected clients. This may range from write errors to volumes getting dismounted (!).
- Especially removing volume access rights for clients that still have documents open on that volumes might cause damaged or only partially saved documents.
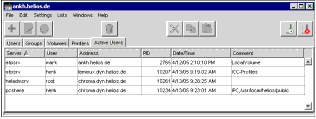
Make it a habit to use the HELIOS Admin feature of sending messages to connected clients to notify them in advance of potential damaging changes. You can verify with Lists > Active Users which users have certain volumes in access. Just open this menu before you save any settings to volumes and it will list the currently logged-in clients. Active Users will be updated automatically after 15 seconds.
HELIOS Admin is available to all HELIOS users, to allow them to inspect the current configuration and printer queues, but only the system administrator and members of three special groups are allowed to make any configuration changes or delete and re-schedule print jobs.
Members of the System Administrator group (default group name "SysAdm") can do all tasks that the system administrator can do with the exception of changing user data for any users with a user ID < 100 (the system administrator has the user ID = 0).
Members of the Printer Administrator group (default group name "PrnAdm") can perform print job related tasks:
The additional Queue Administrator group (default group name "QueueAdm") can change queue settings, i.e. perform all tasks which are related to printer queue configuration and printer queue management:
During the HELIOS Base installation, the "installer" program automatically creates the directory "public", which is published as the "HELIOS Applications" volume on Macintosh, and "HELIOS_APPS" on Windows. This directory is used to store HELIOS applications such as LanTest, or HELIOS Admin.
Start HELIOS Admin from a Windows workstation on the network by opening the network volume "HELIOS_APPS > Windows" via PCShare. Then double-click the respective HELIOS Admin icon. Alternatively, you can copy the application to your local harddisk.
Note: HELIOS Admin for Windows includes multiple file streams and therefore must be started or copied via PCShare. Otherwise file transfers, e.g. via FTP will not work.
Start HELIOS Admin from a Mac OS X workstation on the network by mounting the network volume "HELIOS Applications > MacOS" via EtherShare. Then double-click the respective HELIOS Admin icon. Alternatively, you can copy the application to your local harddisk.
Note: For installations on Mac OS X, HELIOS Admin can be accessed directly on the server via Go > Go to Folder- to go to "/usr/local/helios/public/MacOS".
Copy "/usr/local/helios/public/Java/HELIOS\ Admin.jar" to a UNIX/Linux workstation and enter the command:
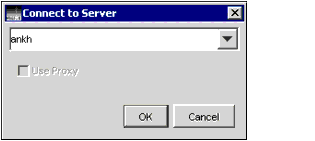
After starting the program, HELIOS Admin opens a window which lets you specify the HELIOS host you wish to connect to (Fig. 27). If you are already connected to the selected host or if you checked the Save Password option (see Fig. 28) for the selected host, the option Force Password Dialog becomes available. If checked, it enforces the login dialog irrespective of the Save Name and Save Password options.
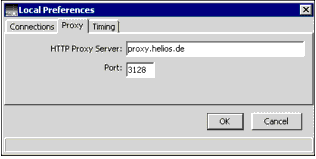
Enter the HELIOS host name, or the IP address and click OK. Activate Use Proxy, to establish the connection to the HELIOS Admin server over a proxy server.
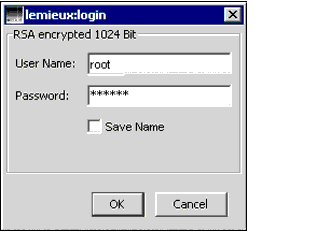
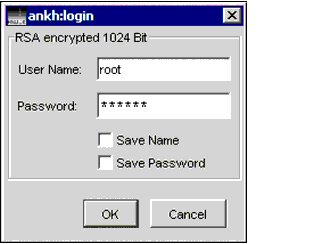
If an individual user name is not yet configured you have to log in as "root" which is usually the name of the system administrator on a UNIX system.
Note: Remember that after the installation of the HELIOS software on the host, the user "root" has an empty password entry. See also chapter 4.6.1 "Setting passwords".
If you check Save name, HELIOS Admin makes a note of your name and the IP address of the Admin server you want to use. The next time you start HELIOS Admin, you only have to enter your password.
You can configure the server to save the login password, too. For this to work, you have to set the preference AllowSavePassword, which is described in 16.10 "HELIOS Admin server preference keys". After restarting "heladmsrv", a new checkbox Save Password becomes available (Fig. 29). You can also log on to more than one host at the same time - see 6.10 "Multiple HELIOS hosts".
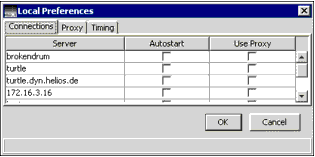
HELIOS Admin allows defining personal preferences for operating the application. You can e.g. specify:
- Hosts which you want to connect to automatically on startup
- Proxy connection
- Display refresh delay timings
This dialog allows you to specify whether connections to available hosts should be established automatically. In addition, you can activate the Use Proxy checkbox on a per-host basis. This setting corresponds to the Use Proxy checkbox in the Connect To Server dialog (Fig. 27).
In this dialog you may specify the name or IP address and the port number of the HTTP proxy server you want to use for establishing a connection to the HELIOS Admin host.
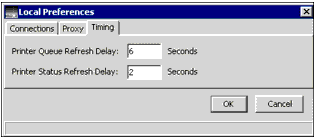
The status of HELIOS printer queues and printers is automatically refreshed every 6 and 2 seconds respectively. You may specify custom values, but note that too short a time interval may slow down the machine considerably because of constant refreshing actions on the server.
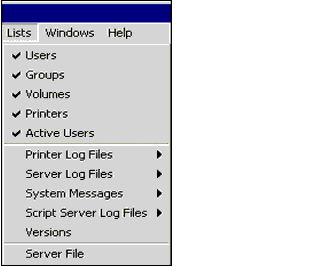
Window titles always show the name or the IP address of the chosen HELIOS Admin server (usually the host). List tabs are available for users, groups, volumes, printers, and active users. Log and message files, as well as the "Versions" file are available in their own windows (Fig. 33).
If the required tabs do not appear immediately after logging on, use the Lists menu to open the required lists manually.
HELIOS Admin is generally compliant with standard conventions (e.g. keyboard shortcuts) for selecting multiple entries (such as users) from list boxes. This saves time, e.g. if you want to open multiple windows.
Use Shift-click to select a range of entries and use Command-click (Mac)/Ctrl-click (Windows) to select/deselect individual entries from a list.
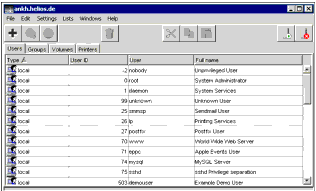
The Users list (Fig. 34) shows all users known to the host. The HELIOS Admin server automatically creates this list by inspecting the host's system file "/etc/passwd" (or the appropriate NIS file, see 10.3 "Configuration with NIS").
Select the required user from the list and choose Open from the File menu (or double-click the user name).
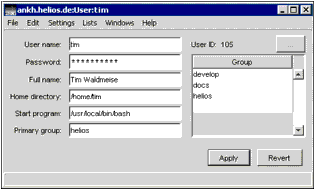
The window title shows the name of the HELIOS Admin server, the window type User, and the user name.
The window shows the User name, the user Password field, the Full name of the user, the Home directory of the user, the Start program, the Primary group and the list of Groups to which the user belongs. Note that the latter also includes the primary group.
The Password field shows always 6 asterisks, even if the password field is empty. It is only used when the system administrator needs to change or define a user password.
Note: We recommend not to use special characters (e.g. Umlauts) in the User name, Home directory or Start program fields. It is best not to use them in the Password and Full name fields either.
The HELIOS Admin server gets the user information from the file "/etc/passwd", with the exception of the list of groups to which the user belongs, which is obtained from the file "/etc/group". If NIS is installed, the information is obtained from the appropriate files instead.
It is now possible to change any of the fields as required. Note that the user Home directory field can be left blank, but a starting program and a primary group are obligatory. If the user should not receive the rights to access the UNIX shell, "/bin/date" can be entered in the Start program field. If the user Home directory field is left empty, no private user volume will be provided by the file server.
Note: "/" as HELIOS volume is not allowed at all. Use another directory if "root" needs a private volume.
In order to assign an additional group to the user, activate the Groups list and click on the desired group name. Without releasing the mouse button, drag the name away from the list - a dotted frame is drawn around the selection - and release the mouse button over the user's list of groups.
Provided that the user is not already a member of this group, the group is assigned to the user who now becomes a member of the group. Most hosts allow at least 16 groups per user.
Note: This procedure is also possible for users and groups on different hosts, as long as user and group are of the type "NIS" (see 6.10 "Multiple HELIOS hosts").
To delete a group from the user's assignments, select the group and choose Clear from the Edit menu.
This operation should not be confused with deleting a group from the Groups list. Only the membership of the user in the group is deleted, which is not the same as deleting the group from the system. Any user must be a member of at least one group. So, if you delete all entries from the user's list of groups, the user will always remain member of their primary group.
If you apply any changes in the user data window, they are only valid after clicking Save and only take effect with the next user login. Provided that the changes have not been saved, the Revert button can be used to recall the original data. If an attempt is made to close the window without saving or reverting changes, HELIOS Admin will ask whether to save or to revert the changes.
When amending and saving user data, the password is only changed if an entry has been made in the Password field. Note that the Password field shows always 6 asterisks, even if the user has no assigned password. On changing the password, HELIOS Admin prompts for the new password to be entered once again, to ensure that no typing mistakes have been made.
A changed password is entered in the file "/etc/passwd" and in the HELIOS user list ("HELIOSDIR/var/conf/passwd"). It is immediately valid, but only takes effect with the next user login. If NIS is installed, the information is changed in the appropriate files instead.
HELIOS Admin opens a user data window which already contains some default values from the Server Settings menu (Fig. 67). For example, when typing in the user name a suggested home directory is automatically filled into the corresponding field. The default suggestion can be changed if required.
After filling in the user data window and clicking on Save, a new user is added to the list. If the user data window is closed without saving, the new user entry is discarded.
On saving the new user, a new entry with the corresponding user data is created in the "/etc/passwd" file. The user ID will be assigned automatically. If groups were specified, these are entered in "/etc/group". If NIS is installed, the information is changed in the appropriate files instead.
Note: The AIX operating system only allows user and group names up to 8 characters. If you use longer names, you will receive various UNIX error messages. You may not be able to make a UNIX shell login if your login name is too long, or one of your group names is too long, but you can still log on to the file server. We recommend to use user and group names of up to 8 characters only.
If deletion is confirmed the entry is removed from the list, and the corresponding entries are deleted from the files
"/etc/passwd" and "/etc/group". Files in the user's home directory are not deleted. They must be removed by the system administrator.
Important: Never delete UNIX users like "bin", "daemon", etc. This may cause serious problems!
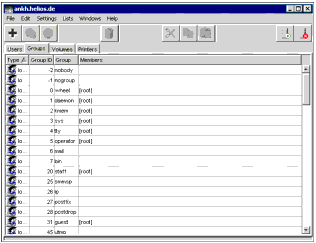
The Groups list (Fig. 36) shows all groups known to the host. The HELIOS Admin server automatically creates this list by inspecting the UNIX system file "/etc/group" (or the appropriate NIS file, see 10.3 "Configuration with NIS").
Select the required group from the list and choose Open from the File menu (or double-click the group name).
The window title shows the name of the HELIOS Admin server, the window type Groups and the group name.
The window shows the Group name and the list of the group members (User). The HELIOS Admin server gets the group information from the files "/etc/group" and "/etc/passwd" (or from the appropriate NIS file).
In order to assign an additional user to the group, activate the Users tab and select the desired user name. Without releasing the mouse button, drag the name away from the Users list - a dotted frame is drawn around the selection - and release the mouse button over the User list of group members.
Provided that the user is not already member of this group, they will be added to the list of members now.
Note: This procedure is also possible for users and groups on different hosts, as long as user and group are of the type "NIS" (see 6.10 "Multiple HELIOS hosts").
In order to delete a user from the User list of group members, select the user name and choose Clear from the Edit menu. This operation should not be confused with deleting a user from the user list. Only the membership of the user in the group is deleted, which is not the same as deleting the user from the system.
If you apply any changes in the group data window, they are only valid after confirmation and only take effect with the next user login. Provided that the changes have not been saved, the Revert button can be used to recall the original data. If an attempt is made to close the window without saving or reverting changes, HELIOS Admin will ask whether to save or to revert the changes.
After filling in the group data window and clicking on Save, a new group is added to the list. If the group data window is closed without saving, the new group entry is discarded.
On saving the new group, a new entry with the corresponding group data and member list is made in the "/etc/group" file (or the appropriate NIS files). The "group ID" will be assigned automatically, but can be changed as follows:
Click on the - button (compare Fig. 35 and Fig. 37) and enter the new user/group ID. Then confirm the changes.
If deletion is confirmed the entry is removed from the list, and the corresponding entries are deleted from the file
"/etc/group". The file "/etc/passwd" is checked for users who were assigned that group as their primary group; if any are found, the ID for the primary group in the user's entry in the "passwd" file is changed by convention to the group ID of the group "nogroup". The user must then be assigned a new primary group before they can log in anew. Also, make sure that the group is not used for the volume Group list of any of the volumes.
Important: Never delete UNIX groups like "bin", "daemon", "lp", or "mail". This may cause serious problems!
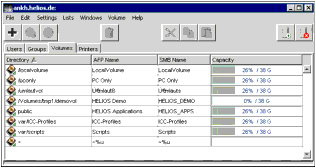
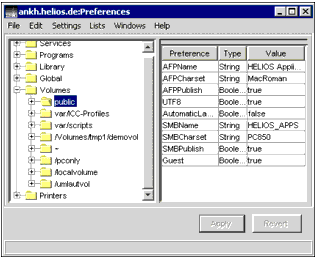
The Volumes list (Fig. 38) shows all HELIOS volumes known to the host. The HELIOS Admin server automatically creates this list by inspecting volume related entries in the "Preferences" file (see "Volume preference keys" in the Base manual).
Before changing volume data, make sure that the volume is not in use. All users should unmount the volume, because changes take effect immediately and this could lead to strange effects, e.g. if you set a volume to "Read Only".
In order to change the settings for a particular volume, you must open the data window that displays all available information about the selected volume (Fig. 39).
Select the desired volume from the list and choose Open from the File menu (or double-click the volume name).
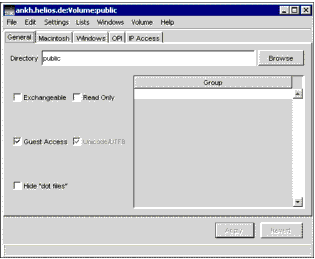
The General tab is always displayed first. It shows the general volume data, which is valid for all volumes. The settings which are available in the tabs Macintosh, Windows, and OPI are detailed in the respective manuals (EtherShare, PCShare, and ImageServer).
The IP Access tab allows you to choose an IP access file for the volume which is different from the general access file "ipaccess", which is published as DEFAULT (see 6.8.5 "IP Access").
The window title shows the name of the HELIOS Admin server (usually the host name), the window type Volume and the volume mounting point (here "public"). Directory shows the UNIX mounting point of the volume.
It is now possible to change the volume directory path and the checkboxes for Exchangeable, Read Only, Guest Access, and Hide "dot files". The volume Groups list is described later in this chapter (see Volume groups below).
Only check Exchangeable for removable media attached to the host which are normally changed while the host is running (e.g. a CD-ROM).
Important: Do not check Exchangeable for local volumes and for storage mounted remotely, e.g. through NFS! The latter is usually mounted automatically on booting UNIX.
Removable media such as CD-ROMs or DVDs must be mounted with a UNIX command or, preferably , by using HELIOS Admin, before they can be mounted on the desktop.
To mount a removable volume, select the volume in the Volumes list of HELIOS Admin and choose Mount from the Volume menu.
Note: Removable media must be compatible with the HELIOS UTF-8 file format.
Read Only must be checked for exchangeable media which are write-protected. Otherwise you will not be able to mount them.
Note: Read only should not be used to enforce read-only access to read/write drives. Use appropriate file permissions for this purpose.
If the option Guest Access is checked, a user can access the volume with the rights of the UNIX user "nobody".
Note: To make guest access to volumes work at all, the preference guest must be specified (see 16.8 "Authentication server preference keys").
Unicode/UTF8 is active and cannot be turned off so the character set encoding for the specific volume is set to Unicode. This provides a correct cross-platform file name transfer (particularly if the names contain special characters such as "Umlauts") between Macintosh clients, PC clients (provided that PCShare is installed), and UNIX servers. On all machines the file names are displayed in the same way.
If the Hide "dot files" option is checked, the HELIOS Admin server passes files which start with a dot (".") in their file name as "hidden" to the connected client.
If you apply any changes in the volume data window, they are only valid after conformation and only take effect with the next user login. Provided that the changes have not been saved, the Revert button can be used to recall the original data. If an attempt is made to close the window without saving or reverting changes, HELIOS Admin will ask whether to save or to revert the changes.
The volumes' directories must not overlap or include the directories of other HELIOS volumes, so choose the volume mount point carefully. However, HELIOS Admin will issue an error message if you try to specify a path which would overlap the directories of other volumes. Furthermore, the directory tree of each HELIOS volume should not be split among more than one file system. Otherwise, the values for used and free space would not reflect the correct status, and trashing of files would only be possible immediately.
Important: Note that symbolic links pointing to directories would confuse the file server. For example two directories in one volume might have the same directory ID and double-clicking one of the folders then could open the other. To prevent this, the HELIOS file servers do not follow symbolic links on folders. If you need links, use the client's "Alias" function instead. If HELIOS file servers detect overlapping volumes they will not mount them and issue an error message instead (see Desktop auto-rebuild in 12.2 "The desktop server program").
Finally, the volume directories should not be "cross-mounted" through NFS, because HELIOS will not allow you to mount the same volume concurrently from different hosts. As soon as the volume is mounted by a user from one host, it will not be available anymore for users of other hosts. The volume will be released again automatically when it is unmounted. However, you can always mount the volume by logging on to the host from which it is already mounted.
After filling in the volume data window and confirming the changes, a new volume is added to the list. If the volume data window is closed without saving, the new volume entry is discarded.
On saving the new volume, a new entry with the corresponding volume data is made in the "Preferences" file.
Especially if you store a large number of files on the HELIOS server, or if the server is used by several different departments in your company, you may want to subdivide the hard disk(s) of your host into several different logical volumes. You can then set access permissions for each volume (and for individual folders in the volume) with the client permissions option. To provide additional security, you can also make specified HELIOS volumes visible only to selected user groups, by using the volume Groups feature.
Open the Volumes data window and the Groups list and select the desired group name. Without releasing the mouse button, drag the name away from the Groups list and release the mouse button over the volume groups list.
HELIOS Admin will prompt for acknowledgment of deletion, to allow deletion to be aborted, if required.
If deletion is confirmed, the entry is removed from the window and the corresponding entry is deleted from the "Preferences" file.
Note: If the volume still contains files and folders, they are not deleted. However, they are no longer accessible to client users.
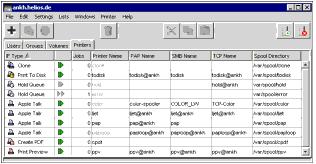
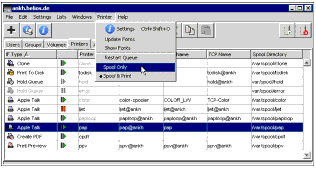
The Printers list (Fig. 40) shows all printer queues known to the host. The HELIOS Admin server automatically creates this list by inspecting the contents of the "printcap" file and printer related entries in the "Preferences" file.
Each printer (i.e. printer queue) is shown in the list under its own unique host name (Printer Name) as specified in "HELIOSDIR/var/conf/printcap". Each queue can also have a PAP Name (Macintosh), an SMB Name (Windows), or HELIOS TCP Name, which is usually not the same as the host printer name. If the name appears gray the respective name is defined but not published to the clients.
Which of the names are available on the workstations depends on the way the client is connected to the server: via AppleTalk, via TCP/IP, or via SMB. We recommend that you name your printer queues by adding an extension to the name of the physical printer. So you can easily distinguish between queues and printers.
Note: You should always select the printer queue (spooler) rather than selecting the physical printer for printing. Due to print job spooling, it is not only much more efficient to access printers through the printer queues, it also avoids the problem of long waiting periods that may occur if you try to access a printer both directly and through the spooler.
Usually, each printer queue is associated with a single physical printer. However, you might wish to allocate more than one printer queue to a printer, for example to be able to select different printer initialization strings for the same printer (see later). In this case, you will have several spooler names for the same physical printer. However, each printer queue is always associated with its own unique host printer name.
Note: In the following, the term "printer" is meant to encompass all aspects of setting up a particular printer, not only the configuration of the printer's network connection but also the configuration of the associated printer queues.
Changes in the printer configuration affect the files "Preferences", "HELIOSDIR/var/conf/printcap" and the printer queue entries in "HELIOSDIR/var/spool/qmeta/".
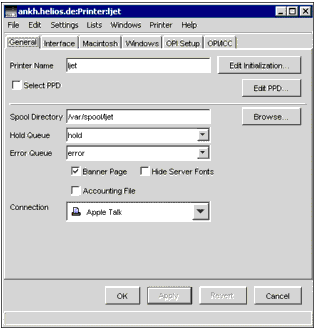
In order to change the settings for a particular printer queue, you must open the Printer window (Fig. 42).
The window title shows the name of the HELIOS Admin server, the window type Printer and the UNIX printer name. This was entered in the Printer Name field.
When typing in the Printer Name, a suggested Spool Directory path is automatically stated in the corresponding field. Of course, the default suggestion can be changed if required.
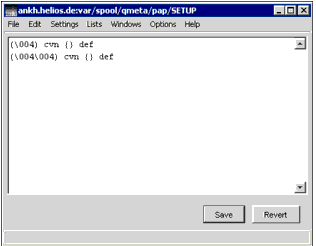
Edit Initialization is used to create or change a PostScript printer initialization sequence ("INIT") for the selected printer. You can use this, e.g. to define a PostScript filter sequence to remove unwanted single and double "Ctrl-D" codes generated by some MS-Windows applications. A suitable filter for this is shown in the example in Fig. 41. Usually, each physical printer is associated with a single printer queue. However, you can allocate more than one printer queue to a printer, which allows you to have different printer initialization strings for the same printer and to select between them via different queues.
Note that writing INITs requires some knowledge of the PostScript language. PostScript INITs must not contain the "exitserver" operator because if so, the following print job will not execute properly (see A 3.3 "PostScript RIP inits in HELIOS Admin").
Another way of defining a specific behavior during printing, is to edit the PPD file which has been assigned to the queue. This is described in the section Restart Queue in 6.7 "Printer menu".
If the Select PPD option is checked, an additional section becomes available in the window allowing you to specify a PPD for the printer queue. If a queue has a PPD assigned, you can display the contents of that file in a text window, and root and members of the SysAdm or QueueAdm group can edit the file:
You can use this feature for information purposes at any time, e.g. to find out which PPD file is currently valid in a specific queue. However, you should be very careful as far as the "edit" functionality is concerned. Editing a PPD file requires some knowledge about the structure and syntax of PPD files. Also, your changes may have different effects when printing with different applications.
The Spool Directory field specifies the directory in the UNIX file system where print jobs are temporarily stored before they are sent to the printer. If required, the spool directory can be set to swap out the spool files to other file systems (hard disks), but you should avoid NFS-mounted spool directories because of the performance loss. Note that the spool directory must be unique for each printer. It is recommended to check that there is enough free space in the directory of your choice. The Browse- button allows you to select a spool directory manually.
Note: Make sure a directory path already exists because HELIOS Admin will only create the last subdirectory, e.g. PrintToDisk in "/var/spool/PrintToDisk".
Usually, print jobs vanish after they have been sent to the output device. Hold and error queues act as a kind of archive: All print jobs that have been sent to a specific printer queue are printed, and then stored for a given period of time in the connected hold/error queue. They can be restarted even if the application that has initially launched the job has already been closed. All "correct" print jobs automatically proceed to the Hold Queue after printing. Whenever an error has occurred during printing the print job will be shifted to the error queue (as long as hold and error queues have been specified in the pull-down menus). This holds true for technical mistakes, e.g. if the connection to the printer has been interrupted and for errors that are due to a specific configuration (e.g. the Check Images flag has been set for an OPI printer queue and the print server cannot find a particular image file that has been placed in the document by reference).
The Hold Queue setting is normally used to route a completed job to an actual Hold Queue to await further action. It is also possible to use the Hold Queue setting to route the completed job to another print queue, to set up sequential printing. This is also known as "job pipelining". For example, if a job prints successfully to the printer, it could then go to another queue where the job is optimized for archiving, or for Internet use, etc. If it is routed to a Print to Disk queue, or a Create PDF queue, the output can be saved to a specified directory or user folder. For simultaneous output, a Clone queue can be used, see 6.5.5 "Printer connection type (Interface)".
The Banner Page option determines whether the printer will print a title (banner) page before outputting the print job. The banner page contains information about the print job such as the user name, the time and the document name. It is useful when sorting out a pile of pages if a number of users have been printing at the same time. The banner page is generated automatically. If a file named "BANNER" exists in the printer's spool directory, this file will be used.
The Accounting File option determines whether the print server will write print job details such as the user name and the number of printed pages to the printer log file. The job will be assigned to "root" if no name is specified, or if the name specified is unknown to the HELIOS Admin server. See User and document names in print jobs in A 3.1 "Printer log file structure" for more information.
When printing to a HELIOS printer queue, the client application usually "asks" the print server for already installed fonts, so it only needs to include those fonts in the print job that are missing on the server.
Sometimes you may want the client application to include all needed fonts in the print job, in order to make sure that the exact fonts from the application are used for printing. The Hide Server Fonts option causes the server to "pretend" to not have any fonts installed, which would induce the client application to include all needed fonts.
Choose the Connection type for the printer queue. The different types are explained in 6.5.5 "Printer connection type (Interface)".
If you apply any changes in the printer data window, they are only valid after confirmation. Provided that the changes have not been saved, the Revert button can be used to recall the original data. If an attempt is made to close the window without saving or reverting changes HELIOS Admin will ask whether to save or to revert the changes.
The Macintosh tab is described in the EtherShare manual, the Windows tab in the PCShare manual, and the tabs for OPI Setup and OPI/ICC in the ImageServer manual.
After filling in the printers data window and confirming the changes, the new printer is added to the list. If the printer data window is closed without saving, the new printer entry is discarded.
- A new entry in "HELIOSDIR/var/conf/printcap", and new entries in the "Preferences" file with the key: Printers/<printer queue>/<Preference>
- A link to the interface program is created from "HELIOSDIR/var/spool/qmeta/<printer queue>/if"
- The printer spool directory is created and the "lock" file is created in this spool directory.
- The printer FONTS file and its PPD file are placed in
"HELIOSDIR/var/spool/qmeta/<printer queue>. Privileges are defined by HELIOS Admin in case a new directory is created. Otherwise the privileges that have already been defined, are used. They must be set up properly, otherwise it may happen that - for instance - jobs are not deleted after printing and remain stuck in the spool directory.The spool directory is usually removed when deleting a printer queue. We recommend that you clear any existing print jobs and wait until the printer is idle before deleting the queue.
Note: The spool directory is not deleted if it contains files which are unknown to the LPR printing system.
For deletion, activate the Printers list, select the printer name, and choose Clear from the Edit menu.
If deletion is confirmed, the entry is removed from the window and the queue on the host is stopped. HELIOS Admin deletes the configuration entries in the "Preferences" file and in "HELIOSDIR/var/conf/printcap", and the corresponding link for the interface program will be removed.
The Interface tab in the Printer window (Fig. 42) allows selecting and configuring the printer output interface for a queue. These settings specify where the output of the print queue is sent. The various interface types are described below.
The AppleTalk connection type is only available if you have the EtherShare product installed and licensed. This connection type is described in the EtherShare manual.
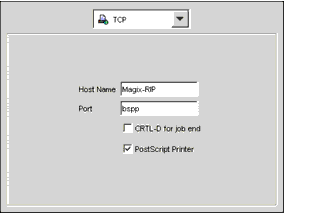
TCP (Fig. 43) connects a printer to the network via the TCP/IP stream protocol. Enter the name (or the IP number) of the TCP/IP printer (or terminal server) in the Host Name field. Enter the service port name (or service number) in the Port field. There should be a PostScript interpreter listening at this address. TCP/IP stream printers must be compatible with the HELIOS TCP/IP stream implementation - contact your printer manufacturer or HELIOS supplier (see HELIOS web site) if you are not sure about this.
You can specify a TCP/IP stream printer either with host internet number and service port number, or with host name and service port name. The latter method requires corresponding entries in the local host's "/etc/hosts" and
"/etc/services" files.
The CTRL-D for job end option causes that a "CtrlD" character is sent to the printer at the end of each job. This is only necessary if the TCP/IP printer is connected to a TCP/IP terminal server via a serial interface. If the PostScript Printer option is switched off the job will be printed "as is"; tasks that are usually accomplished during printing, e.g. font inclusion or image replacement (for OPI only), will be skipped.
Note: Please do not confuse the described output TCP connection with the input HELIOS TCP printing feature for Macintosh clients, which is described in the chapter "Mac OS X client configuration" in the EtherShare manual.
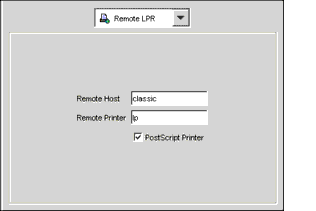
Note that "Remote LPR" is another TCP connection type, but it is not identical to the TCP/IP stream. Remote LPR (Fig. 44) connects a PostScript printer to another remote host on the network via TCP/IP. Enter the name (or the IP address) of the remote host to which the printer is attached in the Remote Host field. Enter the remote printer's UNIX name in the Remote Printer field. The service port name is set to "BSD Remote LPR" (port 515) by default. The entry can be checked in the UNIX file "/etc/services".
For Remote LPR, the local host must be defined on the remote host, in the "/etc/hosts" and "hosts.equiv" (or "hosts.lpd") files.
Note: Remote LPR printers require more spooling space (the size of the resolved job) on the local host than TCP/IP stream printers, and they do not return status messages or answer font queries.
The HELIOS "remote lpr" specification differs somewhat from standard conventions. Thus HELIOS Admin will not list other "Remote LPR" printers which have been manually configured for other purposes. HELIOS Admin will not modify other "HELIOSDIR/var/conf/printcap" entries unless you inadvertently choose an already existing UNIX printer name. If the PostScript Printer option is switched off the job will be printed "as is"; tasks that are usually accomplished during printing, as e.g. font inclusion or image replacement (for OPI only), will be skipped.
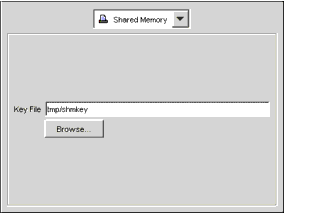
Shared Memory (Fig. 45) can be used for PostScript interpreters (software RIPs) which are installed on the same host, and which are able to communicate through a "Shared Memory" interface.
Enter the path of the Shared Memory "key" file in the Key File field. The key file must already exist on the host. The RIP must be compatible with the HELIOS "Shared Memory" interface specification - contact your RIP manufacturer or HELIOS supplier (see HELIOS web site) if you are not sure about this.
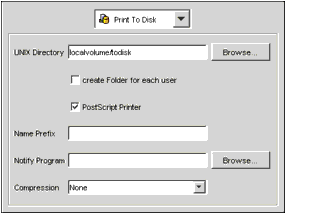
A destination for the file (Directory) must be specified and you may enter a Name Prefix and a Notify Program, if desired. The prefix serves to identify the files that are coming from this specific printer queue (in case you have several "Print To Disk" queues that print to the same destination). The Notify Program option lets you enter a path that leads to a specific program. This program will be started automatically after printing has been finished successfully. Job information (e.g. user, title, pages, etc.) is exported as environment variables, for its use. See notifyprog in 16.3 "Printer preference keys". Furthermore, you can select a Compression mode for the destination file, and you can decide whether or not your print job has to be resolved the same way it would be resolved when printing to an output device. If the PostScript Printer option is switched off the job will be written to the file "as is"; tasks that are usually accomplished during printing, as e.g. font inclusion or image replacement (for OPI only), will be skipped.
Balance Group (Fig. 47) is used to set up a group of printers for load balancing - that is for shifting print jobs to a second or third printer in a group whenever the first printer is busy with a huge job.
Highlight a group of printers for the balance group in the Printers list, and "drag" them into the respective field in the Printer window.
Note: We recommend to select the same PPD for the "Balance Queue" which has already been assigned to the printers in the Printer field. Otherwise the printing results may not be predictable. See section Changing printer data in 6.5.4 "Printers".
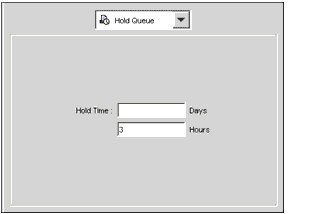
You can specify an individual Hold Time. The default value is 3 hours. If you set the hold time to 0 days and 0 hours this would mean "on hold forever". Print jobs in such a hold or error queue will be stored until you move them to another queue or delete them manually.
Important: Only enter non-negative integer values! Floating point or negative integer values may lead the print server to unexpected behavior.
The Create PDF connection type is only available if you have the PDF HandShake product installed and licensed. This connection type is described in the PDF HandShake manual.
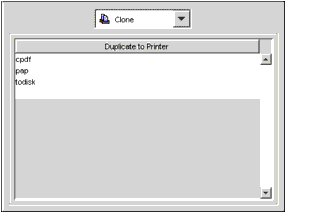
By use of a "Clone queue" print jobs can be duplicated into multiple queues which are defined in a group of printers. To clone a print job to a group of printers the Clone connection type must be selected (Fig. 49).
Highlight a group of printers for the clone queue in the Printers window, and "drag" them into the respective field in the Duplicate to Printer window.
Note: We recommend to select the same PPD for the "Clone" connection which has already been assigned to the printers in the Duplicate to Printer field. Otherwise the printing results may not be predictable. See section Changing printer data in 6.5.4 "Printers".
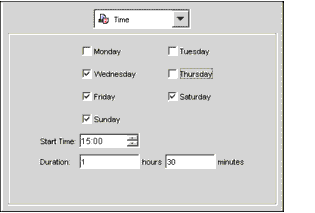
The Time connection immediately forwards print jobs to the Hold Queue (which for this use is most likely a printer queue to a physical printer) during the determined date/time. Outside the defined times the jobs remain in the time queue until the next date/time specification is reached. In the example in Fig. 50 print jobs are immediately forwarded to the Hold Queue on Wednesdays, Fridays, Saturdays and Sundays from 3:00 PM, for 1 hour and 30 minutes.
The print server needs to have a list of resident fonts for each installed printer. The printer's resident font list (the "FONTS" file in the printer's spool directory) is created automatically by the HELIOS Admin server by interrogating the printer when it is first set up. The printer must be connected and online for this to work.
If the HELIOS Admin server is not able to query the font list for some reason, e.g. because the printer is offline or busy with another job at that time, the Printer Name entry in the Printers list appears gray.
For all output devices where no fonts can be queried, e.g. Remote LPR, Print To Disk or Balance queues, the HELIOS Admin server will rely on the font information provided in the PPD files specified for these printer queues. Make sure to select proper PPD files which contain current information for your output device.
If the font list is missing, you should connect the printer, put it online, and select Update Fonts in the Printer menu manually (see Update Fonts in 6.7 "Printer menu").
The following table states which additional HELIOS software product must be installed and licensed in order to make the respective printer interface available:
Selecting one or more users and then choosing Delete from the Edit menu will kill their current server connection. Note that only the user themselves, "SysAdm" or "root" are allowed to clear a connection. The Active Users option gets its information from the file "HELIOSDIR/var/run/stmp". See also 7.7 "swho" for related information.
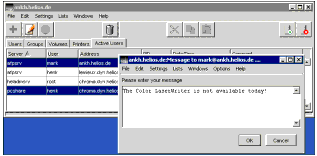
Go into the Active Users window, highlight the user(s) you want to address, select Send Message- from the File menu and enter your individual message in the dialog as shown in Fig. 52. You can also double-click a user in the list to get to the message dialog.
Messages are displayed automatically in a message window on the addressee's monitor. They are not saved in a file; the addressees delete them on closing the respective message window by clicking the OK button.
Such messages can also be sent from the HELIOS server using the "srvmsg" program. For details see 7.1 "srvmsg".
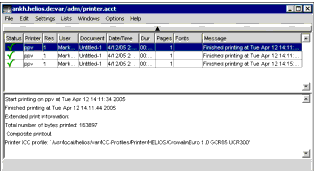
The printer log file shows print job accounting details for the selected host such as job status, printer name, result, user name, document name, starting date/time, duration of job, number of printed pages, used printer fonts, etc. The job status can be:OK and
Error.
The messages file which belongs to each entry in the log file, contains even more information, e.g. the total number of bytes printed and whether you have printed composite or separations. If you are working with ImageServer the printer log messages file also provides information about image replacement. This information is especially useful for print jobs in an error queue because you will get details about the mistakes that may have occurred.
Every night at midnight the (UNIX) "cron" program starts automatically in the background and renames the log file information of the last seven days. The file "Today" becomes the file "Yesterday", "Yesterday" is renamed into "Two Days Ago", and so on. You can then select, for instance, the printer log file of "Three Days Ago". Log files which are older than seven days are deleted automatically.
From within the printer log file you can display the related messages files with a click on the respective item (Fig. 53). This is especially helpful in case of errors that might have occurred.
Note: If the filter option is active (see Filtering log file entries section below), only the filtered part of the printer log file is saved.
You can then read this information into a word processor or spreadsheet program for billing purposes, or to prepare job statistics. The messages files can also be saved as text files. Users are also sent a mail message, and an additional HELIOS message if a printer error occurs.
The user name assigned to the job is the Full name specified in the HELIOS Admin Users list window. The job will be assigned to "root" if no name is specified in the Users list, or if the name specified is unknown to the HELIOS Admin server. HELIOS Admin gets its information from the files "HELIOSDIR/var/adm/printer.acct" (which contains the data of "Today") to "HELIOSDIR/var/adm/printer.acct.6" ("Seven Days Ago"). See A 3.1 "Printer log file structure" for more information.
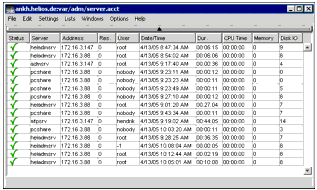
The server log file contents depend on the operating system. Usually, the log file shows messages from all HELIOS servers such as status (
Note: If the filter option is active (see Filtering log file entries section below), only the filtered part of the server log file is saved.
You can then read this information into a word processor for further use. HELIOS Admin gets its information from the files "HELIOSDIR/var/adm/server.acct" (data of "Today") to "HELIOSDIR/var/adm/server.acct.6" ("Seven Days Ago"). See A 3.2 "Server log file structure" for more information.
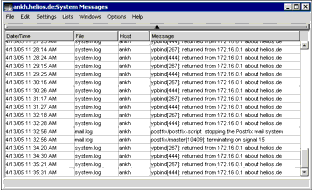
Note: If the filter option is active (see Filtering log file entries section below), only the filtered part of the system messages is saved.
You can then read this information into a word processor, or fax it e.g. to your host manufacturer in case you have a system problem.
HELIOS Admin gets its information from system message file. The location of this file is specified in "/etc/syslog.conf" and depends on the host system, e.g. "/var/adm/messages".
The system message file can grow quite large. It cannot be cleared using HELIOS Admin - the UNIX operating system is usually responsible for keeping it at a manageable size. See the description of the "cron" program in your UNIX documentation for details. If a HELIOS application writes a syslog message, you are immediately notified and the System Messages window is automatically updated. The logging of system messages can be stopped with Options > Stop Updating. Syslog messages logged by non-HELIOS applications will automatically be checked every 30 seconds, and displayed if new messages are available.
Select Options > Filter from the menu to get access to the filter options (alternatively, select ToolBar from the Options menu, and click on the filter icon).
Filtering according to the specified criteria is toggled on/off via the menu item Filter, or the filter icon. In the example in Fig. 56 the server log file has been filtered to display only entries that were issued from "afpsrv" (see Fig. 54).
Important: If you have a filter applied in the system messages window, and receive a message that does not match the filter criteria, the filter is automatically toggled off so the message becomes visible in the list!
This is not the case if in addition the Stop Updating option is set.The filter pane can be toggled visible/hidden with the triangle above the filter pane, at any time the filter is active.
Note: This logic applies to the Server Log File, Printer Log File, and System Messages window.
Script Server is part of the ImageServer software. For a description of the Script Server log files and the Script Server log file structure read the respective chapter in the ImageServer manual.
HELIOS is continuously improving all its software products, and improved versions are released now and then. Besides the program versions, the Versions window also provides information about your licensed HELIOS products, interfaces, and "syslog" configuration.
Select Versions from the Lists menu to list the versions of all HELIOS server modules and client programs (Fig. 57).
Note: The Versions window will be recreated on call for "root" and members of the "SysAdm" group (for other users the existing "Versions" file will be displayed). Therefore, it may take some time to open the window. Regular users will get the information that was valid on the last start of the HELIOS services.
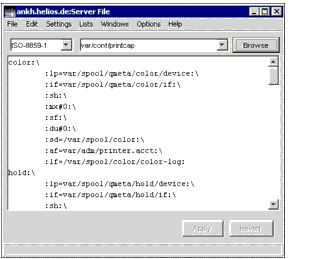
Server File offers a text editor functionality (Fig. 58) within HELIOS Admin, which allows displaying and editing text, e.g. the "printcap" or the "license" file.
The example above shows the HELIOS printer configuration file "printcap". A pull-down menu allows selecting the encoding for the displayed text. The selection contains a number of encodings, e.g. Shift_JIS, MacRoman, UTF-8.
To display a file specify the path to the file in the URL field, or click the Browse button. To edit the file, the Options > Read Only menu item must be unchecked (can only be done by the system administrator).
After editing the file confirm your changes, or Revert if you do not want your changes to be applied.
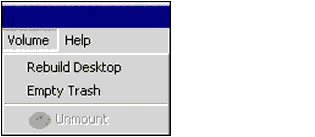
If you have selected a volume from the Volumes tab an additional menu item Volume is available in the menu bar at the top of the screen (Fig. 59). Multiple selections are possible. The functions in the Volume menu only apply to the volume(s) that you have selected.
HELIOS volumes contain a special, invisible file - the volume "desktop" - which is internally used by all HELIOS server products. It contains organizational information such as the icons you see in the Finder. See 12 "The desktop server" for details.
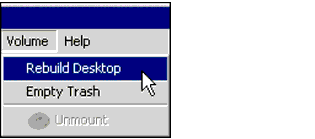
After a period of time each volume desktop tends to collect a number of icons which are no longer needed, since the corresponding application has been removed from the volume. For this reason, you may need to rebuild the desktop from time to time - a process which scans the entire volume for applications and makes sure that the desktop only contains icons for existing files.
To rebuild the desktop of a HELIOS volume make sure that all users unmount the respective volume. Then select the volume from the HELIOS Admin Volumes tab and choose Rebuild Desktop from the Volume menu (Fig. 60).
Important: You cannot rebuild read-only volumes - in this case Rebuild Desktop will be grayed out in the Volume menu. The Read Only option can temporarily be deactivated for hard drives and magneto-optic cartridges to allow the desktop to be rebuilt. See 12 "The desktop server" for related information.
Note: You can optionally select several volumes and thus rebuild several desktops at the same time.
During a HELIOS desktop rebuild, missing resources for directories and files are automatically created for all directories in the HELIOS volume, and file IDs are created (or verified if a matching resource file already exists).
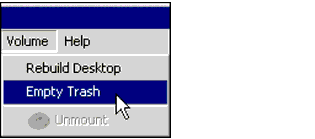
HELIOS volumes with "readwrite" access - this includes both local Macintosh hard disks and HELIOS server volumes - contain a special, invisible folder called Network Trash Folder which is used internally by the operating system. It is used to store files that you have deleted, until you choose to empty the trash and thus delete the files physically (Note that Mac OS X and Windows delete files immediately, without a prior trash backup!). In the case of network (shared) volumes, the trash folder actually contains multiple trash cans which are maintained separately for each user connection.
Unlike local volumes, if you unmount network volumes, the trash is usually emptied automatically, and its content is no longer available the next time you log on. Thus, make sure you have not trashed something by mistake before you unmount a network volume.
However, this auto-clearing mechanism fails in case you shut down the client without first unmounting the network volumes. This can cause problems because of the way the file servers allocate trash cans. Users do not have the same trash can every time they log in, but they receive a trash can number that corresponds to the number of user connections currently established. The first user who mounts a volume receives Trash #1, the second one receives Trash #2, and so on. Now, if user number 20 leaves their trash unemptied, and if this trash can is not allocated again (because there are always less than 20 users who mount the respective volume simultaneously), the trash will never be emptied.
If you notice that there is a lot less free space in the volume than you expected (knowing the total size of the files stored there), this may be because one of the users switched off the workstation without emptying a very full trash can. Your system administrator can check this easily, with a server login by looking at the total size of the network trash folder. The file info dialog only shows the trash can size of the current user.
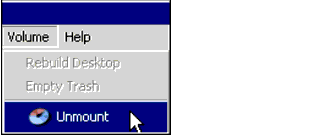
To empty the trash of a HELIOS volume completely, select the volume from the Volumes tab of HELIOS Admin and choose Empty Trash- from the Volume menu (Fig. 61). There is no need to unmount the volume before emptying the trash:
This operation empties all trash for the volume, including the trash of those who are currently using the volume. Accordingly, you should warn logged-on users before calling this function (use the Active Users tab to see who is using a specific volume).
Note: You can optionally select several volumes and thus empty several volume trash cans at the same time.
Removable media such as CD-ROMs or DVDs must be mounted with a UNIX command or, preferably, by using HELIOS Admin, before they can be mounted on the desktop.
To mount a removable volume, select the volume in the Volumes list of HELIOS Admin and choose Mount from the Volume menu.
Note: Removable media must be compatible with the HELIOS UTF-8 file format.
Mounting causes the HELIOS Admin server to execute a UNIX mount by calling the "HELIOSDIR/etc/mount-afp" script. The script accesses the host file system table (e.g.
"/etc/fstab") for mounting information. After the UNIX mount the volume can be mounted on the desktop. You will only see the correct application icons if the medium has a desktop file in valid HELIOS format. Otherwise you will see generic host icons only or alternatively the icons that have been defined in your extension mappings table (see 6.8.4 "Extension Mappings"). Unmount indicates that the volume is currently mounted (Fig. 62).
Before you can eject the medium from the drive again, all EtherShare users of the volume must first unmount it by trashing the volume desktop icon (use Active Users to see who is using a specific volume). PCShare users should use the Disconnect Network Drive- menu item or log out to free up network volumes. You must then do a UNIX unmount by selecting the volume in the Volumes tab and choosing Unmount from the Volume menu. You will get an error message from HELIOS Admin if you try to unmount a drive which is still in use.
Note: A removable "read-only" volume , e.g. a CD-ROM, has no ".Desktop" file. You can unmount it without getting any error message, as long as no file is still in use.
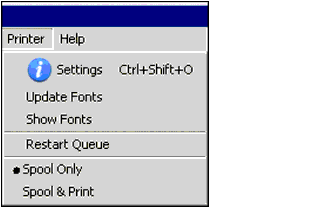
Settings is used to open the printer setting window for a specific printer (see Changing printer data in 6.5.4 "Printers"). You must highlight the printer you wish to set up before choosing this item from the list.
Update Fonts is used to update the print server's resident font list for the selected printer. Because this is done via printer interrogation, the printer must be connected and online for this to work. You need to do this if new fonts have been installed on the printer, through font cartridges, printer cache disks, etc.
Note: Do not confuse the resident font list with downloadable fonts, which have been installed by the HELIOS software in the print server, and which are available to all printers on that host. The latter can be seen by clicking Fonts in the Settings menu.
Each printer's resident font list is created automatically by the HELIOS Admin server when you set it up for the first time. The list is stored in the "FONTS" file in "HELIOSDIR/var/spool/qmeta/<printer queue>".
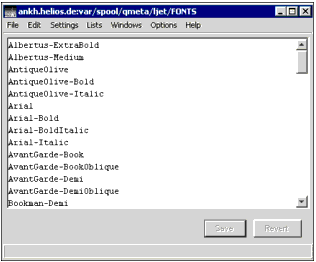
The option Show Fonts lists the resident fonts of the selected printer. The window title shows the host name, the printer and FONTS (Fig. 64).
The option Restart Queue is used to stop and restart printing on the print job queue, and to re-initialize the UNIX "lpd" program for the selected printer. This may be necessary if a fatal error or network connection fault occurs while printing. You will be asked for confirmation.
The option Spool only (Fig. 65) causes print jobs to be spooled to disk but not sent to the printer. This can be useful if it is required to hold back some jobs, e.g. for processing during the night shift rather than during daytime. Printing is restarted with the Spool & Print option (see below). If you switch back from Spool & Print to Spool only, the current print job will be finished on the output device, and the printing will then be stopped again.
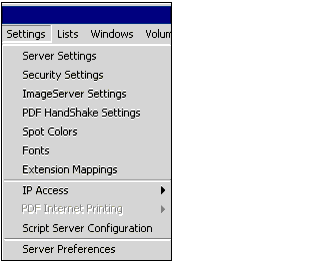
The Settings menu contains configuration windows for Server Settings, Security Settings, ImageServer and PDF HandShake Settings as well as Spot Color, Fonts and Extension Mappings settings can be specified. In addition, the menu provides access to the IP Access lists, the Script Server Configuration, PDF Internet Printing, and all HELIOS Server Preferences (Fig. 66).
The item ImageServer Settings is only available if you have installed ImageServer. PDF HandShake Settings requires PDF HandShake to be installed and licensed. Spot Colors is grayed out unless you have installed either ImageServer, PDF HandShake, or Print Preview. Otherwise they are grayed out. For instructions on how to activate the PDF Internet Printing feature see the PDF HandShake manual.
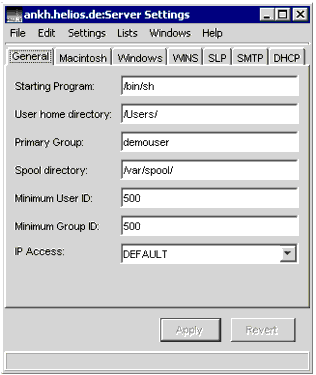
The Server Settings window from the Settings menu allows you to change various standard settings, according to your individual needs (Fig. 67).
Technical note for system integrators: The default spool directory is "/var/spool". Depending on the operating system and configuration, "/var/spool" may reside on root "/", "/var", or on another file system. You should always verify the free space in the spool directory you choose because the space requirements may be high during printing. To verify the free space available, go to "/var/spool" and issue the "df ." command. Compare the free space value to other file systems by using the "df" command. If necessary, establish a separate file system for spooling.
Three of the default parameters which are prompted when creating a new user can be specified here: the user's Starting Program (login), the User home directory, and the Primary Group. Setting appropriate defaults can save time when creating new users, since these three fields are generally configured with similar entries. The entry in the User home directory field must be terminated with a "/".
Use the Spool directory field to configure the default spool directory to be used when creating a new printer. Setting appropriate default values can save time because this field is generally the same for all printers. The entry must - like the User home directory entry - be terminated with a "/". If required, the spool directory can be set to swap out the spool files to other file systems (hard disks), but you should avoid NFS-mounted spool directories because of the performance loss.
Important: Make sure a directory path already exists because HELIOS Admin will only create the last subdirectory!
Minimum User ID and Minimum Group ID specify the lowest number allowed for user numbers (user IDs) and group numbers (group IDs). This parameter is provided as an additional security feature.
The desired access list can be selected from the IP Access pull-down menu. See 6.8.5 "IP Access" for details.
Note: Mac OS X servers:
If you wish to share both HELIOS server volumes and other server volumes via the Apple Mac OS X AFP file sharing the HELIOS server must be assigned a server name that is different from the Mac OS X host name.Allows specifying an SLP Scope and enabling/disabling the SLP Directory Agent, which does the routing of registrations between multiple network adapters.
Allows specifying an SMTP Host and SMTP Sender for all components which send error messages via e-mail, e.g. WebShare, or the printer interfaces.
If you have made any changes in the Server Settings window, they are only valid after confirmation. Revert will set the window back to the last saved setting.
The Authentication tab of the Security Settings window is described in detail in 10.1 "The authentication server program".
In the IP Access tab you can choose the general IP access list and in addition, a platform-bound access list for Macintosh or Windows. See 6.8.5 "IP Access" for a description of how to set up and modify IP access lists.
Note: Double-clicking on an entry in the IP Access column opens a pop-up menu which allows choosing another IP access file from the list.
All defined HELIOS volumes on the host are shown in the Volumes tab. They are listed with their directory, the names under which they are published in the Macintosh and Windows environment, and the selected IP access list.
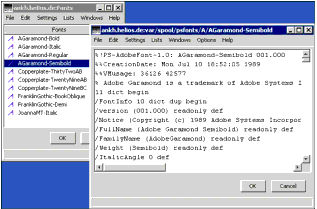
Fonts in the Settings menu shows PostScript printer fonts which have been installed on the host with HELIOS Admin. They are available to all printer queues on that host. HELIOS Admin gets the print server fonts list from the file "HELIOSDIR/var/spool/psfonts/FontDirectory".
Do not confuse this item with Show Fonts in the Printer menu, which displays the list of resident fonts of the selected printer!
Go to File > Open or just double-click on the font name to inspect the manufacturer's coded font header (Fig. 68).
HELIOS Admin can install Adobe "Type 1" and "Type 3" printer fonts (but not Screen fonts or TrueType fonts) on the print server, directly from the font manufacturer's original font disks or another depository.
Open the Fonts window from the Settings menu and choose New in the File menu. Then select the drive and folder. Select individual fonts for copying, or choose Shift-click to load more than one font from the folder that is currently opened.
Storing printer fonts on the server reduces the network load caused by font downloading from the client.
Important: The PostScript fonts that come with the Base product cannot be copied between different servers!
The AFP server usually simulates Macintosh Finder info (such as file type and creator) automatically for files without Macintosh resource. The file type is determined by inspecting the file contents. This allows about 20 different icons to be shown for non-Macintosh files (see Generic icons in "Directory and file formats" in the EtherShare manual).
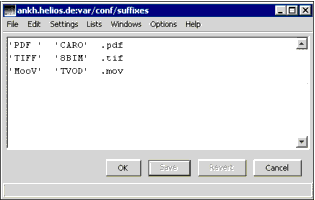
For files that were created by DOS/Windows applications, the file type is typically indicated by adding a suffix to the file name, the so-called file name "extension". The HELIOS file services can display appropriate icons for such files by specifying the extensions in the so-called "extension mapping table" (the default file name is "HELIOSDIR/var/conf/suffixes"). See the suffixes preference in "AFP server preference keys" and Automatic extension mapping in "Public and private volumes" in the EtherShare manual for related information.
Important: The mapping specified in the mapping table will only be applied to files that do not yet include resource information!
For each entry in the "suffixes" file, Extension Mappings lists the configured file name extension alongside the chosen application and document type.
To enter new extension mappings, specify the file type, the file creator and the required extension in one line each. Then confirm your changes.
Note: To toggle edit/read-only, use the Options > Read Only menu item, or the lock icon on the ToolBar.
Note: Make sure that you specify file type and creator in the 4-character syntax, e.g. "PDF " for type "PDF". See the example in Fig. 69.
To protect your site against unwanted access, you can set up an IP access list to restrict access to HELIOS volumes, printers, and services on your host. Though you may create such a list manually on your host (see A 2 "IP configuration - Reference Part"), it is much easier to use HELIOS Admin instead. It offers all options that are required for a standard access control configuration.
During the installation the access lists "ipaccess" and "ipaccess.local" are automatically created. The latter is a template access list that should not be edited.
Go to Settings > Security Settings and open the IP Access tab. From the General IP Access pull-down menu choose the desired access list and confirm with Save.
Access to "afpsrv" or "pcshare", irrespective of the general access setting, is granted by assigning an IP access list that provides the appropriate configuration.
Go to Settings > Security Settings and open the IP Access tab. From the Macintosh IP Access or Windows IP Access pull-down menu choose the desired access list and confirm your changes.
Note: The IP access settings for servers can also be viewed and selected in the IP Access pull-down menu in the Macintosh or Windows tab of the Server Settings.
Access to a certain volume, irrespective of the general access setting, is granted by assigning an IP access list that provides the appropriate configuration.
Note: The IP access settings for volumes can also be viewed and changed in the Volumes tab of the Server Settings.
Open the Security Settings > Volume dialog and choose the desired access list from the IP Access column.
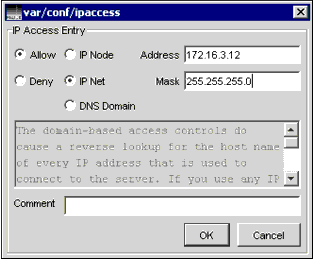
To create a custom IP access list which meets your requirements. select Settings > IP Access > New from the HELIOS Admin menu and click the Add Entry- button in the access list to open the dialog in Fig. 70.
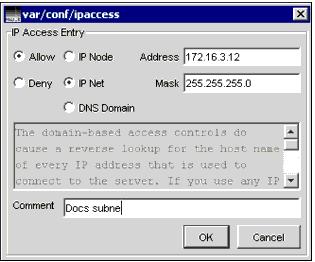
Click the respective radio button to specify whether you want to Allow or Deny either a host (IP Node) or a network (IP Net). For IP Node entries you only have to enter the correct IP address. For IP Net entries enter both an Address and a Mask (Fig. 71). You may also enter a comment, e.g. for explanatory reasons. Click OK to transfer the setting to the new IP access list. Do this for each new entry in the IP access list.
Note: There will be rudimentary consistency checks, so you will have to be familiar with IP net/mask structuring and conventions. See your TCP documentation if you have questions.
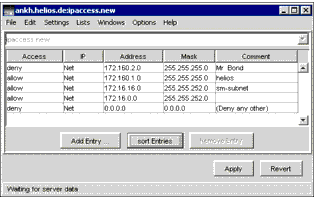
Fig. 72 shows the new IP access list. The list is sorted. The sorting order depends on the specified IP range: the more general, the lower in order. At the end, it contains a Deny any other entry that denies server access to all computers/networks that do not appear in the list before. The representation of "any other" is 0.0.0.0 (for Address) and 0.0.0.0 (for Mask). If the Deny any other entry is missing, access would - by default - be granted to anybody on the Internet whose address had not yet been entered in the "Deny" section. Please note that the Deny any other entry cannot be deleted.
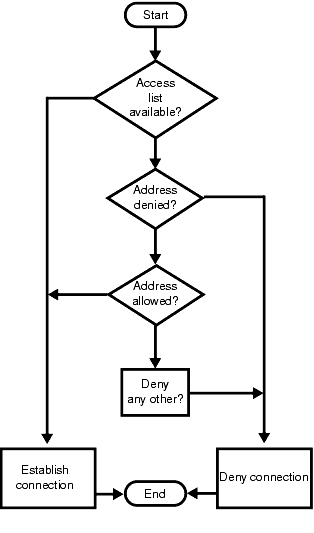
The order can be changed by "drag and drop". With the sort Entries button the logical order of the list can be restored. This allows the program to go through the list from top to bottom and react very quickly. For instance, if an IP address is denied, the program can send the respective message after going through the "Deny" section only - it does not have to check the whole list. The checking mechanism is illustrated in Fig. 73 below.
Note: If domain and net entries overlap, the correct sorting order is not guaranteed.
Mask is only meaningful for network entries. The mask is structured like an IP address and specifies the number of bits that are relevant to the network identification. It filters out the logical network address. The mask 255.255.255.0 for example specifies that 24 bits are to be compared with the IP number. The remaining 8 bits (that identify the individual computers of a given network) are not relevant.
Comment contains a description or name that may help you find out the owner of the respective computer or network.
The Deny any other entry cannot be removed. For security reasons, it is always kept at the end of the list.
This feature gives an overview of all server preferences which have been specified on the host. Preferences are classified by their key (see 16 "Preferences").
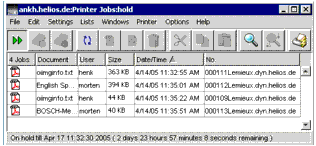
Printer job windows display the current jobs in the printer queue of the selected printer. Due to the HELIOS print job event notification feature the window updates are event-driven rather than being polled. The list shows the document name, the user name, the job size in the spool queue, the starting time, the job sequence number (Fig. 75). For related information, see also 6.5.7 "Printer Log Files".
Open the printer job window for a specific printer queue by double-clicking it in the Printers window (or by highlighting the queue name and choosing Open from the File menu).
The window also contains a status line showing printer status and the quantity of data in kByte already sent to the printer for the currently printing job. Due to font inclusion, etc. the quantity of data sent to the printer can be larger than the job size in the spool queue; if ImageServer is also installed it may be considerably larger than this, due to image inclusion.
The user name assigned to the job is the name specified in the HELIOS Admin Users list window. The job will be assigned to "root" if no name is specified in the Users list, or if the name specified is unknown to the HELIOS Admin server. See User and document names in print jobs in A 3.1 "Printer log file structure" for more information.
Print jobs that appear with a PDF icon in the list, like those shown in Fig. 75, are jobs that have run through a preview queue. To get PDF previews of a print job, you must install and license PrintPreview or PDF HandShake (Create PDF).
Print jobs are always sorted by date/time. They cannot be sorted by other column title items. However, the order of the print jobs in the queue can be changed manually :
Select one or more print jobs and shift them via "drag and drop" to the desired position. Another possibility is to highlight the print job(s) and use the Cut and Paste function from the Edit menu, or ToolBar. The job is pasted right after the (first) selected job.
If you have several printer queues, you can simultaneously open printer job windows for each queue; non-active (background) windows are also updated.
Note that the "heladmsrv" does interpret octal backslash escape sequences in PostScript %%Title comments. This means that e.g. Japanese job titles can be displayed in a job window, provided that you use a local operating system or the "Japanese Language Kit" on your Macintosh.
Select the print job you want to delete in the printer job window and choose Clear from the Edit menu.
You may choose multiple jobs for deletion using standard keyboard shortcuts (see Selecting multiple entries from a list in 6.5 "Lists menu"). You are only allowed to delete your own jobs, unless you are "root" or a member of the "SysAdm", "QueueAdm", or "PrnAdm" groups.
HELIOS Admin will prompt for acknowledgment of deletion, to allow deletion to be aborted if required. You can suppress the warning by holding the Option key when choosing Clear.
If you have more than one printer queue running on the same host, you can open two or more printer job windows simultaneously and move jobs between queues (printers) via "drag and drop". You may want to do this if one of the queues is too long, or a printer needs to be stopped for cleaning. You can do this without stopping the printer queues.
Hold and error queues are usually not connected to a physical printer. Thus, in order to restart a job from a hold or error queue, you must drag it to the printer job window of a queue that will execute the job.
The remaining hold time, which is displayed in the bottom line of the printer job window, can be specified in the Hold Queue connection interface (see Hold Queue in 6.5.5 "Printer connection type (Interface)").
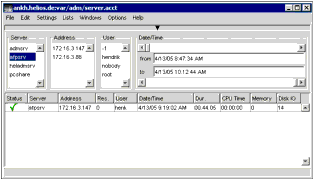
In networks with more than one HELIOS host, HELIOS Admin can access several hosts at the same time, for example to allow configuration data to be copied from one host to another.
Choose Login from the File menu, log on to a host, and repeat this procedure for each required host.
Furthermore, you can copy the configuration for users, groups, volumes, extension mappings and printers from one host to another.
Note: Print jobs in a printer job queue can only be moved between printers on the same host.
Select one or more items in the list of one of the hosts with the mouse. You can choose multiple entries using standard keyboard shortcuts (see Selecting multiple entries from a list in 6.5 "Lists menu"). Move the items via "Drag and Drop" to the corresponding list of the other host.
A new data window is automatically opened for the item on the target host. Please note that the default values entered in the fields of the new data window are those of the copied object, and are not the default values from the target host's HELIOS Admin server.
When the new entry is saved, HELIOS Admin tries to preserve the old user ID if it is not already assigned to another user.
Please note that it is not possible to assign a user to a group of another host. Similarly, you are not allowed to assign a group to a user of another host. Furthermore, it is not recommended (and normally not necessary) to copy user and group data to another host if your installation uses NIS (Network Information Service).
If you copy items between servers that have different software products installed you will possibly not be able to save the items on the target server. For example, if you have set up a "Print Preview" queue on a server and intend to copy this queue to a second server on which the PrintPreview product is not installed, the Save button in the queue's Settings window will be disabled on the target server.
HELIOS Admin then closes the connection to the HELIOS Admin server of the selected host, and therefore all associated windows on the screen.
Choosing Quit HELIOS Admin from the File menu will terminate the HELIOS Admin program and will - at the same time - close all connections.
In some situations - e.g. if you contact your dealer for administrative or support matters - you may need information about your HELIOS software copy, such as serial number, machine ID, or activation key. There are different ways of retrieving these information:
Another possibility to retrieve product information is to use the HELIOS Admin Versions option. This feature is described in 6.5.11 "Versions".
| © 2005 HELIOS Software GmbH |