3 Installation
3.1 Different setups
3.1.1 General overview
WebShare is comprised of two main servers: the WebShare Web Server, and the WebShare File Server. The objective is to enable versatile and high performance remote file access over the internet, while at the same time isolating the file server from the internet. This feature is accomplished by means of the two-tier WebShare server application. The WebShare Web Server acts as an intermediary between the internet and the WebShare File Server:

When remote users log in to WebShare, their only access is to the WebShare Web Server, which is connected to the internet. The WebShare Web Server is very secure, and contains no data, passwords or configuration information. This WebShare Web Server accepts requests and forwards them to the WebShare File Server, via a private protocol. The file server authenticates these requests, and then starts a separate process with each user’s access rights, so that remote users can access only the files and directories for which they have file system permissions. The WebShare File Server forwards the requested content to the WebShare Web Server which generates dynamic web pages for the remote users. This enables them to “see” the file server, without being directly connected.
Ideally, the WebShare Web Server application should run on a dedicated server, allowing all other services and ports to be shut down. The WebShare File Server application then runs on the server that contains the actual data to be shared. The following sections detail the various server configurations possible, and the related firewall options. Additional security details are discussed in 10 “WebShare security”.
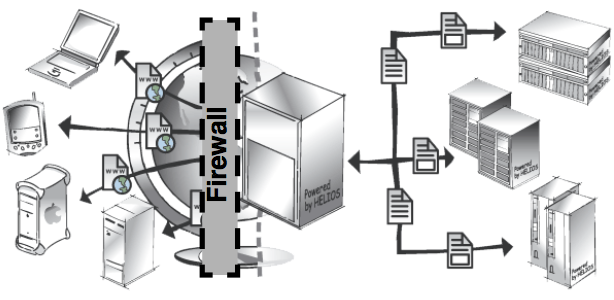
3.1.2 Software firewall (Internet)
A software firewall can be configured directly on the WebShare Web Server (Fig. 3.1). For example, on an OS X server, software firewall settings can be defined via “System Preferences... > Sharing”. It must only allow incoming HTTP connections, and only on port 2009. Other ports on this server must not be reached from the internet in order to provide a high level of security. Chapter 10.1.11 “Switching WebShare to port 80 on the WebShare Web Server” describes how to change the default HTTP IP address and port.
Furthermore, the WebShare Web Server needs two network interfaces, one for the internet, and one for the intranet. IP-routing must be switched off.
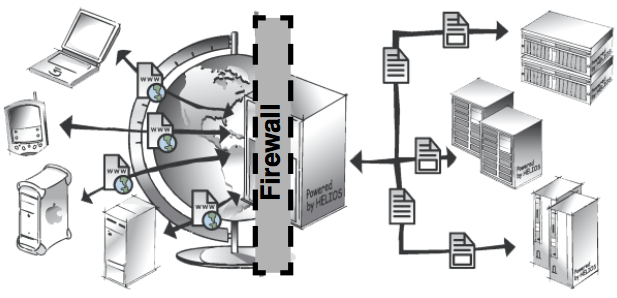
3.1.3 Hardware firewall (Internet)
Another possibility is to install a hardware firewall between the internet and the WebShare Web Server (Fig. 3.2). As described in 3.1.2 “Software firewall (Internet)”, the firewall must only allow incoming HTTP connections on port 2009. Here, one network interface for both the internet and the intranet will do, but two network interfaces offer additional security. IP-routing must be switched off.
3.1.4 Hardware firewall (Intranet)
A hardware firewall can also be positioned between the WebShare Web Server and the intranet. It should only allow incoming connections on ports 2010-2015. In addition, a software firewall should only allow incoming HTTP requests on port 2009 (Fig. 3.3). This setup requires two network interfaces, one for the internet and one for the intranet. IP-routing must be switched off.

3.1.5 Single-server solution
In a single-server solution (Fig. 3.4), the WebShare Web Server and the WebShare File Server are running on the same machine. The hardware firewall must deny incoming HTTP connections other than on port 2009.
3.2 WebShare Web Server installation
3.2.1 System requirements
For the installation of the WebShare Web Server the following prerequisites apply:
Any supported HELIOS server platform. See a current listing of all supported platforms at: www.helios.de/web/EN/support/platforms.html
The programming language Perl (version 5.8.4 or newer)
64-bit Java 6 or newer (see 4.1.2 “Server requirements” in the HELIOS Base manual)
32 MB RAM; 2 MB per active client
- Note:
-
If a two-tier WebShare server configuration is used, then only HELIOS Base and the WebShare Web Server should be installed on the server that is connected to the Internet. On the WebShare File Server, HELIOS Base and the WebShare File Server get installed. It is only necessary to enter the HELIOS license information on the WebShare File Server.
3.2.2 Software installation
The installation of the HELIOS WebShare Web Server follows the standard HELIOS software installation scheme. It is described in detail in the chapter “Software Installation” in the HELIOS Base manual.
3.2.3 Verifying the installation
There are some steps you should take in order to verify that the installation of the WebShare Web Server was successful:

-
On a command line, issue
srvutil status(see “srvutil” in the HELIOS Base manual):$ srvutil status Service Status PID When Restarts srvsrv Running 28287 Wed 10:08 notifysrv Running 28289 Wed 10:08 authsrv Running 28294 Wed 10:08 desksrv Running 28295 Wed 10:08 heladmsrv Running 28302 Wed 10:08 afpsrv Running 28303 Wed 10:08 indexsrv Running 28290 Wed 10:08 papsrv Running 28304 Wed 10:08 pcshare Running 28305 Wed 10:08 lpd Running 28312 Wed 10:08 websharesrv Running 28306 Wed 10:08 dhcpsrv Running 28309 Wed 10:08 opisrv Running 28313 Wed 10:08 scriptsrv Running 28307 Wed 10:08 createpdf Running 28293 Wed 10:08 mdnsproxysrv Running 28297 Wed 10:08 websharewoa Running 28298 Wed 10:08 toolsrv Running 28308 Wed 10:08
The result of the status query shows that “websharewoa” is running. If “websharewoa” is not running, check the system messages for errors.
- Note:
-
On OS X systems, the installation can be verified with the “HELIOS Services” application, which is installed in the OS X “Applications” folder.
The following steps may be used to verify that the WebShare Web Server is also available remotely:
-
In your browser enter the URL:
http://hostname:2009
If the HELIOS WebShare homepage appears, the installation was successful.
-
If it is not, try:
http://<DNS name>:2009- Example:
http://myserver.com:2009
-
If this fails, try:
http://<IP-address>:2009- Example:
http://172.16.0.8:2009
If you are successful with using the IP address in the URL but not with “host name” or “DNS name”, the installation of the WebShare Web Server was successful, but you may have a DNS configuration problem.
-
Verify with the HELIOS “socket” utility (verbose mode) that the web server can be reached:
$ socket -v myserver.com 2009
Trying to connect to myserver.com port 2009 ...
...
Successfully connected to server.
-
If this returns an unknown host, try the IP address:
$ socket -v 172.16.0.8 2009
Trying to connect to 172.16.0.8 port 2009 ...
...
Successfully connected to server.
-
If this also fails, try (directly on the WebShare Web Server):
localhost$ socket -v localhost 2009
Trying to connect to localhost port 2009 ...
...
Successfully connected to server.
-
Exit “socket” with Ctrl-C.
- Note:
-
The host names and IP addresses in the excerpts above are just examples!
- Note:
-
By default, the WebShare Web Server allows connecting to all WebShare File Server hosts. The preference WSAllowedHostNames (7.6 “Preferences”) restricts the access to named WebShare File Servers only.
3.3 WebShare File Server installation
3.3.1 System requirements
For the installation of the WebShare File Server the following prerequisites apply:
Any supported HELIOS server platform. See a current listing of all supported platforms at: www.helios.de/web/EN/support/platforms.html
The programming language Perl (version 5.8.4 or newer)
32 MB RAM; 2 MB per active client
Each server that publishes files via WebShare requires a WebShare File Server license
3.3.2 Software installation and licensing
The installation of the HELIOS WebShare File Server uses the standard HELIOS Installer. It is described in detail in the chapter “Software Installation” in the Base manual.
The license is entered according to the instructions given in the chapter “Entering a new license” in the HELIOS Base manual.
3.3.3 Verifying the installation
There are some steps you should take in order to verify that the installation of the WebShare File Server was successful:
-
On a command line, issue
srvutil status(see “srvutil” in the HELIOS Base manual):$ srvutil status Service Status PID When Restarts srvsrv Running 28287 Wed 10:08 notifysrv Running 28289 Wed 10:08 authsrv Running 28294 Wed 10:08 desksrv Running 28295 Wed 10:08 heladmsrv Running 28302 Wed 10:08 afpsrv Running 28303 Wed 10:08 indexsrv Running 28290 Wed 10:08 papsrv Running 28304 Wed 10:08 pcshare Running 28305 Wed 10:08 lpd Running 28312 Wed 10:08 websharesrv Running 28306 Wed 10:08 dhcpsrv Running 28309 Wed 10:08 opisrv Running 28313 Wed 10:08 scriptsrv Running 28307 Wed 10:08 createpdf Running 28293 Wed 10:08 monitorsrv Running 28296 Wed 10:08 mdnsproxysrv Running 28297 Wed 10:08 websharewoa Running 28298 Wed 10:08 toolsrv Running 28308 Wed 10:08
The result of the status query shows that “websharesrv” is running.
- Note:
-
On OS X systems, the installation can be verified with the “HELIOS Services” application, which is installed in the OS X “Applications” folder.
The following steps may be used to verify that the WebShare File Server is also available remotely (use the appropriate server host name, or IP address, in place of “helioshost”):
$ socket -v helioshost 2010
Trying to connect to helioshost port 2010 ...
...
Successfully connected to server.
-
Exit “socket” with Ctrl-C.
As the example above shows, the WebShare File Server port (2010) is available.