1 HELIOS Tool Server
HELIOS Tool Server allows integrating remote applications and tools to be used by a main server. Certain applications and technologies are only available on a special platform. Instead of reinventing these required applications and technologies, Tool Server makes them remotely available on any major server platform. Tool Server provides the platform and already includes several useful tools – additional tools can be added by the user. HELIOS provided tools and samples are installed in minutes.
The main goal is to make remote applications easy to use, therefore HELIOS Tool Server comes with a dedicated license-free installation which installs on any major platform, i.e. Mac/Windows. The “toolclient” application detects all servers automatically by using mDNS (“Bonjour”) and choosing the server that offers the required service and provides best computing performance. Automatic job load balancing, file transfers, processing, auditing, and error handling makes it quite easy.
1.1 The Tool Server concept
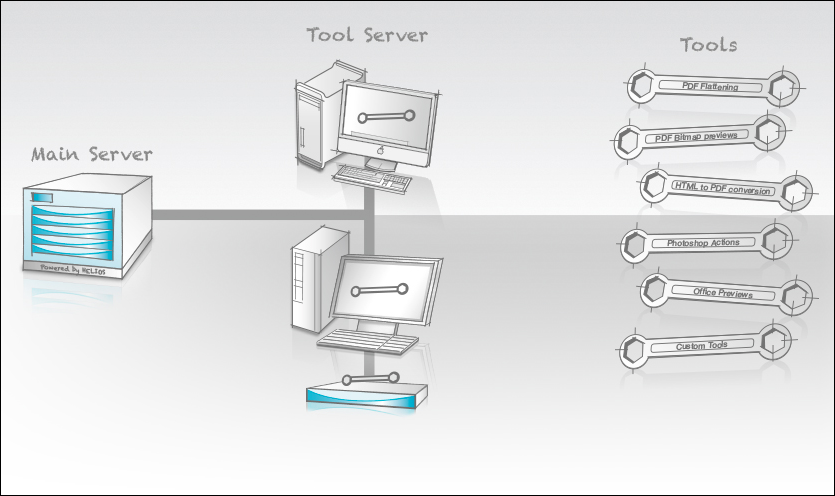
Each job basically consists of a job data type and an input file with job options. Both of these will be transferred to the server, which passes this information to a tool that can handle this data type. The custom tool will process the job and creates an output file and a log file. The server monitors the processing tools and transfers the output and log file back to the client (Fig. 1.1).
1.2 New Tool Server features
For new features in the Tool Server software see the HELIOS website:
www.helios.de Go to HELIOS Product Versions – New Features
For HELIOS Base, the foundation used by all HELIOS products, see the HELIOS Base product web page:
www.helios.de Go to Products > Base
1.3 Getting started
Step 1:

-
Using the Mac or Windows HELIOS Installer on your HELIOS CD or Test Drive download, install the Tool Server on each Mac or Windows system that is intended to be used as a Tool Server (see the HELIOS Base manual for installation instructions).
- Note:
-
Only the “Base” and “Tool Server” modules should be installed, unless other HELIOS products are licensed to be run on this system.
The installer installs several ready-to-use Tool Server tools. These tools and their usage are described in 1.6 “The tools”.
Step 2:
To use the HELIOS provided tools they must be copied to the “Tool Server” folder.
- Note:
-
To copy the files, you must be logged-in on the computer with administrative privileges.
-
Mount the “Settings” volume and navigate open the “Tool Server > Samples” folder. Copy the scripts you want to activate into the parent folder (“Tool Server”).
-
Using a Terminal window, navigate to the “HELIOSDIR/var/settings/Tool Server/Samples” directory, and copy the scripts you want to activate into the parent directory “Tool Server” (using HELIOS “dt cp”).
Step 3:
-
Save any of your own custom tools into the “settings/Tool Server” folder.
The following steps require “root” user access (except on Windows).
Step 4:
-
Using a Terminal window, verify that “toolsrv” is running:
# cd /usr/local/helios
# bin/srvutil status
Service        Status        PID When           Restarts
srvsrv         Running      1535 Mon  11:21
notifysrv      Running      1537 Mon  11:21
authsrv        Running      1538 Mon  11:21
desksrv        Running      1539 Mon  11:21
dhcpsrv        Running      1540 Mon  11:21
heladmsrv      Running      1543 Mon  11:21
lpd            Running      1544 Mon  11:21
mdnsproxysrv   Running      1541 Mon  11:21
toolsrv        Running      1545 Mon  11:21
Step 5:
-
Using a Terminal window, notify the “toolsrv” process about the changed script setup:
# cd /usr/local/helios
# bin/srvutil reconf toolsrv
Step 6:
-
Using a Terminal window, run
toolclient -lto verify available tools:# bin/toolclient -l Server Info for ankh.local.: currentConnections: 1 currentToolJobs: 0 cpuMegaFlops: 138.94 cpuMegaInts: 524.25 cpuCount: 1 Type: action-psd License: - Type: html2pdf License: ImageServer Type: pdf2bmp License: ImageServer Type: pdfflatten License: ImageServer Type: sharpen-psd License: - Server Info for blade.local.: currentConnections: 1 currentToolJobs: 0 cpuMegaFlops: 635.93 cpuMegaInts: 1048.49 cpuCount: 2 Type: action-psd License: - Type: html2pdf License: ImageServer Type: pdf2bmp License: ImageServer Type: pdfflatten License: ImageServer Type: sharpen-psd License: -
1.4 toolclient (tool client application)
- Usage:
toolclient -t <jobtype> [-i <infile>] [-o <outfile>]
           [-O <propfile>] [-s <server>] [-p <port>]
           [-T <timeout>] [-B <rwsize>] [-S] [-v] [-V]
           [-l] [-L] [-X <key>=<value>] -h
The “bin/toolclient” application is part of the HELIOS Base installation and is therefore available on any HELIOS supported server platform. “toolclient” requires a valid ImageServer license. The tool client finds the tool server via mDNS (“Bonjour”) or via a specified TCP/IP address. It can be integrated in any application by simply calling “toolclient” as an external application. HELIOS provides Script Server scripts for its included tools, this allows hot folder based job processing (see HELIOS ImageServer manual). The job input and output data are linked to stdin and stdout unless it is otherwise specified via parameters. Error messages are reported on stderr, the exit code represents the success or failure status. An output file can be a binary file. RGBA raw bitmap images are automatically converted to PNG files.
The following options are supported:
- -t <jobtype>
Job type. Use
toolclient -lto list available job types (see 1.4.1 “Available job types (scripts)”).- -i <infile>
Read input from
<infile>instead of “stdin”.- -o <outfile>
Write the result to
<outfile>instead of “stdout”.- -O <propfile>
Write the result file properties to
<propfile>. Properties are optional key/value pairs from the tool.- -s <server>
TCP/IP hostname of tool server. If this option is not specified, “toolclient” uses mDNS to find a tool server. You can use
-smultiple times to setup a list of possible tool servers.- -p <port>
Tool server port number, used only if
-s <server>is specified.- -T <timeout>
Timeout of “toolsrv” tool in seconds (default =
180).- -B <rwsize>
Read/write block size in bytes (default =
32768).- -S
Suppress result from tool, no output file is written.
- -v
Set verbose flags for tools.
- -V
Network verbose: show mDNS lookups, connections, etc.
- -l
List remote tools, license and CPU information.
- -L
Test mode, check calls/s, e.g.:
-v -L 20000.- -X <key>=<value>
Tool specific options. For applicable options read the tools documentation (1.6.1 “The individual tools”).
- -h
Display help file.
- Example:
toolclient -t pdf2bmp -s ankh.helios.de -i 1.pdf -o 1.png
This call sends the file “1.pdf” to the server “ankh.helios.de” and expects a bitmap in return, which will be written as PNG to “1.png”.
1.4.1 Available job types (scripts)
These job types are included:
- html2pdf
Convert an HTML page to a PDF document.
Configuration file: html2pdf.conf- pdfflatten
Flatten transparencies in a PDF document.
Configuration file: pdfflatten.conf- raw2tiff
Convert a RAW document to a TIFF file.
Configuration file: raw2tiff.conf- pdf2bmp
Convert a PDF document to a bitmap PNG file.
Configuration file: pdf2bmp.conf- sharpen-psd.applescript
Sharpens images using Photoshop.
Configuration file: sharpen-psd.conf- action-psd.applescript
Image manipulation using a Photoshop action Macro.
Configuration file: action-psd.conf
Additional job types can be added as described in 1.7 “Develop your own tools”.
1.5 toolsrv (tool server application)
The tool server (“toolsrv”) can be installed, via a separate installation item, on one or more workstations or servers. It registers the server via mDNS, checks what data types are available in “HELIOSDIR/var/settings/Tool Server”, measures the computing performance and makes all this information available upon request to the tool client. If a job comes in the server creates a unique job directory in “var/tmp/”, saves the input file and spawns the specified tool as a separate process. The server monitors its tools, the tool’s stderr output will be logged, and if a time-out occurs the server will shut down the tool and clean up temporary files. After the tool has accomplished the job, the output file and log data will be returned. The tool server is basically “job content” blind, it does not know anything about file formats and job specific parameters. The tool client communicates with the tool server via TCP/IP.
Although there is no direct limitation for the number of concurrent tool server jobs, the optional Script Server hot folder will automatically serialize jobs for a given hot folder, which limits the number of concurrent jobs. The tool client passes the necessary product license information (of the tool client machine) to the tool server, which passes this information via environment variables to the tools. The tool server itself will not check any license availability. There should be no need to change the preferences of the tool server application. The “toolclient” and “toolsrv” applications are designed to hide complex networking and job distribution technologies from users. They offer robust remote automation with very little configuration.
- Note:
-
Large or complex jobs may considerably slow down the machine where “toolsrv” is running.
1.5.1 Configuration files
The configuration files can contain the tool that is to be
called (Tool), the required HELIOS license (License) and
the user under which the tool should be executed (RunAsUser).
In addition, Exclusive, e.g.: Exclusive=Photoshop,
can be specified in order to prevent several Tool Server scripts
from simultaneously calling the same application.
- Important:
-
The “conf” file must be terminated with a blank line. Otherwise the last line will not be read!
- Example:
Configuration file “html2pdf.conf”:
# osxhtmlrender config file
Tool=osxhtmlrender
License=ImageServer
RunAsUser=mike
- Note:
-
On Windows systems the
RunAsUserentry requires setting the existing user password again using the HELIOS “authutil” tool, e.g.:authutil passwd -n mike -p secret
1.5.2 Tool server preference keys
This section lists all the preference keys that are pertinent to the tool server. Find a description of how to set, view, change or delete preferences, with the HELIOS “prefdump”, “prefvalue”, and “prefrestore” utility programs in the HELIOS Base manual, in the chapter “HELIOS utility programs”.
- Important:
-
Make sure that preference keys DO NOT start or end with a slash (“/”) character, and note that they are case-sensitive! Also, if any preference key or preference value includes spaces, that key or value must be enclosed in quotes.
Key: Programs/toolsrv/<preference>
- ipaccess
- str"ipaccess"
Specifies the file name of the IP access list that makes the tool server accessible for clients which have one of the IP addresses on the IP access list.
- MaxProc
- int(see description)
Allows limiting the published number of CPUs to the number specified by this preference. Only values smaller than the total amount of CPUs are supported. If this preference is not set, the number of CPU cores is used.
- TcpPort
- int2019
TCP/IP communication port for the communication between client and server.
- WorkingDir
- str"var/tmp"
Specifies the location where the tool server creates its temporary working directory. The temporary working directory will be deleted as soon as the tool has accomplished its task.
1.6 The tools
The tools are responsible to process an input job for a given data type. HELIOS includes several tools which process certain file types. The idea of the tools is to focus on the job, e.g.: take the input file and parameters, process it and write an output file and print logging information to stderr. The benefit is that you need not worry about client-server communication, load balancing, and multiple platform support.
For example, a tool may run on Windows and the tool client
runs on Linux. HELIOS Tool Server delivers the infrastructure
to integrate remote applications. The tool itself
can be very simple, e.g. a few lines of script (Perl, AppleScript,
Visual Basic or any other executable program). The tool must exit
with zero if the job processing was successful or with an exit
error code and messages to stderr if an error
occurs. The tool itself will receive any number of parameters
from the tool client via (-X variable=value).
If the tool requires any licenses it must check the availability
of the licenses itself. Due to the fact that the tool may run
on a remote workstation all license information is provided
by the tool client via the tool server to the tool, using
environment variables. Each tool will be monitored by the tool
server. In case of a job time-out the tool will be asked to
stop via a termination signal. If the tool does not quit within
two seconds after receiving the termination signal, it will be
killed.
After the job is done the tool server will remove all temporary files within the job directory, including the job directory itself. By default all tools run as the system service user. It can be necessary that a tool runs under a special user account to use the settings/context of this specific user. The user name can be specified in a tool configuration file named “<toolname>.conf”. See also 1.5.1 “Configuration files”. Custom tool configuration files are stored in “HELIOSDIR/var/settings/Tool Server/”.
1.6.1 The individual tools
The tools can also be used stand-alone, i.e. for testing purposes1. But it is recommended to use them with the HELIOS Tool Client because these tools can then also be used remotely and independent of a special platform. In addition, the tool client stays clear of workload. The tools are located in “HELIOSDIR/etc/tools”.
| Platform | Function | |
|---|---|---|
| osxhtmlrender | Mac | Convert HTML to PDF utilizing Apple’s WebKit technology |
| osxpdfrender | Mac | Create an RGB bitmap preview of a PDF using OS X rendering technologies |
| osxpdfflatten | Mac | Flatten PDF documents by automating Adobe Acrobat |
| winpdfflatten | Win | Flatten PDF documents by automating Adobe Acrobat |
| osxraw2tiff | Mac | Converts RAW documents to TIFF files, using Apple’s image technology |
| OfficeReader | Win | Generates previews of Office documents |
| Mac | Generates previews of Office documents | |
| osxapplescript | Mac | Launch a specified AppleScript |
- Note:
-
OS X based tools have received support to work in the logged-in user environment. When specifying a “RunAs” user name for a tool on OS X, the tools will run within the proper user session. This allows logins with multiple user names so each tool automation can run under a specified user, e.g. “PDF Flatten” under user1, “Photoshop Action” under user2, etc. To permit OS X GUI program automation, e.g. in Acrobat and Photoshop, a user must be logged-on, otherwise desktop applications will not start.
1.6.2 osxhtmlrender
If called with “toolclient“ use html2pdf as type
This tool utilizes Apple’s WebKit technology to process HTML documents and convert them into PDF files. This is a fairly complex task because HTML pages can contain CSS style sheets, JavaScript, and other modern HTML content. The “osxhtmlrender” tool provides similar results compared to Safari HTML to PDF printing. The tool allows optional specification of the page sizes, margins and alignment. There are many web applications/solutions that produce nice HTML lists/reports/documents. The “osxhtmlrender” tool is an excellent solution to turn them into PDF documents. Additional HELIOS PDF tools are available to encrypt these documents.
- Usage:
osxhtmlrender[-C <dir>] [-i <infile>] [-o <outfile>]
             [-O <propfile>] [-X <key>=<value>]...
             [-h]
The following options are supported:
- -C <dir>
Set working directory, where the files to be acted upon reside, and the log file is to be saved.
- -i <infile>
Read input from
<infile>instead of “job.in”.- -o <outfile>
Write output to
<outfile>instead of “job.out”.- -O <propfile>
Write properties of output file to
<propfile>instead of “job.outprops”.- -X <key>=<value>
Tool specific options (paper sizes and margins are specified in points):
- LeftMargin (float)
E.g.:
-X LeftMargin=10.0- RightMargin (float)
E.g.:
-X RightMargin=10.0- TopMargin (float)
E.g.:
-X TopMargin=10.0- BottomMargin (float)
E.g.:
-X BottomMargin=10.0- ShouldPrintBackgrounds (bool)
E.g.:
-X ShouldPrintBackgrounds=TRUE- PrintsHorizontallyCentered (bool)
E.g.:
PrintsHorizontallyCentered=TRUE- PrintsVerticallyCentered (bool)
E.g.:
PrintsVerticallyCentered=FALSE- PrintScalingFactor (float
0.0 ... 1.0; default is1.0) E.g.:
-X PrintScalingFactor=0.5- PaperSize (float, float)
E.g.:
PaperSize=300.0,400.0- PaperName (
A4,A5,Legal,..., default isA4) E.g.:
-X PaperName=Letter- Orientation (
PortraitorLandscape, default isPortrait) E.g.:
Orientation=Landscape- VerticalPagination (
AutoorFitorClip) E.g.:
VerticalPagination=Fit- HorinzontalPagination (
AutoorFitorClip) E.g.:
HorizontalPagination=Auto
- -h
Display help file.
- Example:
toolclient -t html2pdf -i test.html -o test.pdf -s
localhost -X BottomMargin=20.0 -X TopMargin=10.0
Convert the HTML file “test.html” into a PDF file (“test.pdf”) that contains all referenced objects. In addition, a top margin of 10 points and a bottom margin of 20 points is applied.
- Note:
-
When using “toolclient” with “html2pdf” to convert an HTML page to a PDF file, the source tags of the referenced images (
<img src=...>) must contain the absolute path, otherwise the images cannot be incorporated in the resulting PDF document. Optionally you may add the web URL in the first line of the downloaded HTML page.
- Note:
-
The data type “html2pdf” processes an HTML page according to the specifications defined in the style sheet for printing (rel="stylesheet" ... media="print"), if available. These might interfere with the custom “osxhtmlrender” options that are set with the
-Xflag.
1.6.3 osxpdfrender
If called with “toolclient” use pdf2bmp as type
This tool makes use of Apple’s Quartz technology, to create an RGB preview bitmap of a given PDF file. It is mainly used to allow the preview generation of PDF files containing Japanese characters. Due to font licensing limits PDF HandShake cannot process every Japanese PDF, so “osxpdfrender” is an alternative solution.
- Note:
-
High-quality previews including CMYK colors and proper overprint previews are provided via the HELIOS ImageServer and PDF HandShake products by using the “layout” command.
- Usage:
osxpdfrender [-C <dir>] [-i <infile>] [-o <outfile>]
             [-O <propfile>] [-X <key>=<value>]... -h
The following options are supported:
- -C <dir>
Set working directory, where the files to be acted upon reside, and the log file is to be saved.
- -i <infile>
Read input from
<infile>instead of “job.in”.- -o <outfile>
Write output to
<outfile>instead of “job.out”.- -O <propfile>
Write properties of output file to
<propfile>instead of “job.outprops”.- -X <key>=<value>
Tool specific options:
- Width (int)
Width of the resulting bitmap image in pixel
e.g.:-X Width=144- Height (int)
Height of the resulting bitmap image in pixel
e.g.:-X Height=144- PageNumber (
int; default is1) Page number to process
e.g.:-X PageNumber=28- AntiAlias (
TRUEorFALSE; default isTRUE) Width of the resulting bitmap image in pixel
e.g.:-X AntiAlias=TRUE
- -h
Display help file.
1.6.4 osxpdfflatten
If called with “toolclient” use pdfflatten as type
This tool accepts a PDF file and uses Adobe Acrobat 8.1 or newer on Mac to flatten transparencies and output a PDF file that does not contain transparencies anymore. This tool uses the Acrobat Professional preflighting technology to flatten PDF files.
- Note:
-
On a Mac the “osxpdfflatten” tool runs as “root” unless
RunAsUseris added to the configuration file (recommended!). It is required to log in once as the defined user, start Acrobat manually and log out again. This ensures that Acrobat preference files are available for the user, otherwise the error message “*** no user interaction is permitted” will be issued.
- Note:
-
“osxpdfflatten” requires a dedicated workstation, users cannot work on this machine because it will start and stop Acrobat and open/close windows which will confuse users. Clicking into an Acrobat window will interfere the flattening automation.
- Usage:
osxpdfflatten[-C <dir>] [-i <infile>] [-o <outfile>]
             [-O <propfile>] [-X <key>=<value>]... -h
The following options are supported:
- -C <dir>
Set working directory, where the files to be acted upon reside, and the log file is to be saved.
- -i <infile>
Read input from
<infile>instead of “job.in”.- -o <outfile>
Write output to
<outfile>instead of “job.out”.- -O <propfile>
Write properties of output file to
<propfile>instead of “job.outprops”.- -X <key>=<value>
Tool specific option:
- Profile (str)
Absolute path to a custom PDF preflight profile. The profile must be located on the “pdfflatten” machine (Mac/Win workstation/“Tool Server”) and its path must be specified in accordance to its system, e.g.:
-X Profile="/Volumes/Profiles/Magazine Ads.kfp"
or
-X Profile="C:\Profiles\Magazine Ads.kfp"
Alternatively, a UNIX path relative to the HELIOS directory can be specified, e.g., if the profile is stored in the “Settings” volume, “var/settings/PDF Preflight/...”
- -h
Display help file.
- Example:
toolclient -t pdfflatten -s localhost -i test.pdf -o flat.pdf
The transparencies of PDF file “test.pdf” are flattened, i.e. each transparent object is converted to a non-transparent object. The file is then output to a flattened PDF file (“flat.pdf”).
1.6.5 winpdfflatten
If called with “toolclient” use pdfflatten as type
Same features as the “osxpdfflatten” tool but it automates Acrobat on Windows.
1.6.6 osxraw2tiff
If called with “toolclient” use raw2tiff as type
This tool converts RAW documents to TIFF files, using Apple’s imaging technology.
- Usage:
osxraw2tiff [-C <dir>] [-i <infile>] [-o <outfile>]
            [-O <propfile>] [-X <key>=<value>]... -h
The following options are supported:
- -C <dir>
Set working directory, where the files to be acted upon reside, and the log file is to be saved.
- -i <infile>
Read input from
<infile>instead of “job.in”.- -o <outfile>
Write output to
<outfile>instead of “job.out”.- -O <propfile>
Write properties of output file to
<propfile>instead of “job.outprops”.- -X <key>=<value>
Tool specific option:
- FileExtension (required)
The file extension of the input file without dot, e.g.:
cr2.
- -h
Display help file.
1.6.7 OfficeReader
OfficeReader creates a PDF preview of Office documents, using Microsoft Office (Mac/Windows). Prerequisites are:
.NET Framework 3.5
Microsoft Office 2007, 2010 or 2013 (needs to be activated!)
Add-in “Microsoft Save as PDF or XPS” (Microsoft Office 2007 only)
In Office 2013, you may need to install language packs if exporting the PDF fails (Options > Language)
- Important:
-
In the “OfficeReader.conf” file, the
RunAsUser=<user name>entry must be added. It requires that the existing user password is set again using the HELIOS “authutil” tool, e.g.:authutil passwd -n mike -p secret
Microsoft Office 2011 (needs to be activated!)
- Important:
-
In the “OfficeReader.conf” file, the
RunAsUser=<user name>entry must match the name of the currently logged-in user!
- Usage:
OfficeReader [-C <dir>] [-X <key>=<value>]...
             -h        (for help info)
The following options are supported:
- -C <dir>
Set the working directory to
<dir>.- -X <key>=<value>
Tool specific options (see below).
- -h
Display help file.
In addition to the main options, tool specific options may
be specified (the specification of the SUFFIX option
is mandatory!):
- SUFFIX
The suffix of the original document (required).
- DEBUG
TRUEenables a verbose logging. The default value isFALSE.- OPENTIMEOUT (Mac only)
This option is useful if a file cannot be processed, e.g. due to password protection. The default is 5 seconds.
- Example 1:
toolclient -t OfficeReader -i Presentation.ppt -X SUFFIX=ppt
           -o ppt.pdf
Create a PDF preview (“ppt.pdf”) of the PowerPoint input document “Presentation.ppt”.
- Example 2:
toolclient -v -t OfficeReader -i Calculation.xls -X SUFFIX=xls
           -o excel.pdf
Create a PDF preview (“excel.pdf”) of the Excel input document “Calculation.xls”.
- Example 3:
toolclient -v -t OfficeReader -i Text.doc -X SUFFIX=doc -o word.pdf
Create a PDF preview (“word.pdf”) of the Word input document “Text.doc”.
- Example 4:
toolclient -t OfficeReader -i password.doc -X SUFFIX=doc
           -X OPENTIMEOUT=10 -o pass.pdf
Sets the timeout to open the document “password.doc” to 10 seconds.
The following notes apply to Windows only:
If the error message exited with status -2146232576
appears, the local installation and the user respectively
should be verified. Usually, OfficeReader runs with
“Administrator” rights. If the error message appears, it can
be that MS Office does not run as “Administrator”.
To solve this problem, either the MS Office installation
must be corrected or the correct user must be specified in
the MS Office configuration file:
RunAsUser=Administrator
The error ToolSync_ExecJob failed: tool 'etc/tools/OfficeReader.exe' failed, exit status= -1073741515 indicates
most likely that a DLL could not be found.
This means that either OfficeReader is not properly
installed or the MS Office installation is faulty, e.g. due to
a wrong Office version or a missing Microsoft Office
add-in “Microsoft Save as PDF or XPS” or “.NET Framework”.
The error ***ERROR***: checkSetup: There is no default
printer. indicates that there is no default printer defined as
needed for the PDF export.
These error messages were encountered in different Windows versions:
Error: Retrieving the COM class factory for component with CLSID {000209FF-0000-0000-C000-000000000046} failed due to the following error: 80080005
Solution: Open Change User Account Control settings. Select Never notify from the slider.
Error: ***ERROR***: Could not open document: Microsoft Excel cannot access the file 'C:\Program Files (x86)\Helios\var\tmp\toolsrv-8\job
Instead of this error message, an exception message can be thrown.
Solution: Check if the directory “C:\Windows\System32\config\systemprofile\Desktop” exists. If not, you need to create it. If your Windows installation has a “C:\Windows\SysWOW64” directory (which will be the case on most 64-bit systems), you also need to create the “C:\Windows\SysWOW64\config\systemprofile\Desktop” directory.
Error: A damaged default printer (i.e. wrong permissions) can be the reason for a hanging Excel export. The export will be stopped after a ToolServer time out (default time-out is 180 s).
Solution: Create a new default printer.
1.6.8 osxapplescript (AppleScript launcher)
This tool reads “job.in” and launches the specified AppleScript. The resulting file is written to “job.out”.
- Usage:
osxapplescript [-C <dir>] [-i <infile>] [-o <outfile>]
               [-X <key>=<value>]... -h
The following options are supported:
- -C <dir>
Set working directory, where the files to be acted upon reside, and the log file is to be saved.
- -i <infile>
Read input from
<infile>instead of “job.in”.- -o <outfile>
Write output to
<outfile>instead of “job.out”.- -X <key>=<value>
Tool specific options:
- ToolScript (str)
The AppleScript to launch, e.g.:
-X ToolScript=sharpen-psd.applescript.- ShowScript (bool; default is
FALSE) Show the called AppleScript. If “ShowScript” is called with “toolclient” the
-voption must also be specified.
- -h
Display help file.
- Note:
-
The “osxapplescript” tool is a launcher, which is used by the AppleScript automation tool examples:
“sharpen-psd.applescript” and “action-psd.applescript”
1.6.9 sharpen-psd.applescript
If called with “toolclient” use sharpen-psd as type
This is an example AppleScript which sharpens a JPEG image using Photoshop CS4.
- -X <key>=<value>
Tool specific options:
- JobInSuffix (str)
The tool only receives the file “job.in”. So we need the suffix (including the leading dot “.”) of the original file to rename it properly because Photoshop does not open an image with a wrong suffix.
- KeepApplRunning (int; default is
0) The AppleScript needs to quit the target application due to possible memory leaks, etc. when the job is finished. This parameter (when
1is set) allows keeping the application running for debugging/script writing purposes.
- Example:
toolclient -v -s ankh.helios.de -t sharpen-psd
           -i SourceImage.jpg -o DestinationImage.jpg
           -X JobInSuffix=.jpg -X KeepApplRunning=0
1.6.10 action-psd.applescript
If called with “toolclient” use action-psd as type
This is an example AppleScript which does image manipulation using a Photoshop CS4 action macro.
- -X <key>=<value>
Tool specific options:
- JobInSuffix (str)
The tool only receives the file “job.in”. So we need the suffix (including the leading dot “.”) of the original file to rename it properly because Photoshop does not open an image with a wrong suffix.
- KeepApplRunning (int; default is
0) The AppleScript needs to quit the target application due to possible memory leaks, etc. when the job is finished. This parameter (when
1is set) allows keeping the application running for debugging/script writing purposes.- Note:
-
The tool specific options “JobInSuffix” and “KeepApplRunning” are required options.
- ActionName (str)
Name of the called Photoshop action.
- Example:
toolclient -t action-psd -i SourceImage.jpg
           -o DestinationImage.jpg -X JobInSuffix=.jpg
           -X KeepApplRunning=0 -X ActionName=myCustomAction
           -X ShowScript=FALSE
1.6.11 Notes on AppleScript based tools
AppleScript is a technology which allows using features of any application capable of AppleScript. There are sample scripts included that perform tasks using Adobe Photoshop. However, there are several things to keep in mind:
In the command line context it is not possible to perform any GUI related commands. So e.g.
display dialogcannot be used. Make sure that the used commands do not trigger any dialog in the target application. E.g. for Photoshop it is a good idea to use theset display dialogs to nevercommand.“toolsrv” needs to clean up all processes after the job is done (or when a used application does hang). Since “toolsrv” does not know about applications started by the AppleScript it is required to write all PIDs of these applications to a log so that the corresponding processes can be killed in case something went wrong. For that the function “WriteChildPID” can be used. See the sample script “sharpen-psd.applescript” for details.
Target applications may need the correct suffix for the input file. So you have to make sure that the input file “job.in” is renamed properly.
“sharpen-psd.applescript” contains the function
WriteLogto give feedback to “toolclient” when the verbose option is used.“toolsrv” and “toolclient” are designed for server processing. Unfortunately some client applications are not designed in that way so that these applications need to be terminated after job processing, e.g. due to memory leaks which would bring the workstation (on which “toolsrv” is installed) down after running many jobs. For debugging/script creation it may be useful to disable this feature since it may take some time to restart the target application(s). “sharpen-psd.applescript” contains an example how this can be achieved via the
KeepApplRunningproperty.When using the
toolclient -voption it is possible to show the called AppleScript using the-X ShowScript=TRUEoption. This is useful to see the whole script since the script header properties are written by the tool server before the script. This option is for debugging purposes only.
1.7 Develop your own tools
Each tool needs a configuration file that at least specifies the tool itself. However, it can also contain additional information such as
RunAsUser=, License=, etc.For example, the tool “mytool” has the configuration file “mytool.conf”:
# mytool config file
Tool=mytool
RunAsUSer=mike
The tool and its configuration file must be stored in “HELIOSDIR/var/settings/Tool Server”. After that, “toolsrv” must be reconfigured in order to make the script being recognized (see reconfiguration line in 1.3 “Getting started”).
A tool needs an input file “job.in” and generates an output file “job.out”.
Optionally, the tool can create a file “job.outprops” with information about the generated output file.
- Example:
DataType=RGBA
Width=400
Height=200
Possible values for “DataType” are: PDF, PNG (RGB PNG file), RGBA (RGBA bitmap, 4 bytes per pixel) and RAW (arbitrary data).
Messages on stderr will be provided to the tool client application (“toolclient”).
Job type, which is used in the
toolclientcall (see 1.4 “toolclient (tool client application)”).A termination handler to shut down within two seconds after receiving a
SIGTERMsignal.The
-hoption to display available parameter options.The
-Cdirpath option to do a “chdir” into the specified job directory.The
-voption to turn on verbose error/job information printing to stderr.A proper exit code (
0=success).
Examples for shell scripts, Perl scripts, and Visual Basic scripts can be found on the HELIOS website.
1.8 Required licenses
Usually the tool client is used on the main workflow server and requires an ImageServer license.
Although “toolsrv” requires no license, it is only allowed to be installed and used as long the customer owns a valid ImageServer license on the host where the “toolclient” application is used. This varies from the actual HELIOS license agreement which you can find in the file “license.txt” on the HELIOS CD, and which is displayed in the HELIOS Installer during the installation.
For the tools no local license is required. They will check with the tool client for a valid license:
| Tool | License |
| osxhtmlrender | ImageServer |
| osxpdfflatten/winpdfflatten | ImageServer |
| osxpdfrender | ImageServer |
| OfficeReader | ImageServer/WebShare/Universal File Server |
| osxraw2tif | ImageServer |
| osxapplescript | – |
- 1 Tools that require a license need a local license in order to run.