5 Using ImageServer
The preceding chapter described how to set up ImageServer volumes and printer queues via HELIOS Admin. This chapter gives notes on image layout generation, and describes folder-specific OPI settings, tagging images with ICC profiles, the export/import of metadata such as XMP information, the “touch” program, which allows refreshing layout images, print options for printing from QuarkXPress and InDesign, and how to view HELIOS XPPV documents.
5.1 Notes about layout generation
The automatic generation of layout files is volume dependent.
If you have retouched your high-resolution original
image files using an image processing application, make
sure that you save them in a volume on which Create Layouts
is enabled (see also 4.2 “Volume settings”). OPI will not
generate layouts for files that you save on your local hard disk.
- Important:
-
You should always select unique file names for your high-resolution original images, at least if you want to save them in the same folder! Different extensions will not do. For example, if you save “flowers.psd” (Photoshop) and “flowers.tif” in the same folder, they both will produce a “flowers.tif” layout image. The contents of this layout may show either the content of “flowers.psd” or “flowers.tif”.
- Important:
-
If you are using clients running Mac OS 8/9, make sure to limit the file name of the images to 31 characters! Mac OS 8/9 shortens file names which exceed this limit to 31 characters. In that case, OPI would not work.
The generation of layouts will take a few moments, it starts after a user-defined time delay. This is – by default – after a delay of 30 seconds (see Layout Delay in 4.1 “ImageServer settings”) before the OPI server starts generating them.
Layout files are generated in a “layouts” subfolder. ImageServer always generates layouts, even if the resolution of the original image is lower than the default layout resolution. In this case the layout would inherit the resolution of the original.
5.1.1 Notes for Photoshop users
Since Photoshop 6, layers can be vector-based. So you should consider before saving your high-resolution originals, that not every image format can handle such layers. The file format of the high-resolution image determines whether the vector data (not the vector layer!) in the document is maintained in the layout file, although the preview in the Finder may show it anyway.
It is recommended to stick to the Photoshop native (PSD) format when vector-based data is employed within the document.
When saving the file to EPS-format Photoshop, the following warning is issued:
Files with vector data will be rasterized by Photoshop when opened.
- Note:
-
You can switch off the
Include Vector Dataoption in theEPS-Optionsdialog. Then the layout file, generated by ImageServer, will contain the (rasterized) text.
We recommend to activate the option Maximize PSD File
Compatibility in the Photoshop preferences in order to
provide a better compatibility with ImageServer.
5.2 Define folder specific OPI settings
Usually, all OPI settings that define the attributes of layout files are server or volume specific (see Fig. 4.1 in 4.1 “ImageServer settings” and Fig. 4.5 in 4.2 “Volume settings”). It is, however, possible to specify alternative settings for individual folders, for automatic layout generation on the OPI server, by simply changing the folder name, e.g. from a Mac or Windows computer.
The “%” character always introduces a new specification. You can add different definitions following that character, including: resolution, file format, and color space.
A 1, 2 or 3 digit dpi value for the resolution of the layout
files that are to be generated within this folder. %0 means
that no layout is generated at all!
The t flag will produce TIFF layouts even if
the high-resolution image contains a clipping path or spot
colors. If you want to use TIFF layout files for multi-path
handling, do not use high-res EPSF files with a clipping path
(see also MaskToEps and SpotToEps
in 9.1.2 “Global OPI preferences”).
An EPS image is special since the “opisrv”
does only check the raster-based information of the image and does
not look in additional object/vector based image parts.
ImageServer supports both vector-based and raster-based EPSF files.
- Note:
-
As a workaround, you may use the “layout” command (see 6.1 “layout”) to create TIFF layouts from an EPSF image.
For other layout file formats use the following flags:
%t |
TIFF (and enforce raster layout images) |
%e |
EPS |
%j |
JPEG (and enforce raster layout images) |
%g |
PNG (and enforce raster layout images) |
%n |
Neutral |
The %n flag causes the folder to use the OPI server settings, ignoring
all folder specific OPI settings of any parent folder.
%m |
Mac only |
%p |
Cross-platform/PC |
- Example:
Folder_name%80emwill produce 80 dpi Mac EPSF layouts.
%b |
Grayscale |
%r |
RGB |
%c |
CMYK |
%l |
Lab |
Specify the color mode of the printable and screen previews. If
you use l, TIFF layouts and the printable previews of EPSF
layouts will be in Lab, the screen previews of EPSF layouts
will be in the RGB color space.
%u |
Ignore spot colors |
%v |
Enable spot colors |
%x |
Ignore masks |
%y |
Enable masks |
- Important:
-
The chosen parameters in a folder name affect all subfolders, i.e. they are automatically valid for the complete directory tree!
The folder name must end in %, followed by none or more
digits for the resolution, and by the other options in the
order as listed below. Options are not case-sensitive. Other
characters or spaces in the options string are not allowed.
| 1. | Resolution (in dpi) |
| 2. | e, t, g, j, n |
| 3. | m, p |
| 4. | b, c, r, l |
| 5. | u, v |
| 6. | x, y |
- Example:
The appended “%0” of the “test-images%0” folder will prevent the OPI server from creating layout images from the high-resolution originals saved to that folder.
The folder named “test-images%36pb” is for high-resolution images you want to substitute with 36 dpi layouts containing PC previews in Grayscale color mode for printable and screen EPSF and TIFF previews.
5.3 Tag images with ICC profiles
- Note:
-
See the client requirements for HELIOS ICC Tagger in chapter 4.1.3 “Client requirements” of the HELIOS Base manual.
For high-quality color matching, the OPI server needs an ICC source profile (image profile) for each image and an ICC output profile (printer profile) for the printer queue.
HELIOS ICC Tagger serves to tag high-resolution original images with an ICC source profile and thus allows correct color data transformation (for details about color data transformation with ICC profiles see Fig. B.1 in B “Colors, color matching, proof printing – basic concepts”).
Please note that for tagging both the images and the profiles have to be available on the server. The volume in which the tagging will be done must have enough disk space available – at least as much space as the largest image would need, because “opisrv” might temporarily duplicate data.

-
Mount the “HELIOS Applications” volume, open the “Windows” folder (Mac: “MacOS”) and then “ImageServer Tools”. Double-click the “HELIOS ICC Tagger” program icon.
The HELIOS ICC Tagger program allows creating so-called ICC info files that contain tagging instructions for all images in a given folder or tagging single images individually.
-
Select
FileandNewfrom the program menu. If HELIOS ICC Tagger issues an error message that the profile repository (by default this is the “ICC-Profiles” volume) cannot be found, mount either the volume or, if your profiles are stored in another volume, change the profile search path by clicking theChangebutton and specify the correct path.
Confirm withOK.
The dialog (Fig. 5.1) lets you set general tagging options as well as specific options for all the different file formats that are supported by ImageServer.
You can define separately for each single file format (TIFF, EPSF, etc.) whether you wish to tag the profiles by reference or embed them into the image file.
-
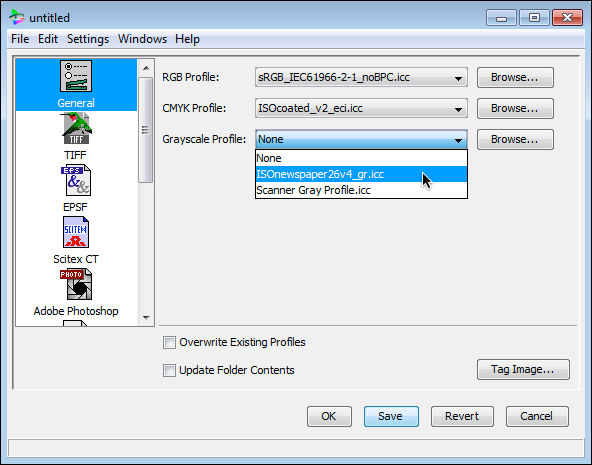
In the corresponding pop-up menu select an RGB, CMYK, and Grayscale profile for the specific file format.
The Overwrite existing profiles checkbox should be used
carefully. Whenever you save an image that already
contains an image profile to the folder that contains this
particular ICC info file (or if you move the image to that
folder) the old profile will be overwritten.
By selecting Update Folder Contents, current ICC profile
settings are applied immediately to the images in the
respective folder (allow “opisrv” some time to apply the
changes).
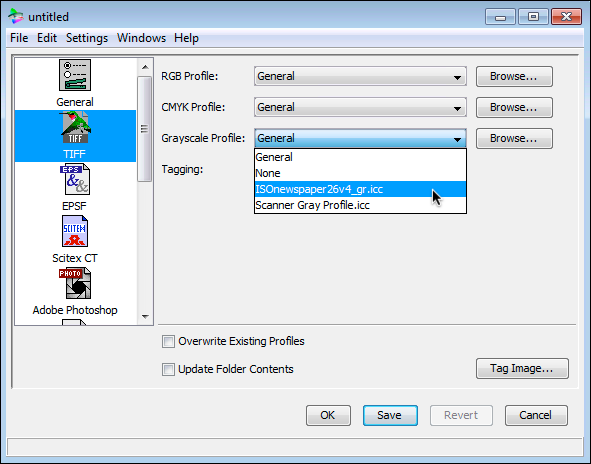
After setting the “General” options (Fig. 5.1), which apply
the chosen CMYK, RGB, and Grayscale profile for different
file formats, individual profiles can be assigned in the
same way for specific file formats, which can be selected
from the scroll list at the left. Selecting General
from the pop-up menu means that the profiles which you have
specified in the “General” section are applied. Fig. 5.2 shows an
example for the TIFF file format.
- Note:
-
Generalis the default setting in the pop-ups for the different file formats unless the file format denies tagging of a particular profile type, e.g., PICT images cannot be tagged with a CMYK profile.
When you have set up tagging for all required file formats, you can save your new ICC info file.
-
Click the
Savebutton to open the dialog that lets you select the destination folder (Fig. 5.3).
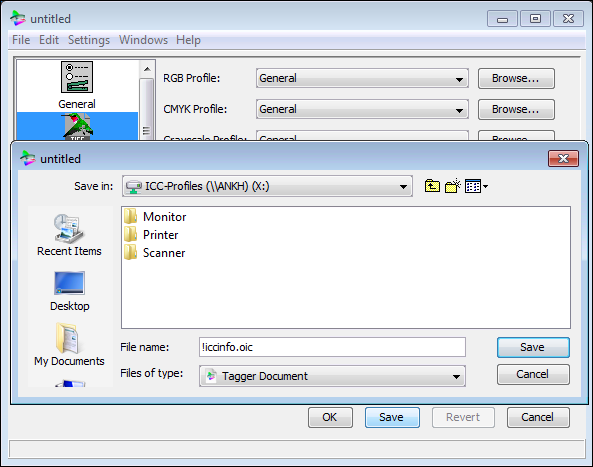
Please note that there are a few important things you should know about saving:
The file name for an ICC info file is “!iccinfo.oic”. This name must not be changed.
The tagging instructions that are contained in the file are applied to images in the destination folder only – they are not valid for subfolders. But: if you save an ICC info file in the volume root directory, it will be valid for all folders in the volume that do not contain their own ICC info file.
Images that were already stored in the destination folder are not tagged automatically. Tagging is only applied to images coming in later. If you want to tag existing image files, the
Update Folder Contentscheckbox must be active (as already described in Creating an ICC info file above).
The ICC info file can be re-edited at any time. Just double-click the file icon to open the HELIOS ICC Tagger.
- Note:
-
If you have added your own image profiles to the “ICC-Profiles” volume issue the following command to update the ICC index file, in order to notify the OPI server about the changes:
# srvutil reconf opisrv
You may also tag single images one by one with the HELIOS ICC Tagger program. The procedure is similar to that described above.
-
Select
FileandNewfrom the program menu to open the ICC info file dialog.
-
Select the file format of the image you want to tag and choose the correct profile. Then click the
Tag Imagebutton to open the dialog that lets you choose the desired image file.
The HELIOS ICC Tagger program internally creates an ICC info file which is used for tagging the images and then deletes it afterwards.
The HELIOS ICC Tagger program may only be used for tagging high-resolution original images. If you happen to tag a layout image this will be silently ignored because layouts are tagged automatically by the OPI server. The rules for layout tagging are as follows:
If the layout inherits the color space of the high-resolution image (e.g. CMYK) it also inherits the profile. For a high-resolution image without a profile the layout will not have a profile either.
If the high-resolution image and the layout have a different color space the layout will be tagged with the profile that has been used by the OPI server for color data transformation. See also OmitProfile in 9.1 “ImageServer preferences”.
- Note:
-
For details about color spaces of layout images refer to 3.5 “How ImageServer modifies color modes”.
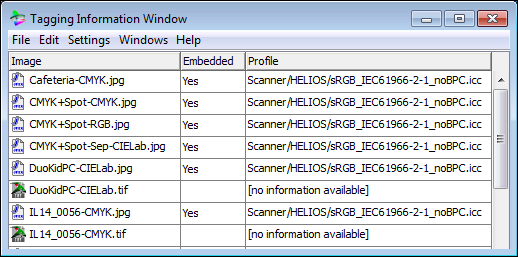
There are two methods to find out about profile information that has been tagged to an image file with the HELIOS ICC Tagger program:
-
Select
File > Open Tag Info. Then drag and drop the file(s) you want to get profile information about into the window.
Another possibility is to select Open from the
File menu, navigate to the image and highlight
it and then click Open. The “Tagging Information Window”
(Fig. 5.4) lists the file(s) and
gives information about possible profile tagging and
whether the profiles are referenced or embedded.
You may also use our “oiimginfo” program to find out whether a specific image is already tagged with a profile. See 6.4 “oiimginfo”.
5.4 Export/Import XMP etc. information
An image file can contain XMP (Extensible Metadata Platform), metadata or clipping path information. ImageServer enables users to export this information from a file, and likewise, to import such information into an image file.
5.4.1 Export
-
Specify “oiimginfo” for an image file with the
-foption and an export file name (See also-E <ExportType>in 6.4 “oiimginfo”).
- Example:
$ cd /usr/local/helios
$ bin/oiimginfo -E XMP -f /demovol/Info.xmp image.jpg
ImageServer will create a file in the specified directory (in the example above in “/demovol”), which contains the extracted XMP information.
5.4.2 Import
-
Make sure the XMP file is UTF-8 coded.
-
Specify “layout” with the
-foption (see 6.1.11 “Tagging ICC profiles, path information, and metadata to images”).
- Example:
$ cd /usr/local/helios
$ bin/layout -f "XMP:ADD:/demovol/Info.xmp" image.jpg
5.5 Refresh layouts using the “touch” program
The “touch” program is meant to help you generate new layouts. This might be necessary either …
… if you want to replace layouts that have been generated with an earlier ImageServer version and thus make them fully compatible with the latest program version, or
… if you have changed any OPI settings (using the HELIOS Admin program) and now want to refresh your existing layout files accordingly.
Usually, a layout file is generated shortly after you have saved a high-resolution original image on the server. The layout file will then bear the attributes that are defined at that moment in HELIOS Admin. If you change settings in the Admin, the existing layouts will not be updated automatically.
In case you decide to update an old layout, you could open your high-resolution original image file and save it once again. Or, you can use the “touch” program for that purpose. This is much more convenient because the program simulates the saving procedure without opening any image processing application.
-
Mount the “HELIOS Applications” volume, open the “Windows” folder (Mac: “MacOS”) and then “ImageServer Tools”.
-
Drag the “touch” program icon onto your local desktop.
-
Drag the image file(s) you want to re-layout onto the “touch” icon (Fig. 5.5).
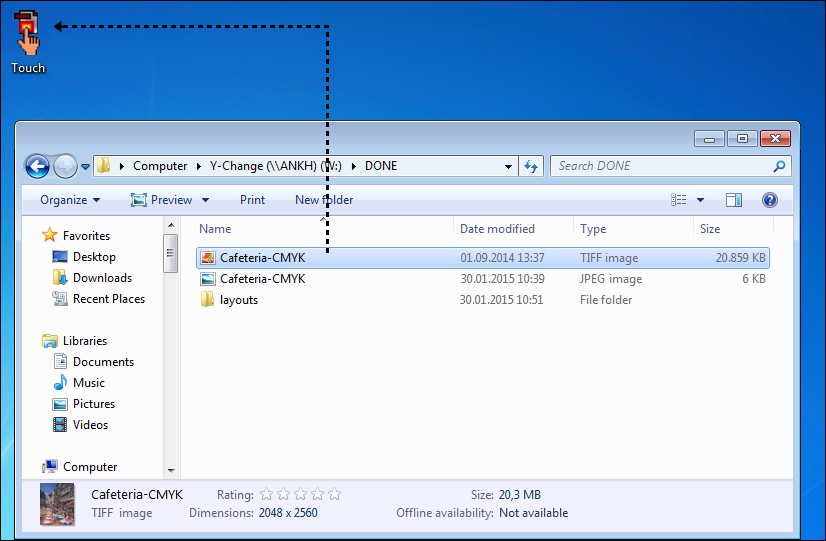
The “touch” program will – after a delay of 30 seconds (default) – automatically lead to the generation of new layout files.
- Note:
-
You may select several images at a time and drag them onto the “touch” icon. Likewise, you can drag a complete folder onto the “touch” icon. However, this can lead to a high server load on the host, depending on the number of files in that folder because its content will then be processed recursively.
Please note that the time the server needs for the generation of new layouts, depends on the number of layout jobs and processes.
The “touch” program may also be used for tagging ICC profiles to high-resolution images. This is done by “touching” a complete directory which contains high-resolution images and an “!iccinfo.oic” file. Due to the fact that the “Touch.exe” program enforces a new layout process in the directory, existing source profiles are read out anew according to the information stored in the “!iccinfo.oic” file.
5.5.1 Using “Touch.exe” under Windows
Under Windows, only a certain amount of files can be dragged onto the “Touch.exe” icon at a time, otherwise Windows will issue an error message.
In this case do the following:
-
Start “Touch.exe” and drag all selected files into the program window. You may also copy the selected files in the Explorer and paste them into the program window.
5.5.2 opitouch
“opitouch” is the command line version of this program. It is described in 6.2 “opitouch”.
5.6 OPI print options – Printing from QuarkXPress and InDesign
OPI options in the print dialog are application specific. In the following, we explain how to specify OPI settings in the QuarkXPress and InDesign applications, and the effects on the printing results.
5.6.1 QuarkXPress
For example, QuarkXPress offers the Include Images option
(Fig. 5.6), as long as OPI Active is checked.
With this option selected, the PostScript job which is sent from the workstation to the OPI server will include the image data and all OPI comments that describe these images. Once the job has arrived on the server, ImageServer will replace the image data with the high-resolution originals – or print the layouts that have been placed (see Print Layout Images in 4.3 “OPI printer queue settings”).
If Include Images is not selected, the amount
of data that is sent from the client to the server will be
reduced. The PostScript file will no longer contain the image data of the
layout files. However, the OPI comments are still included.
In this case the OPI server does not replace images, but
fills blanks. The printouts will be complete and correct.
It may be reasonable to deactivate this Include...
option whenever documents contain a lot of TIFF or EPS images and
thus become rather large (even with layout files).
- Important:
-
Only deactivate the
Include...options if all your images are stored on the OPI server. This works properly if you are using layout files only. In case you place high-resolution originals in your layout document, this might cause problems, because the OPI server, by default, does not replace high-resolution images nor fills blanks either. If you deactivate one of theInclude...options for high-resolution images, these images will be missing on the printout.
You can solve this problem by switching theReplace Imagesoption toAllon ImageServer – see 4.3 “OPI printer queue settings”.
You may additionally select Low Resolution to downscale
high-res TIFF images in the document when printing out.
5.6.2 InDesign
When printing a document from InDesign, the OPI options in the “Advanced” section let you selectively omit different imported graphics types when sending image data to a printer or file, leaving only the OPI links (comments) for later handling by an OPI server. This behavior is almost the same as that described in 5.6.1 “QuarkXPress”.
If the checkbox OPI Image Replacement (Fig. 5.16)
is active, InDesign replaces low-resolution EPS images with
high-resolution graphics at output time. You must deselect this
option to have ImageServer perform server-based OPI
image replacement.
These options allow you to selectively omit different
imported graphics types (EPS, PDF,
and Bitmap Images) when sending image data
to a printer or file, leaving only the OPI comments for
later handling by ImageServer OPI. The comments contain
the information needed to locate a high-resolution image
in a HELIOS OPI volume. InDesign only includes the comments
in the print job. Please note that the Omit for OPI
option does not apply to embedded graphics.
5.7 Using QuarkXPress with ImageServer
ImageServer supports background tinting of Bilevel and Grayscale raster-based images that are used by QuarkXPress. To benefit from this functionality you must first copy the “HELIOS OPI TuneUp XT” module to the QuarkXPress “XTension” folder:
-
Mount the “HELIOS Applications” volume, open the “Windows” folder (Mac: “MacOS”), then “ImageServer Tools” and “HELIOS OPI TuneUp”.
-
Then copy the “HELIOS OPI TuneUp XT” file from the appropriate folder (e.g. “XPress 8”) into the “XTension” folder of your QuarkXPress application.
Now the installation of the module is complete and you can immediately utilize it after a restart of QuarkXPress. Once you have designed your QuarkXPress document, you can view information about the images you have placed in it:
-
For that purpose, select
UtilitiesandUsage...and then thePicturestab from the QuarkXPress menu.
The “Usage” window will provide details you might need for setting up the print dialog for OPI. It tells you e.g. whether you have imported layout files only (this is indicated by the path and file name) and what kind of file formats you are dealing with. Fig. 5.7 shows an example document with the “Usage” window.

5.7.1 Print settings in QuarkXPress
In the “Layout” tab of the print dialog you can specify
whether to print composite or separations (Fig. 5.8).
If you switch on Separations, please note that – in case you have
selected a particular ICC printer profile for your printer
queue – only CMYK and Multichannel (e.g. Hexachrome)
output profiles cooperate with this option. Other profiles do
not allow printing separations and will cause error messages.
In case you get such messages, please check the printer
queue settings in the respective HELIOS Admin dialog (4.3 “OPI printer queue settings”).
Printing separations may fail if you have placed RGB high-resolution
images in your document or if you have selected
sRGB IEC61966-2-1 as default color space for layouts
(4.1 “ImageServer settings”). This restriction is only caused by
older QuarkXPress versions, because the software does not
separate RGB images (even if the high-resolution originals
are CMYK).

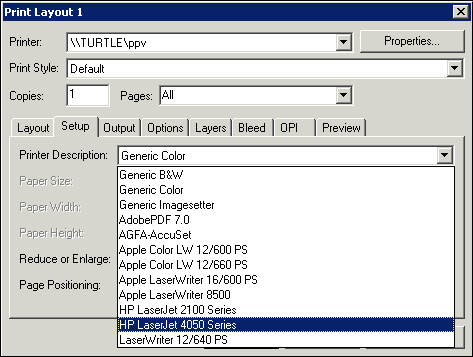
The “Setup” tab lets you check paper settings for the document and select a printer type.
-
Select the printer in the
Printer Descriptionpull-down menu (Fig. 5.9).Generic Colormay be selected if your printer type is not stated in the list and you plan to print colored images, but do not selectGeneric B&W.
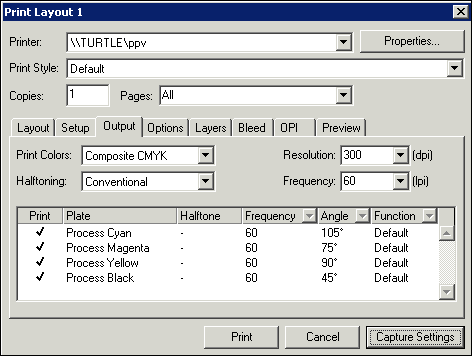
In the “Output” tab (Fig. 5.10) you may select printer settings for your print job.
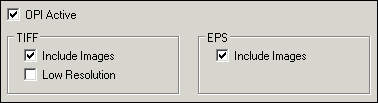
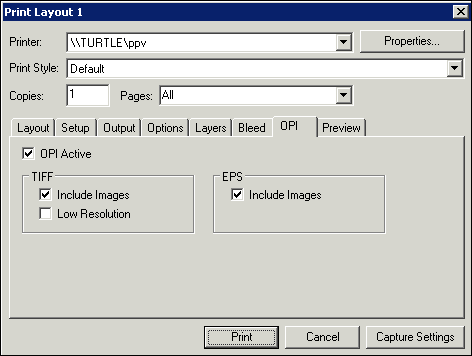
The “OPI” tab lets you specify whether to include the images of the document in the print job or not. This can be set for TIFF and EPS images separately (Fig. 5.11).
Details about these settings are described in 5.6 “OPI print options – Printing from QuarkXPress and InDesign”.
5.7.2 Overcoming QuarkXPress limitations with ImageServer and PDF HandShake
You can use ImageServer to overcome some QuarkXPress limitations. QuarkXPress 3 through 5 cannot produce DeviceN output, and QuarkXPress 3 through 6 cannot produce in-RIP separations. But if you use QuarkXPress in connection with ImageServer, you can produce in-RIP separations with DeviceN output. Here is how you can do it:
-
Print your jobs composite from QuarkXPress to a “Create PDF” printer queue (requires PDF HandShake) to create PDF documents, using the ImageServer OPI image replacement functionality. Make sure that DeviceN printing is enabled on this queue (see Fig. 4.7 and PostScript 3/DeviceN in 4.3 “OPI printer queue settings”).
These PDF documents will include full composite DeviceN spot color information generated from the high-resolution DCS-2, TIFF and Photoshop images with spot colors, as well as from colorized grayscale images. You can print these PDF documents, e.g. via PDF HandShake with its variety of options including host-based and in-RIP separation to your PostScript 3 compatible output device.
5.7.3 HELIOS Preview XT
With this extension installed, a preview file with the same name as the document and the suffix “.xpv” will be generated each time you save a QuarkXPress document. The following steps describe how to install the extension and how it is used:
-
Mount the “HELIOS Applications” volume, open the “Windows” folder (Mac: “MacOS”), then “ImageServer Tools” and “HELIOS Preview”.
-
Copy “HELIOS Preview XT.xnt” from the appropriate QuarkXPress version folder into the “XTension” folder of the QuarkXPress application.
- Note:
-
For QuarkXPress 6 or newer, you need to mount the proper “HELIOS Preview XT.dmg” disk image before getting access to the “HELIOS Preview XT.xnt” extension.
Now the installation of the module is complete and you can immediately utilize it after a restart of QuarkXPress:
- Note:
-
Open
Edit > HELIOS Preview XT...from the QuarkXPress menu bar.
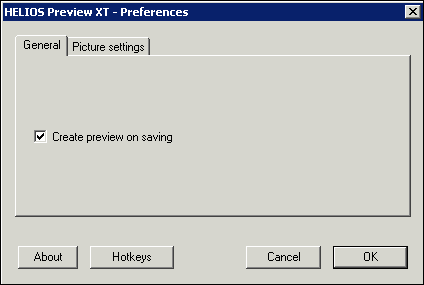
The checkbox Create preview on saving in the
General tab allows you to specify whether
previews should be generated each time a QuarkXPress
document is saved (Fig. 5.12).
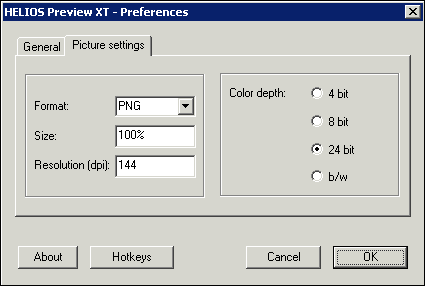
The Picture settings tab allows the specification of the
preview image file format, PNG or JPEG (Fig. 5.13).
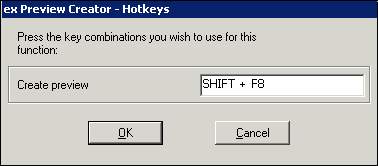
In the “Hotkeys” window tab you may specify a shortcut which enforces the preview generation without saving the document (Fig. 5.14).
5.8 Using InDesign with ImageServer
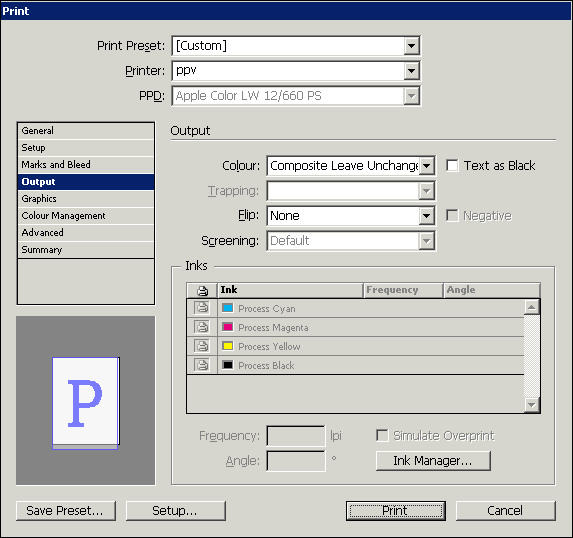
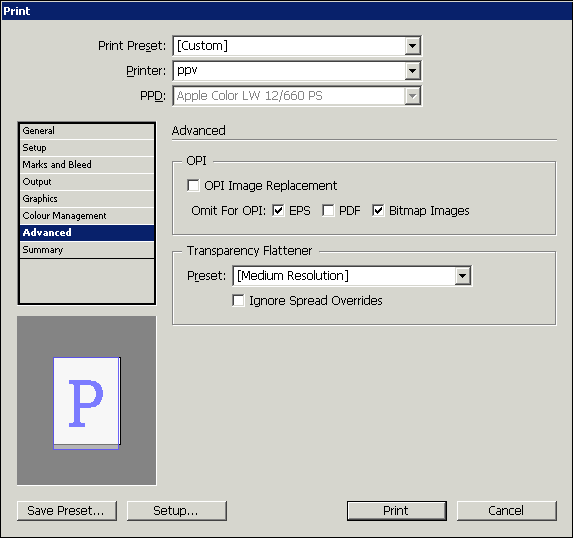
In this section we focus on the InDesign print output settings (Fig. 5.15), which allow you to specify if printing composite or separations, and the advanced settings (Fig. 5.16), in which OPI related settings are provided.
In the Color pull-down menu you can select whether to print
composite, separations or in-RIP separations. In order to
have ImageServer perform composite color matching, thus
keep image data unchanged, you should select Composite
Leave Unchanged. If you wish to print documents from InDesign
to an already defined color space, select Composite
Gray, Composite RGB, Composite CMYK.
Here you can omit EPS, PDF or bitmap layout images for
OPI. If one or more of these options are checked, InDesign
does not include the placed layout images in the document,
but will include all OPI references. This reduces the document
size significantly while preserving all the essential
information which is needed to have ImageServer perform
proper OPI image replacement.
Furthermore the option OPI Image Replacement must be unchecked.
This ensures that ImageServer performs server-based image replacement.
When selecting an EPS layout image from the Place... dialog
box, select the option Show Import Options. The option
Read Embedded OPI Image Links tells InDesign to read links from
OPI comments for images which are included (or nested) in
the graphic (Fig. 5.17).
This option must be deselected if you are using layout images and plan to have the ImageServer OPI functionality perform the image replacement. When this option is deselected, InDesign preserves the OPI links, but does not read them. When you print or export, the layout images and the links are passed on to the output file.
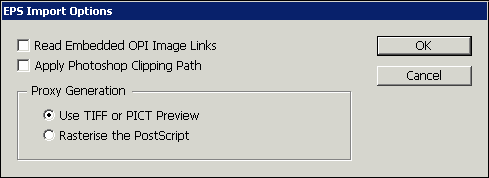
Select the option Apply Photoshop Clipping Path to import a
clipping path from a Photoshop EPS file.
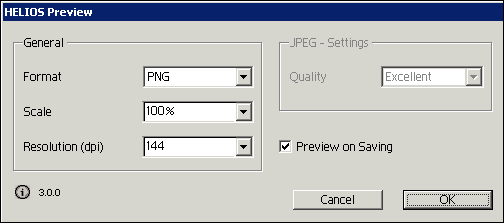
5.8.1 The HELIOS Preview plug-in
With this plug-in installed, a preview file with the same name and the suffix “.xpv” will be generated each time you save an InDesign document. The following steps describe how to install the plug-in and how it is used:
-
Mount the “HELIOS Applications” volume, open the “Windows” folder (Mac: “MacOS”), then “ImageServer Tools” and “HELIOS Preview”.
-
From the appropriate InDesign version folder mount the “HELIOS Preview XT.dmg” disk image and copy the “HELIOS Preview XT.pln” plug-in into the “Plug-Ins” folder of the InDesign application.
- Note:
-
InDesign 2, CS and Windows clients:
Copy “HELIOS Preview XT.pln” into the “Plug-Ins” folder of the InDesign application.
Now the installation of the plug-in is complete and you can immediately utilize it after restarting InDesign:
-
Open
Plug-Ins > HELIOS Preview > Preferences...from the InDesign menu bar.
The “HELIOS Preview” window appears (Fig. 5.18).
It allows you to specify the preview image file format, which can be PNG
or JPEG, and their respective settings. In addition, you may
specify with the Preview on Saving option whether previews
should be generated each time an InDesign document is saved.
5.8.2 PDF-native OPI workflows
ImageServer provides a native PDF-based OPI image replacement solution that replaces, within in a PDF file, the low-resolution bitmap images with the high-resolution originals. This preserves transparency and metadata, and allows server-based PDF workflows utilizing OPI low-resolution images.
Modern pre-press applications, e.g. Adobe InDesign, are moving to a direct PDF output workflow allowing advanced features like PDF transparency, drop shadows, and embedded XMP metadata. These features are incompatible with today’s PostScript output, but will be fully supported by this solution.
The main advantages of the HELIOS server-based OPI solutions are:
Server based color management to color transform images for different printing processes. ICC profiles can be applied or embedded into PDF print jobs
Submit PDF print jobs before all images are ready – the server will generate the final high-resolution PDFs when all images are completed
Much faster PDF export from InDesign, using
Omit for OPIServer defines color management for all OPI images
Remote users using WebShare can download low-resolution images and return PDF print jobs with images omitted, which are then replaced on the server for final output. For complete details, see “11 PDF-native OPI workflow” in the HELIOS PDF HandShake manual.
5.9 Viewing HELIOS XPPV documents
XPPV is a file format developed by HELIOS used for storing previews of multi-page documents, e.g. Quark XPress documents. The Mac file type for these document preview files is “XPPV” and the standard suffix is “.xpv”.
HELIOS WebShare allows conveniently previewing and proofing XPPV documents via any web browser (see 5.9.2 “Viewing preview images in WebShare” below).
5.9.1 Converting the preview image format
The preview of a page in an XPPV file can be converted to other image formats using the “layout” command (see 6.1.8 “Image conversion options”).
- Example:
# layout -oSpotToProcess=true -oScreenResolution=0 -oPrintColor=RGB
  -aPageNumber=1 -T JPEG -l doc.xpv page1.jpeg
5.9.2 Viewing preview images in WebShare
HELIOS WebShare can display previews of QuarkXPress and InDesign document pages. The HELIOS “Preview” extensions automatically save an “.xpv” file containing the document preview together upon each QuarkXPress or InDesign document save. WebShare users can click on this “.xpv” file to view the document previews of each page. For more information see the section “Image and document previews” in the HELIOS WebShare manual.
5.9.3 XPV action scripts in WebShare
WebShare includes two sample action scripts related to XPV preview files.
Within WebShare, first select an “.xpv” file, and then “XPV info” on the
Action > menu (if enabled). It will list extensive information about the
images, colors, text blocks, fonts, and other details about each page in
the corresponding InDesign or QuarkXPress document. If the Collect
files from XPV action script is selected, it will collect the referred data (QuarkXPress
or InDesign document and images) from the XPV document, and save it into a
“collection” folder. It also creates a report about the used fonts. See
“7.4.3 Sample action scripts” in the HELIOS WebShare manual.