B Legacy services and tools
B.1 AppleTalk is optional since HELIOS UB2
For many environments there is no need for AppleTalk anymore. In OS X 10.6, AppleTalk has been removed entirely by Apple. On Linux, AppleTalk support depends on the kernel configuration (see B.4 “AppleTalk kernel configuration” and the HELIOS Support website for details). All HELIOS EtherShare services are supported over TCP/IP, including HELIOS printer drivers for OS X and Mac OS 9.
Therefore we decided in HELIOS UB2 to make the AppleTalk support optional. The legacy services “atalkd”, “admsrv”, “mailsrv”, “termsrv” and “timesrv”, which are only needed for Mac OS 9 or older clients, are also optional.
AppleTalk support is off by default. The AppleTalk kernel modules are not loaded, and the legacy services are not started. The EtherShare file server, print server etc. run using TCP/IP only. If AppleTalk support is required, it can be enabled after the UB64 installation (see below).
Upgrading to HELIOS UB64 does NOT remove AppleTalk support. The kernel modules and all services continue running. But you can remove AppleTalk support and the legacy services after the installation of HELIOS UB64.

-
To remove AppleTalk support, enter the following commands as superuser:
# cd /usr/local/helios
# bin/stop-helios
# sbin/atsupport uninstall
# bin/start-helios
This unloads the AppleTalk kernel modules from the system, and also disables the services “atalkd”, “admsrv”, “mailsrv”, “termsrv”, and “timesrv”.
- Note:
-
On AIX, the unloading of network protocols is not supported. Therefore an additional system reboot is required.
-
To enable AppleTalk support, enter the following commands as superuser:
# cd /usr/local/helios
# bin/stop-helios
# sbin/atsupport install
# bin/start-helios
This installs the AppleTalk kernel modules and also enables the services “atalkd”, “admsrv”, “mailsrv”, “termsrv”, and “timesrv”.
-
If you need AppleTalk support (e.g. for printing via PAP), but not the legacy services, execute the following commands as superuser:
# cd /usr/local/helios
# bin/stop-helios
# sbin/atsupport driver-only
# bin/start-helios
This installs the AppleTalk kernel modules (and “atalkd”), but disables the services “admsrv”, “mailsrv”, “termsrv”, and “timesrv”.
OS X 10.6 or later does not support AppleTalk at all. The services “admsrv”, “mailsrv”, “termsrv”, and “timesrv” are disabled automatically.
B.2 The “atalkd” service
The EtherShare AppleTalk protocol stack is either contained in a UNIX loadable module, which is designed to be added to the operating system during runtime or in a driver which is built into the UNIX kernel during the EtherShare installation.
The AppleTalk protocol stack is closely connected to the “atalkd” (AppleTalk Daemon) program. The protocol stack and “atalkd” provide important basic functions for AppleTalk networks. The HELIOS servers (print server, file server, etc.) are designed around this base system.
- Note:
-
The OS X platform uses its generic AppleTalk implementation and not the HELIOS “atalkd” daemon. All parameters are set in the
Networkpanel.
The “atalkd” program implements permanent services on the AppleTalk network which are required to operate the EtherShare system. For example, all EtherShare components depend on the functions of this program in order to be able to communicate with the network. None of the servers will start until “atalkd” is running (otherwise you will get a “… cannot register” error message, see also B.5 ““atalkd” error messages”). The host is normally configured to start “atalkd” automatically when UNIX is booted.
“atalkd” is also responsible for making the names of all AppleTalk services, which are available on the UNIX host (i.e. EtherShare file server, print server, Terminal server, mail server, and Time server), known to the AppleTalk network.
When a HELIOS service is started, the chosen AppleTalk name for the server (defined in the configuration) is passed to “atalkd”, which also receives a corresponding message from the server when it is shut down. “atalkd” automatically checks whether the chosen name is unique to the network zone. If the name is already in use the server is immediately aborted with the error message “Duplicate name exists already”, and it is necessary to change the name in the configuration.
“atalkd” is also responsible for the AppleTalk routing table maintenance, to allow the kernel modules to route between all active network interfaces.
Another task of “atalkd” is to manage all information about connected AppleTalk networks. On AppleTalk, different logical networks are grouped into zones. “atalkd” automatically maintains an internal routing table to keep track of changes in the network configuration. The routing table allows services and information to be routed through different segments of the network, if required.
Changes in the routing table are also passed on to the AppleTalk protocol modules to allow data packets to be routed between different network segments.
B.3 Configure EtherShare as AppleTalk network router
The HELIOS “netconf” utility offers a very convenient user interface for network configuration.
Note that HELIOS “netconf” is only a configuration tool. Messages, like information about whether Automatic configuration is possible or not, are issued by the respective server programs, not by “netconf” itself.
“netconf” automatically recognizes and displays the network interfaces that are supported by EtherShare, i.e. Ethernet. Even though it is possible to enter new interfaces not yet known to EtherShare, you should keep in mind that these new interfaces may, under certain conditions, cause a system crash.
You do not need to stop EtherShare before configuring your interfaces and zones with “netconf”. However, you must stop and start EtherShare after the work is done in order to let the new configuration take effect. “netconf” is described in detail in B.3.4 “Manual network configuration”.
You can use the HELIOS “zones” program to check your network for existing zone information. See B.8 “zones” for a more detailed description of this program.
B.3.1 Example network setups
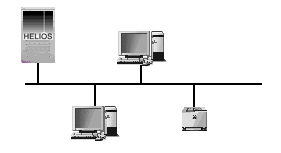
The following figures show example network setups, from one up to four NICs (Network Interface Card):
Fig. B.1 shows a network setup which is comprised of a server (with one NIC), two clients, and a network printer. This configuration is simple because all nodes are attached directly to the bus.
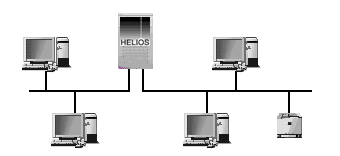
In the second example configuration, the setup is comprised of one server, but now with two NICs. The server has to link two networks, which include two clients each. Additionally, a network printer is connected to one “single” network (Fig. B.2). A set of single networks linked together by routers and forming a larger network is called an internet.
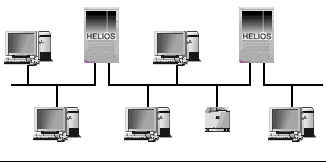
In the last example configuration (Fig. B.3) three single network segments form an internet. Two servers route the networks via four (2+2) NICs. The nodes in each segment are accessible from any other network on this particular internet.
B.3.2 Automatic network configuration
If your EtherShare host has only a single network interface, or you do not want to configure EtherShare as a “seed router” (see B.3.3 “Seed routers, non-seed routers”), EtherShare’s AppleTalk protocol stack can be configured to “interrogate” network numbers and zone information automatically each time it loads, and thus avoid the necessity of manually specifying these parameters during the EtherShare configuration. This situation is automatically detected by the “netconf” program. If automatic configuration is possible, you will get the following message when you select the network interface:
There is only one network interface detected, thus there
is no need to configure any network numbers!
If only one interface is existing, the installation program does not allow manual configuration with “netconf”.
- Note:
-
The Automatic configuration option requires other AppleTalk routers to be connected up and online during EtherShare startup. If “atalkd” does not detect any available external routers it starts in single-network mode.
For all EtherShare supported UNIX operating systems (except for Linux), the Automatic configuration option is also allowed if you have more than one network interface.
Automatic configuration is enabled by a simplified interface specification in the “Preferences” file:
[][Programs][atalkd][if]
flags=0
type=Stringlist
value=[1]
[4]eth0
[][Programs][atalkd][if]
flags=0
type=Stringlist
value=[2]
[4]eth0
[4]eth1
The entries are inserted automatically by the HELIOS Installer for all recognized hardware interfaces. To reinstate automatic configuration after you have already configured the interfaces, you can use “netconf” as described in B.3.4 “Manual network configuration”. Alternatively, you can change the “Preferences” using the “prefvalue” command (see HELIOS Base manual). The relevant preferences are described in 9.3 “AppleTalk preference keys”.
B.3.3 Seed routers, non-seed routers
If your network includes other, external routers in addition to EtherShare, or if it includes certain other types of AppleTalk entities, then it is necessary to specify network numbers and zone information for each physical segment in your network. Routers are configured in accordance with the manufacturer’s instructions. The EtherShare configuration is described below.
When you consider an example network with two standalone routers, you can either “hard-configure” both routers with identical zone information or configure one of them to “interrogate” the zone information broadcast by the other one. In the first case, both routers are so-called seed routers. In the latter case, one of the routers is a seed router, because it is responsible for broadcasting the zone information, and the other router is a passive, non-seed router.
The latter case requires less work, because you only have to hard-configure one of the routers. If you change the configuration of the seed router, the non-seed router automatically reconfigures itself after a short delay. Configuration changes become effective after a restart of the HELIOS software by use of the “stop-helios” and “start-helios” scripts (see the HELIOS Base manual).
However, the first case is technically safer because the network is left completely without zone information if the seed router fails or loses power. This can cause serious disruption of your entire network.
EtherShare can be configured as a seed router by manually configuring the network connection as described below. However, even if you have chosen to use the EtherShare Automatic configuration option instead, it is still not a true non-seed router, because it only “interrogates” network numbers and zone information of the local network segments once, when the AppleTalk module loads, and not on-the-fly like a conventional non-seed router. Of course, it always adjusts automatically to changed network numbers and zone names of remote network segments (on the far side of external routers).
You may use the HELIOS “zones” program to check your network for existing zone information. See B.8 “zones” for a more detailed description of this program.
B.3.4 Manual network configuration
Automatic configuration is described earlier in this chapter. Manual configuration is only necessary if automatic configuration is not possible or not desired.
This is done by running the “netconf” program in the “HELIOSDIR/sbin” directory. We strongly recommend that you configure your network connection in this way, and not by changing the “Preferences” file, because “netconf” checks the validity of your entries, and in particular the use of valid network numbers.
- Note:
-
If required, you may read B.3 “Configure EtherShare as AppleTalk network router” above for technical details of network configuration parameters.
-
Start “netconf” with the following UNIX command:
# cd /usr/local/helios/
# sbin/netconf
- Important:
-
Do not run “netconf” from a HELIOS Terminal connection under Mac OS 9. Stopping the HELIOS services by use of the “stop-helios” script would cut the connection to the server! Better use either the host’s console, or a terminal connection other than HELIOS Terminal.
The “netconf” startup screen shows the program’s main menu (Fig. B.4).

The following keys are available to handle the “netconf” program:
TAB key: navigate within a “netconf” dialog
“Ctrl -J”, “Ctrl -K” (or ARROW) keys: navigate within a list of items
“+” and “-” (or SPACE bar): mark/unmark items from a list
ESC key (or Ctrl-X): quit the current dialog
Further keys that are required in a specific dialog only are listed in the bottom line of the respective dialog. Alternatively, they are described in the help windows.
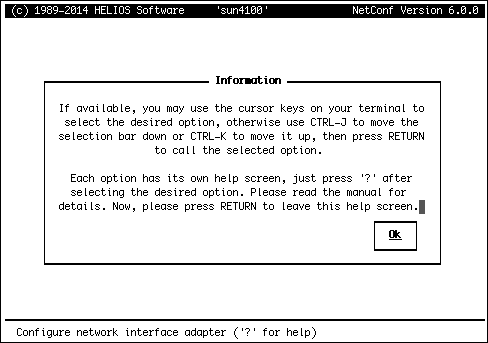
“netconf” includes a convenient online help system which can be activated by pressing “?”. An example is shown in Fig. B.5.
Please note that:
“netconf” gets its information from the “Preferences” file (see zone in 9.1 “Global preference keys”).
If you are doing an upgrade installation, the HELIOS Installer automatically preserves your previous “Preferences” file so that previously entered zone, network, and printer information, etc. do not get lost.
If you temporarily deactivate one interface, the configuration will also be saved in “Preferences”, and will be available again upon reactivating the interface.
If you have an IBM RS/6000 host, note that two logical interface names exist for each card. “et0” is used for AppleTalk (and is used by EtherShare), and “en0” is used for TCP/IP. You should see an “et0” entry in the list for the AppleTalk connection.
The Configure Adapter option in the main menu displays
a list of all available interfaces.
Fig. B.6 shows a network with one single interface only, where no configuration is necessary. If you press RETURN in order to open the configuration dialog, a corresponding message pops up.
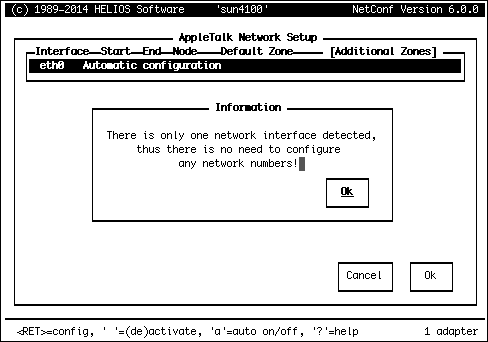
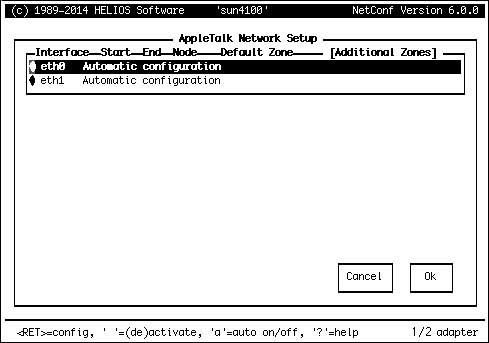
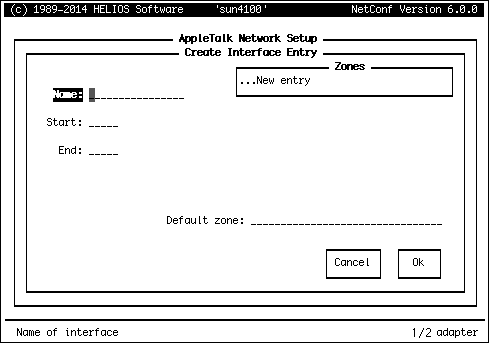
Fig. B.7 shows a network with two interfaces. As mentioned before, “netconf” automatically checks for all recognized Ethernet interfaces in your host and displays them. If an interface cannot be recognized it will be missing in the list. In that case, you can press “Ctrl-V” (on some machines it may be necessary to press “Ctrl-V” two times) to open a dialog that lets you specify and configure a new interface. This dialog is shown in Fig. B.8. For instructions on how to fill in the dialog, please read the paragraph Changing an interface entry.
Remember that for a new entry, you need to know the correct name of the interface and whether it supports AppleTalk. Incompatibilities may cause system crashes.
If you wish to change the configuration of an existing interface, you have to switch off automatic configuration by using the “a” key, and then press RETURN.
Note that you can enter a manual configuration and then toggle between active and non-active. The manual settings will be stored in the “Preferences” file when you switch automatic configuration on, and they will be available when you switch automatic configuration off again.
You may (de)activate entries in the “AppleTalk Network Setup” dialog by means of the space bar (compare bottom line info in Fig. B.7).
In the dialog shown in Fig. B.8, you must enter a network number range from Start-End, where Start can be equal to End.
If you have either an external or an internal router, a valid number for Start and End is any number between 0 and 65279. Numbers between 65280 and 65534 are only used if you do not have a router, otherwise they are reserved. Note that EtherShare provides an internal router automatically if you have more than one network connection, as in this example.
Each range, e.g. 10-10, allows approx. 250 entities (nodes).
The correct choice of the network number range is subject to the following restrictions:
If you have no router (i.e. only one internal Ethernet connection in your host and no other, external routers) do always use the
Automatic configurationoption.If you want to connect your host to an external router box on the same network segment, you must use the same network number range (Start-End) and the same zone names in the same order as the router. Please refer to the router’s manual to find out how to determine its configuration. This is often done via web-based configuration.
If an external router broadcasts information that differs from the configuration you have entered, you will receive a warning when EtherShare starts. The system will always rely on the router’s information, in that case, and will ignore your entries.
If your host has more than one network connection, as in this example, network numbers and network number ranges must be unique and must not overlap each other or those of other, external routers to which you want to establish a connection.
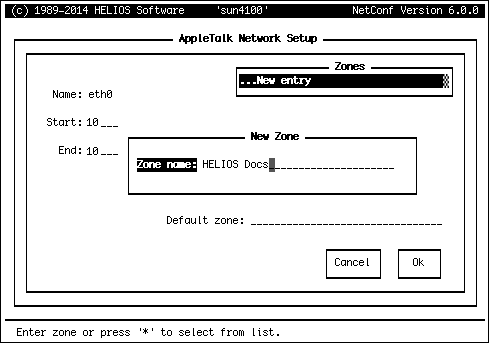
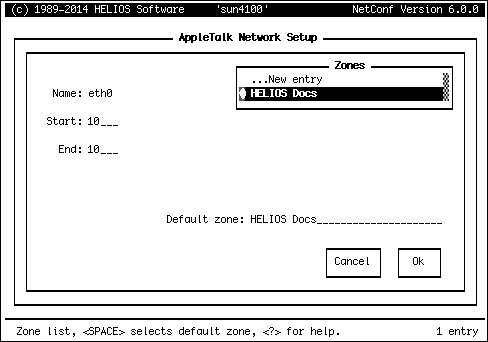
Proceed to the Zones list in the dialog and press RETURN
to open a second dialog that lets you specify the name of the
default zone for the current interface (Fig. B.9).
You may use the New Zone dialog again to define additional
zones for the interface later.
When entering names, please keep the following in mind:
Zone names must not exceed 31 characters.
After entering the default zone name, you may enter additional zone names for the same network number range.
If you wish to connect your host to an external AppleTalk router box, you must use exactly the same zone name(s) in the same order as the router. Please refer to the router’s instruction manual to find out how to determine its configuration.
If an external router provides one or more zone names for the local network segment, you must either specify all of them or none of them. In the latter case, EtherShare “interrogates” the router for the names. This is, however, less safe (see B.3.3 “Seed routers, non-seed routers” above).
If your network has more than 12 zones, they can be specified manually by editing the “Preferences” file.
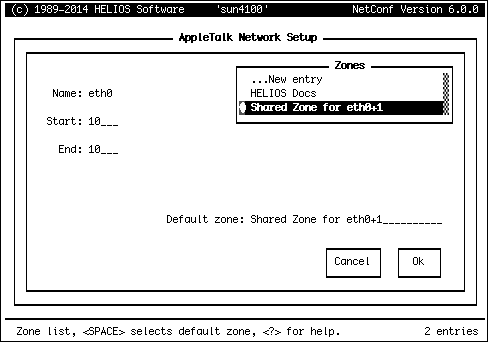
If you wish to replace an entry, use the BACKSPACE key first to delete the existing one.
In the
New Zonedialog, you can use the “*” key to open a pop-up menu that shows all recently used zone names.
Fig. B.10 shows the completed dialog.
The settings will be saved on selecting the Ok button.
They appear in the list of interfaces as illustrated
in Fig. B.11.
- Note:
-
Zones are stored as UTF-8 encoded names in the preference file. “netconf” cannot handle non-ASCII names, therefore we recommend to set zone names with special characters, e.g. Umlauts, via “prefvalue” using an UTF-8 terminal, e.g. the OS X Terminal.
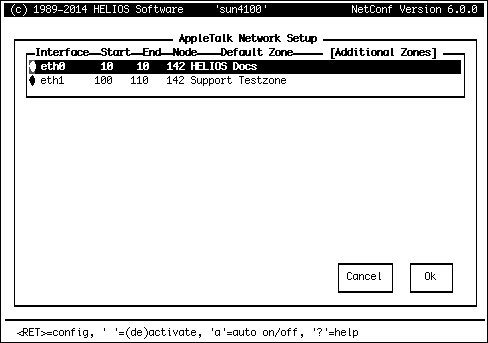
Fig. B.12 shows the dialog for the interface “eth0”. In that dialog, we have entered two zones, and have made the second one the default zone by pressing the space bar.
The final example configuration is shown in
Fig. B.13. The configuration
includes two interfaces with three zones. You can now
press the ESC key to return to the main menu and then select item
Configure Zones to register the available
zones (Fig. B.14).
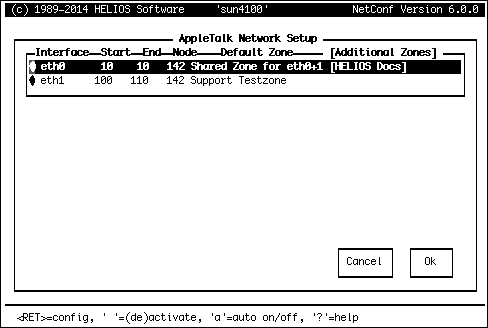
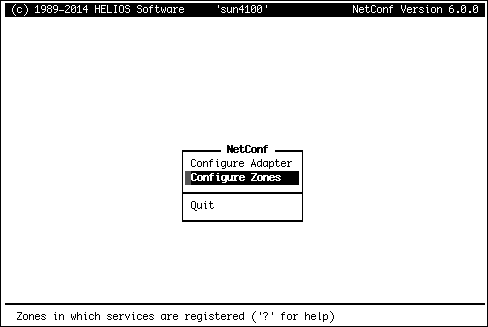
Fig. B.15 shows the dialog that lets you register zones, i.e. specify zones where EtherShare services should be listed.

You can move a zone between the left and right column of the dialog by using the “Ctrl-L” or the “Ctrl-H” key. This is illustrated in Fig. B.15 above and Fig. B.16 below.
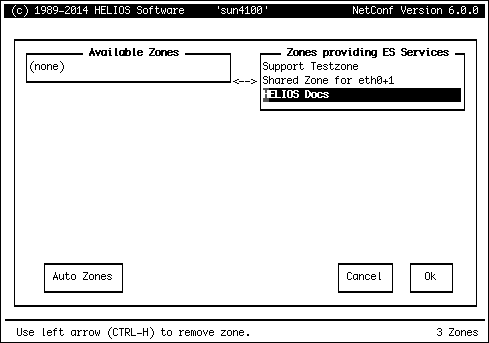
The Auto Zones button in the dialog can be
used to make sure that for each active interface at least
one of its zones is registered.
EtherShare services can only be registered in local zones, i.e. in zones that have been set up on a network segment which is directly connected to the server.
- Note:
-
The lists in the dialog (
Available ZonesandZones providing ES Services) are empty ifAutomatic configurationis active.
The default zone can be determined when using the zones -l
command (see B.8 “zones”) on a UNIX shell. In the list of
zones, the default zone is marked by an “*”.
New zones can be added with “Ctrl-V” (see List interfaces/Add interface entries entries above).
If your network changes (on segments where EtherShare is installed), for example if you have added a new router, you can use “netconf” again to reconfigure the network connection at a later date, without re-installing EtherShare. To do this, EtherShare must be stopped using the “stop-helios” command on the host’s console.
The connections will be active as soon as you restart EtherShare with “start-helios”.
If you have chosen the Automatic configuration
option rather than manual configuration with “netconf”, all you
need to do is stop EtherShare with “stop-helios” and restart
it again – EtherShare’s AppleTalk protocol stack will
“interrogate” the network numbers and zone information
again when it reloads.
B.4 AppleTalk kernel configuration
In order to be able to communicate using the AppleTalk protocols, EtherShare needs support from the operating system. Commonly, UNIX suppliers deliver the TCP/IP networking protocols together with their standard operating system release, but no AppleTalk networking protocols. EtherShare thus contains drivers that implement the AppleTalk protocol with Ethernet. On some machines, EtherShare also supports other network connections. All files that relate to the kernel side of the EtherShare system reside in the directory “HELIOSDIR/etc/kernel”. The following is a detailed description of what is changed in the operating system by the EtherShare installation. This is probably of interest to advanced UNIX users only, since the EtherShare configuration shell scripts hide most of the details necessary to get the AppleTalk drivers running.
The kernel modules come in two flavors depending on host operating system architecture. System V.4 based systems use a stream-based architecture where each AppleTalk communication endpoint is represented as a file descriptor opened through the streams multiplexor “/dev/ddp”. Berkeley-based systems use file descriptors opened through the socket mechanism.
B.4.1 Loadable drivers
Solaris and IBM RS/6000 systems support a concept of loading drivers, which can be loaded into the operating system during runtime. In such cases, it is not necessary to re-link the UNIX kernel with new modules. The “start-helios” shell script takes care of loading the driver when starting AppleTalk, if the driver is not already loaded.
EtherShare uses two kernel modules on Solaris systems, “aarp” contains the “AppleTalk Address Resolution Protocol” streams module and “ddp” the “Datagram Delivery Protocol” streams multiplexor. “aarp” is located in “/kernel/strmod” and “ddp” in “/kernel/drv”. During installation the files are copied from “HELIOSDIR/etc/kernel” to the “/kernel” directory. In addition, the installation script adds a line to the “/etc/minor_perm” and “/etc/devlink.tab” files to get the proper link from “/devices/pseudo/clone:ddp” entry to “/dev/ddp” using the proper permissions. The drivers are loaded and unloaded by Solaris automatically, no manual loading or unloading should be necessary.
A long list of all loaded modules can be produced by using the “modinfo” command. The “modunload” command can be used to unload the drivers, but only if they are unused.
On IBM RS/6000 systems, only one driver is loaded by the “start-helios” script (“HELIOSDIR/etc/kernel/atalk”). This driver is dependent upon the AIX version. The installation procedure makes a link from the corresponding and appropriate file to “/usr/lib/drivers”.
In addition, entries are added to the ODM database, to allow the loading of the driver through the “mkdev” command. The logical name for the kernel module is “atalk0”. Use the following command to load the module:
# mkdev -t atalk
The “lsdev” command can be used to see if the kernel module is loaded:
# lsdev -C -l atalk0
- Note:
-
On AIX, the unloading of network protocols is not supported.
B.5 “atalkd” error messages
“atalkd” is the first program started by EtherShare and is responsible for configuring the network interfaces. Thus, most of the error messages are concerned with network errors. All error messages are prefixed with “atalkd:”. This is left out in the following for brevity. “atalkd” can also issue any of the “license” and “generic” error messages (see HELIOS Base manual).
Some error messages depend on the class of operating system (OS). “atalkd” divides the variations in two classes: stream-based OS (e.g. Solaris) and socket-based OS (AIX …).
- /dev/ddp: %m
“atalkd” could not open the DDP streams multiplexor. This will happen if the kernel modules are not installed (stream-based OS only).
- PopenSkt %s: %s
An error occurred while opening an AppleTalk socket. The first “%s” is the socket (rtmp, nbp …) and the second “%s” is the error cause. The most likely reason is that an attempt was made to start a second “atalkd” process while one is already running.
- addif: garbled interface “%s”
“atalkd” could not understand the syntax of the
ifentry in “Preferences”. Use “netconf” (in “HELIOSDIR/sbin”) for network configurations instead.- addif %s: %m
The interface “%s” could not be opened due to “%m”. You will get this error, e.g. if you specify a non-existent interface with the
ifflag in “Preferences” (stream-based OS only).- addif DL_ATTACH_REQ %s to %d: cannot attach
With a stream-based OS, you will get this error if you specify an interface unit number which is not supported by the underlying network driver (e.g. “le2” if you have only “le0” and “le1”).
- addif DL_BIND_REQ %s: cannot bind to sap 0x%x
With a stream-based OS, this can happen if the specified service access point is already in use. For example, this could happen if you start “atalkd” twice or if you have another product installed that already uses AppleTalk.
- ignoring interface %s, no seed router found
The interface “%s” was supposed to be configured automatically, but no external seed router was found to supply network numbers and zone names. For example, more than one interface card is installed on your server and none of the network segments has an active seed router.
- network range conflict on %s:%d-%d, ignoring interface
The interface “%s” was configured with a network number range that conflicts with other network interfaces. Use the
Automatic configurationoption in “netconf” (in “HELIOSDIR/sbin”) to let “atalkd” automatically configure the interface.- conflicting seed info on %s, using %d-%d instead of %d-%d
The interface “%s” was configured manually to use a particular network range, but an external seed router did supply a different range for this cable segment. “atalkd” will use the value from the external seed router and ignore the manual configuration.
- routing conflict on %s from net %d, node %d
While the network was already up and running a new router on network interface “%s” was sending conflicting routing table information. The conflicting information will be ignored. This can happen if a router starts up later (e.g. on a dialup line) or two previously independent AppleTalk networks are merged. All routers that seed that cable segment must be checked for proper configuration.
- too many hops via %s to %d (%d)
The routing information received on interface “%s” shows that the maximum hop count of AppleTalk packets would be exceeded attempting to reach network “%d”. In parentheses appears the actual number of hops. Check your AppleTalk network topology in order to provide no network is more than 15 hops away from any other part of the network.
- autoconf: socket %m
With a socket-based OS, “atalkd” could not create an AppleTalk socket. If “%m” = “Protocol not supported”, this means that no AppleTalk kernel modules are found in the currently running UNIX. If “%m” = “Can’t assign requested address”, this means that none of the network interfaces specified in “Preferences” succeeded to configure.
- autoconf %s: SIOCGIFFLAGS %m
“atalkd” could not get the flags associated with interface “%s”. This can happen if the interface specified in the
ifflag in “Preferences” does not exist (socket-based OS only).- autoconf: SIOCSIFADDR %m
“atalkd” could not set the AppleTalk address for an interface. This happens on all interface cards that do not support AppleTalk.
- routine: DDPWrite to %d: %s
The named routine (nbp, rtmp, …) could not write a packet to network “%d”. If “%s” = “Network unreachable”, this usually means that network numbers are misconfigured.
- rtmp_kupdate: %m
A route could not be added by “atalkd” to the kernel-resident routing table. This usually means that network numbers are misconfigured.
- register_me: cannot register %s
“atalkd” could not register its serial number on the network. This can happen if you use the same end-user serial number twice on the network, e.g. you have transferred EtherShare to a new host and not deleted the old copy.
- nbp_listener: duplicate EtherShare serial
“atalkd” has detected that there is another end user copy of EtherShare on the network which is using the same serial number.
- addif: cannot autoconf more than one interface, entry “%s” ignored
With a socket-based OS, “atalkd” can only configure one network interface automatically. All following interfaces are ignored. See B.3.2 “Automatic network configuration” for more details. This “atalkd” error message can only occur with EtherShare under Linux.
B.6 atechoping (AppleTalk tool)
You may use the AppleTalk echo diagnosis program “atechoping” to test the network for services, and thus see if the EtherShare base system is communicating with other AppleTalk nodes. When you run this program on the host, you should get one response line for the host’s loopback channel and one for each Mac that is switched on and connected to the same network segment. If no Mac computers are connected you should only get a single response line for the host’s loopback channel.
- Example:
$ cd /usr/local/helios
$ bin/atechoping
got packet from 21.27, skt 4, type 4
got packet from 29.216, skt 4, type 4
got packet from 20.128, skt 4, type 4
got packet from 20.218, skt 4, type 4
got packet from 20.229, skt 4, type 4
got packet from 25.62, skt 4, type 4
got packet from 26.143, skt 4, type 4
got packet from 24.30, skt 4, type 4
got packet from 21.214, skt 4, type 4
got packet from 20.143, skt 4, type 4
got packet from 21.39, skt 4, type 4
got packet from 20.230, skt 4, type 4
got packet from 27.54, skt 4, type 4
got packet from 20.249, skt 4, type 4
got packet from 20.144, skt 4, type 4
Each line shows the net node, socket, and echo type.
You can also enter atechoping <nn>, where <nn> is the
network number, to echo test other networks. Other
EtherShare hosts also return a one-line message.
B.7 poll
The HELIOS “poll” program is a command line utility for network checks (compare B.9 “vpoll (AppleTalk tool)”). It can be executed automatically in the background, e.g. if you include the “poll” command into a batch program. “poll” returns one message line for each AppleTalk service (entity) on any network that answers within a second response time. This includes one response line for the HELIOS servers “atalkd”, “afpsrv”, “termsrv”, “timesrv”, “admsrv”, and “mailsrv” for each EtherShare host that can be found and for each registration (if the services are registered in several zones). In addition, each “papsrv” print spool will have a message line.
Each line shows the network number, node number, socket number, object name, object type and zone name.
Please note that:
“poll” can be specified with command line parameters as follows:
$ poll 'name:type@zone'
You can use “=” as a wildcard for “name”, “type”, and “zone”.
“poll” has a limited buffer – only 3 to 4 pages of information can be displayed at a time – for large networks, you may need to use wildcards to limit the range of services which are polled.
- Example:
poll "=:Laser=@*"lists all services whose type starts with “Laser”. The “*” represents “this zone”, thus the zone you are currently a member of.
“poll” may display entities multiple times – depending on the route an “echo” took; this is normal.
The following example shows the responses you may get when using the “poll” program:
$ cd /usr/local/helios
$ bin/poll
20 168   2 690c0d3e        EtherShare *
20 143 253 p610             AFPServer *
20 143 238 printpreview-SpoolerLaserWriter *
20 143 245 p610-PrintToDisk-SpoolerLaserWriter *
20 143 246 p610-lw8500-spoolerLaserWriter *
20 143 248 p610-color-spoolerLaserWriter *
20 143 243 p610             MailServer *
20 143   2 0025f98a        EtherShare *
20 128   2 DEMO_002614cb   EtherShare *
20 251   2 DEMO_00205420   EtherShare *
41 142 251 HELIOS EtherShare PublicAFPServer *
41 142 253 proxy           AdminServer *
20 143 229 p610             UNIXTerminal *
20 143 231 p610             AdminServer *
20 196   2 6906eae9        EtherShare *
20 241   2 807de1b8        EtherShare *
20 211   2 2bbf260c        EtherShare *
20 230   2 7758302e        EtherShare *
20 144   2 726041aa        EtherShare *
20 249   2 80024a74        EtherShare *
20 250   2 56010ee6        EtherShare *
20 229   2 2be5ffb7        EtherShare *
20 141   2 0c027a2f        EtherShare *
- Note:
-
“poll” outputs all names in the default AppleTalk client encoding, e.g. MacRoman. To display UTF-8 names use “uniconv” for the conversion, e.g.:
$ bin/poll | bin/uniconv MacRoman UTF8
B.8 zones
The “zones” program can be used to list the names of all zones that can be found on the network, and to quickly find out the current AppleTalk default zone.
Since the “zones” program uses the EtherShare AppleTalk protocol modules, which reference the “Preferences” file for configuration details, mistakes in this file will cause you to see less zones than those shown on the Mac clients. For example, if you get the zone name(s) wrong for a router, “zones” will not show any zones which exist on the other side of the router. Mistakes in “Preferences” will affect “vpoll”, “poll” and “atechoping”, too, for the same reason.
- Usage:
zones [-l]
B.8.1 Option
- -l
Shows only local zones.
In the following example, you see all zones and an “*” in front of the current default zone “HELIOS I”:
- Example:
$ cd /usr/local/helios
$ bin/zones
* HELIOS I
  HELIOS II
  HELIOS Support
- Note:
-
“zones” outputs all names in the default AppleTalk client encoding, e.g. MacRoman. To display UTF-8 names use “uniconv” for the conversion, e.g.:
$ bin/zones | bin/uniconv MacRoman UTF8
B.9 vpoll (AppleTalk tool)
The “vpoll” application can be used to get a more detailed view of the available AppleTalk devices on the network. It is a very sophisticated program that can be used for different purposes – not only for verifying the installation. “vpoll” is an interactive program that allows setting several parameters before starting the network check. In addition, it allows monitoring how fast the different devices in your network respond to the network check.
-
To start the program enter:
$ cd /usr/local/helios
$ bin/vpoll
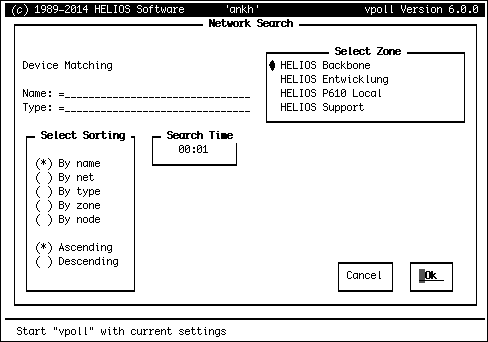
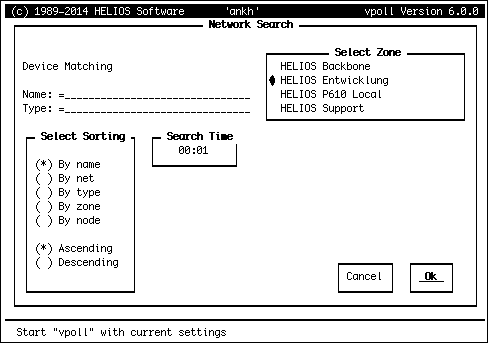
Fig. B.17 shows the startup screen of the program with the default settings.
Note that “vpoll” provides the information online but also allows saving the data in a file. Use “Ctrl-W” for that purpose. If you enter “Ctrl-W”, e.g. in the “Device List” window, you will be queried for a “Logfile Name” where current settings and lists should be saved as ASCII. Subsequent saves will be appended to the log file. After finishing and restarting “vpoll”, the first “Ctrl-W” you enter will induce the program to query for a “Logfile Name” again.
The following keys are relevant for using “vpoll”:
TAB key: navigate within a “vpoll” dialog
“+” and “-”: (un)select items from a list
ARROW keys: navigate within a list of items
ESC key: quit the current dialog
Whenever a user changes any parameters (as shown in
Fig. B.18), the new settings will be
saved for this specific user. You can use the Name
and Type lines to limit the network check to specific
devices. The “=” is used as a wildcard.
Please note that the bottom line gives short descriptions of the currently selected item (Fig. B.18).
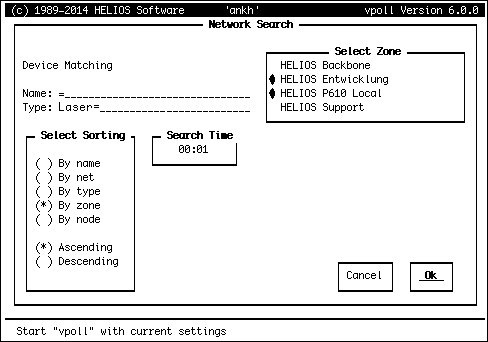
In Fig. B.19, we have set up a network check for all devices in zone “HELIOS Entwicklung”.
-
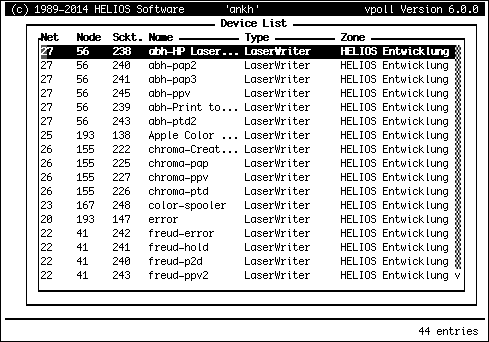
To start the network search, proceed to the
Okbutton (using the TAB key) and then press RETURN.
You will get a device list like that shown in Fig. B.20.
All devices of the zone “HELIOS Entwicklung” are listed –
they are sorted by name. The device list includes the
network number (Net), the node number
(Node), the socket number (Sckt.)
and the Name, Type, and Zone
of the respective device. Usually, any combination of
Net, Node and Sckt.
should be unique. It is possible, however, that a combination
appears several times; in that case the zones are different.
-
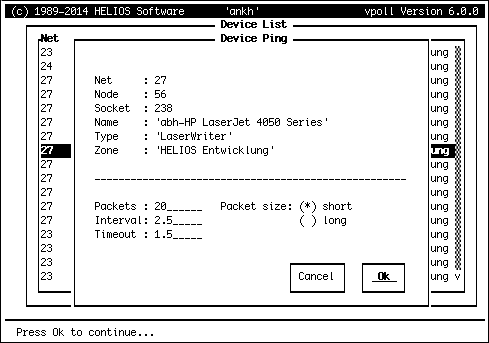
Scroll through the device list and press RETURN to open the “Device Ping” dialog for a specific device.
In the “Device Ping” dialog you can again set individual parameters for a device check, namely: the number of packets, the packet size, the poll interval, and a value for timeout.
The device check will start the moment you select the Ok
button in the “Device Ping” dialog (see Fig. B.21
and Fig. B.22).
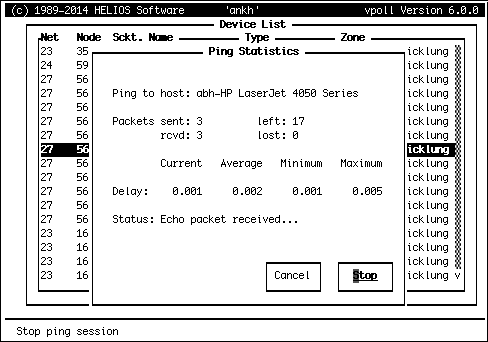
You can stop and restart the ping statistics at any time; the
behavior of the respective button (the Stop button
in Fig. B.22) will change,
depending on the status.
-
Use the
Cancelbutton (or the ESC key) to close the current dialog. TheCancelbutton in the “Network Search” dialog (see Fig. B.17) will quit the “vpoll” program.
B.10 converthome
“converthome” converts an old style EtherShare home directory to a UTF-8 based volume using the current charset of the home directory specified in the “Preferences” file as default. However, the entry in the “Preferences” file is not affected, so you have to set the volume preferences manually. The changes are recorded in the volume in “convert.log”.
You may overwrite the default charset by using the -U
option. The passed home directory must not be in use when
issuing converthome, even when calling for scan only.
- Usage:
converthome -v -s [-U charset] <path_to_homedir>
converthome -h (show help)
B.10.1 Options
- -v
Verbose for diagnostics (verbose is on if you specify
-v)- -s
Scan desktop only (scan is on if you specify
-s)
- Example:
# converthome -U SJIS /home/macuser
B.11 convertvol
Converts
a volume from
its current file name encoding as given in the “Preferences” file
to a new encoding as defined with the -C parameter. In doing so,
however, the entry in the “Preferences” file is not affected, so
you have to set the volume preferences manually. The changes are recorded in
the volume in “convert.log”.
The options are simply passed through to the “rebuild” program (see the respective chapter in the HELIOS Base manual).
- Usage:
convertvol [-p] [-s] [-v] -C [oldes|utf8] [-U charset] <path_to_volume>
B.11.1 Options
- -p
Output the converted file names
- -s
Scan desktop only (scan is on if you specify
-s)- -v
Verbose for diagnostics (verbose is on if you specify
-v)- -C
Volume encoding can be converted to another character encoding
- -U
New character encoding
- Example:
If the volume in “/support/temp” is encoded in old-style EtherShare “:Hex” syntax it can be converted as follows:
# convertvol -C MacRoman /support/temp
- Note:
-
We recommend to convert old-style “:Hex” volumes using EtherShare Admin (see EtherShare 2.6 manual). This is straightforward by switching off
Unicode/UTF8, selecting the desired character encoding from theAFP Charsetpop-up menu, and saving the volume settings anew.
B.12 The mail server
- Note:
-
See the HELIOS EtherShare 2.6 manual for details on the HELIOS Mail client application.
This chapter describes the function and configuration of the EtherShare mail server. In conjunction with the HELIOS Mail1 application, the mail server allows workstations in the AppleTalk network to send e-mail messages and files to other Mac or UNIX users on the network. Incoming mail is received in the background while you will be informed by a “Mail Notification Feature”. You also receive HELIOS server messages, such as printer messages, via email.
HELIOS Mail requires that your host’s mail program (e.g. “sendmail”) be installed and configured. If your host has an internet connection and is configured for UNIX mail (“uucp”), you can also communicate with any other internet e-mail system.
The EtherShare built-in (TCP) POP3 server allows you to use mail clients other than Mac and mail applications other than HELIOS Mail.
- Note:
-
The mail server system and the POP 3 server allow HELIOS client workstations to receive e-mail messages. Sending emails via the server depends upon the host mailserver and is independent of the HELIOS mail server system.
B.12.1 The mail server program
The mail server system consists of the program “mailsrv”. It is created automatically in the “HELIOSDIR/sbin” directory during the installation. EtherShare is configured to start “mailsrv” automatically when UNIX is booted.
“mailsrv” implements mail server functions on the host and manages the communication with HELIOS Mail and the UNIX “mail” programs on the host. It also notifies Mac OS 8/9 users of incoming mail via the “Mail Notification Feature”, which runs in the background on each workstation, provided that HELIOS Mail is installed. Each new login request from the HELIOS Mail program (or any other mail program) on a Mac workstation starts a new host process.
B.12.2 The POP3 server
EtherShare includes a POP3 server so that it is possible to use a mail client other than HELIOS Mail with the mail server on the UNIX host.
- Note:
-
Some programs call the POP3 server “E-mail account”, “POP account” or “Mail server”.
For internal communication, EtherShare uses certain TCP sockets that need to be available, otherwise certain EtherShare services will not be available and a corresponding error message will be issued.
For the EtherShare mail server, which provides POP3 and PCMAIL services, the “mailsrv” process has to be able to connect to specific sockets to allow POP clients to communicate properly. Some of the sockets used on the server are:
Service |
Socket |
pop3 |
110/tcp |
pcmail |
2001/tcp |
You may verify available/used sockets by checking
“/etc/services” and the output of netstat -a -n.
-
In order to check whether the HELIOS POP3 server is running, enter the following command under UNIX:
$ socket localhost 110
The server will issue the following response:
+OK HELIOS POP3 Mail Server <…> ready
-
Type
quit.
If you receive a response other than that shown above, this indicates that another mail server had already been running before the HELIOS mail server was started. In that case, HELIOS Mail cannot use the socket, recognizes the other mail server, and does not start.
The POP3 protocol allows both non-encrypted and encrypted passwords. If you want to use encrypted passwords, you have to make sure that your UNIX host is configured accordingly. Passwords can be set up by use of “authutil” (see HELIOS Base manual). You will get an error message from the client if the server has not been configured properly. For more information, please refer to chapter 5.3 “Users and groups”.
B.13 The EtherShare administration server
- Note:
-
Full details on EtherShare Admin can be found in the EtherShare 2.6 manual.
EtherShare Admin is used to configure HELIOS servers from Mac OS 8/9 clients. However, we recommend to switch to the modern, cross-platform HELIOS Admin (see HELIOS Base manual).
The EtherShare administration server system consists of the program “admsrv”. It is created automatically in the “HELIOSDIR/sbin” directory during the installation. EtherShare is configured to start “admsrv” automatically when the host is booted.
Preferences for the configuration of the EtherShare Administration server are listed in 9.8 “EtherShare administration server preference keys”.
B.14 The Terminal server
- Note:
-
Full details on the Terminal server program can be found in the EtherShare 2.6 manual.
This chapter describes the function of the Terminal server. In conjunction with the HELIOS Terminal application, the Terminal server allows workstations on the AppleTalk network to make simultaneous terminal connections to one or more UNIX hosts (multiple sessions capability).
The Terminal server2 system consists of the program “termsrv”. It is created automatically in the “HELIOSDIR/sbin” directory during the installation. EtherShare is configured to start “termsrv” automatically when UNIX is booted.
“termsrv” implements terminal server functions on the host and manages the communication with HELIOS Terminal. Each new login request from a Mac workstation starts a new host login process. “termsrv” then re-directs the host’s input and output to the workstation via the network.
B.15 The Time server
- Note:
-
Full details on the Time server program can be found in the EtherShare 2.6 manual.
You can add the “Time Server”3
functionality to the Chooser as shown in Fig. B.23. This allows you
to select a specific server by pressing the Set Time button in the
Chooser dialog and thus making sure that the time on your Mac client is always
in sync with the time on the server you have chosen. If the
time of your Mac goes wrong by one hour, you have to open
the Date & Time control panel and check whether Daylight
Savings Time is set up correctly.
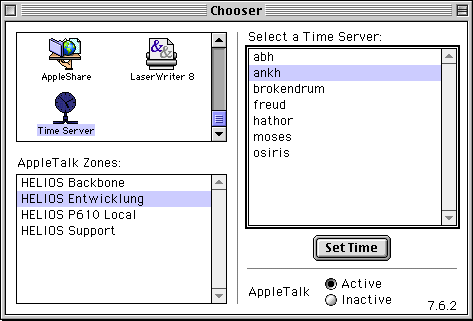
After the Time server has been selected, the local Mac time will be set according to the server time whenever you boot your Mac.
- 1 The HELIOS Mail client application is not available for OS X. Use up to Mac OS 9.x.
- 2 The HELIOS Terminal client is not available for OS X. Use up to Mac OS 9.x.
- 3 The HELIOS Time Server client
Chooserextension is not available for OS X. Use up to Mac OS 9.x.