3 HELIOS Admin
This cross-platform based administration service is comprised of two components, the HELIOS Admin server and the HELIOS Admin client.
The HELIOS Admin client is a convenient tool that allows configuring users, groups, volumes, printer queues, etc., and which is supported for various client platforms due to its Java heritage. For details see the chapter “HELIOS Admin” in the HELIOS Base manual.
In this manual we focus on the EtherShare related usage of HELIOS Admin, such as configuring AFP volume settings or PAP printer settings.
- Note:
-
EtherShare administration server and EtherShare Admin are being phased out by HELIOS, so it is recommended to use the cross-platform HELIOS Admin instead. For details on EtherShare Admin, refer to the EtherShare 2.6 manual on the HELIOS product CD or in the “HELIOS Applications” volume.
3.1 General remarks
This chapter describes the use of the application HELIOS Admin to perform EtherShare related configuration from any workstation in a convenient and secure way.
In order to use HELIOS Admin, the HELIOS Admin server must already be running on the host you want to configure. The HELIOS Service Controller is configured to start this service automatically when the system is booted.
Other chapters in this manual describe how administrative work, which is required to configure and maintain the EtherShare system, can be done directly on the host, e.g. by using “prefvalue” (see “HELIOS utility programs” in the HELIOS Base manual). However, most of these tasks can be carried out much easier using HELIOS Admin from one of the workstations.
HELIOS Admin offers a high degree of convenience to the system administrator. The application allows the host configuration to be represented graphically with lists and windows. Using HELIOS Admin from any workstation, server users, groups, volumes, and printers can be installed, configured and deleted. You can also interrogate each PostScript printer for available resident fonts and install downloadable fonts to the print server.
HELIOS Admin accesses and modifies the “Preferences” configuration file. HELIOS Admin and the HELIOS Admin server have built-in safety checks to avoid conflicting or invalid configuration settings.
HELIOS Admin has the additional advantage that almost all changes are immediately effective, without having to restart the affected service.
Benefits:
Any new suffix mappings or changes to existing ones will be available immediately.
Any new HELIOS volume or printer will be available immediately.
Any changes to HELIOS volumes, e.g. setting groups membership, will be available immediately.
Potential drawbacks:
Any changes to HELIOS volumes, e.g. removing or changing mount points, switching characteristics to read-only or changes in groups membership may result in side effects for EtherShare clients, in case the volume is still mounted. This may range from write errors to volumes getting dismounted(!).
Especially important – Removing access rights to volumes for clients that still have documents open on that volume might cause damaged or only partially saved documents.
Make it a habit to check the Active Users list
prior to making any changes that might affect connected users.
In this list you can check which users have certain volumes in access.
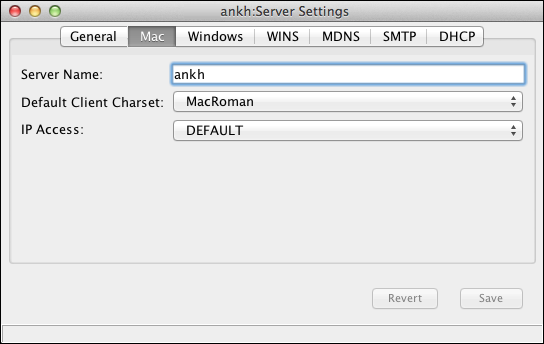
3.2 Server settings
In the Settings > Server Settings window (Fig. 3.1), in
the Mac tab, you can specify the Server Name
(if no server name is specified here, the system uses the host name)
and select the Default Client Charset.
From the IP Access pop-up menu choose the desired IP access
list for the server. The chapter “HELIOS Admin” in the HELIOS Base manual
describes in detail how to edit the default IP access list according to your needs.
- Note:
-
If you wish to share HELIOS server volumes on a OS X server platform running native AFP file sharing, the HELIOS server should be assigned a Mac server name (
Server Namein Fig. 3.1) that is different from the OS X server name.
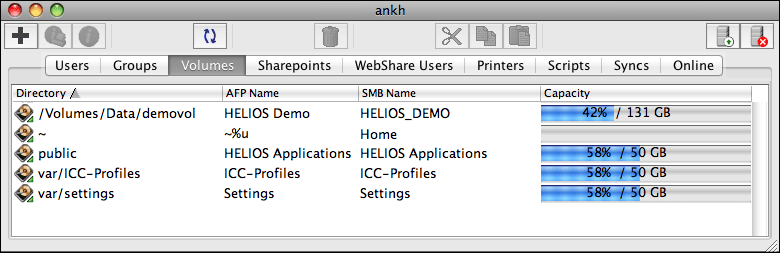
3.3 Volume AFP settings
This chapter refers to AFP related volume settings only. For general information on volume settings and instructions on how to change them see “Volume settings” in the “HELIOS Admin” chapter of the HELIOS Base manual.
The Volumes list shows
all HELIOS volumes on the host (Fig. 3.2).
The HELIOS Admin server automatically creates
this list by inspecting volume-related entries in the “Preferences”
file (see “Volume preference keys” in the HELIOS Base manual).

-
Choose the
Volumestab. If it is not available, activate it in theListsmenu.
Before changing AFP volume data, make sure that the volume is not in use. All users should unmount the volume, because changes take effect immediately and this could lead to strange effects.
-
Select the volume name, and choose
Openfrom theFilemenu (or double-click the volume name).
The Mac tab displays the AFP information about the
selected volume (Fig. 3.3).
The Mac Visible checkbox determines whether the volume
is visible at all in the Mac Connect To Server... dialog.
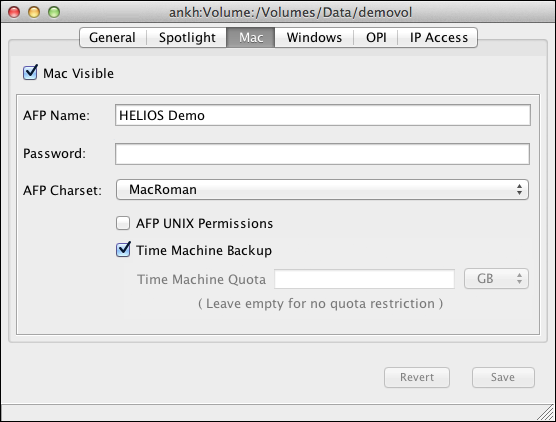
The AFP Name field allows specifying the name by which the volume
is published in an AFP environment, and which is visible in the
“AFP Name” column (Fig. 3.2). The AFP volume name
can have up to 255 characters.
The Password field allows specifying a volume specific password,
which Mac clients must enter prior to mounting the volume.
- Important:
-
The
Passwordoption is only valid for AFP users. In case the volume is also published via PCShare for Windows this option remains without effect for these users!As of OS X 10.11 the AFP volume specific password feature is no longer supported. If there are clients in the network running OS X 10.11 or newer this feature should not be used anymore.
From the AFP Charset pop-up menu you can choose the AFP
character encoding which is used by older clients without Unicode support:
EUC-KRMacArabicMacCentralEurRomanMacCyrillicMacGreekMacIcelandicMacRomanMacRomanianMacTurkishSJIS
If AFP UNIX Permissions is NOT active (default),
a folder inherits the permissions of the parent folder when
used with OS X clients.
- Note:
-
This option is not available if EtherShare is installed on a Windows platform. However, this option can be activated using the
useunixpermpreference (see “Preferences” in the HELIOS Base manual).
The Time Machine Backup checkbox (see Server setup
in 5.7 “Time Machine”) must be activated to enable Time Machine backups for the
volume.
3.4 Printer spooler settings
This chapter refers to Mac related printer settings. For general information on printer settings, e.g. how to create and delete printers, see “HELIOS Admin” in the HELIOS Base manual.
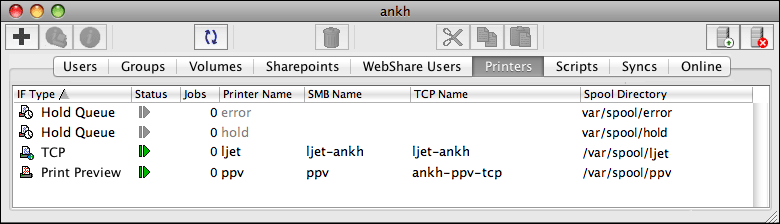
The Printers list shows
all HELIOS printer queues on the host (Fig. 3.4).
The HELIOS Admin server automatically creates this list by inspecting
printer-related entries in the “Preferences” file (see “Printer preference
keys” in the HELIOS Base manual).
-
Choose the
Printerstab. If it is not available, activate it in theListsmenu.
Before changing printer data, make sure that the printer is currently not in use.
-
Select the printer, and choose
Settingsfrom thePrintermenu (or double-click the printer name while holding down the key).
key).
The Mac tab displays information about the selected
printer (Fig. 3.5).
For basic printing without any queue setup and without PPD synchronization,
the LPR Bonjour Registration can be enabled. Then the printers
will appear automatically in the OS X printer configuration. No additional
client setup is required. 6.3.2 “Create a new printer” describes the
configuration of a new printer.
The TCP Name
field in the TCP Printer
section specifies the name by which the TCP printer
is registered by HELIOS mDNS (“Bonjour”), and by which this
printer can be reached via the master TCP port. The TCP name of the
printer only becomes visible in the network if the
TCP Printer checkbox is active.
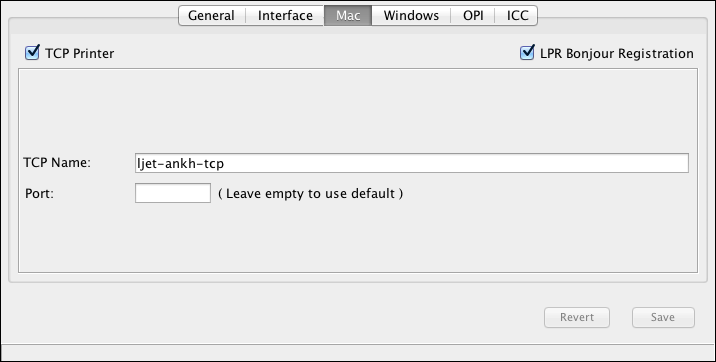
For instructions on how to create and configure a HELIOS TCP Printer see 6.3.1 “Client configuration”.
Optionally, a dedicated TCP/IP port can be set:
-
Specify a port number for the TCP printer in the
Portfield.
Defining a port may be helpful to share a TCP/IP queue over the internet. By default all EtherShare printer queues are handled on port 2007.