7 Setting up PDF Handshake with the EtherShare Admin
PDF Handshake can easily be set up from any of your Macintosh clients - just like the EtherShare base product and EtherShare OPI.
What you do with the Admin now, is setting up high-quality color matching for the PDF files you want to print - and specifying parameters for layout generation (if you are using EtherShare OPI 2.1 as well).
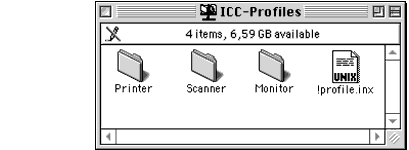
Before opening the Admin program you should mount the "ICC-Profiles" volume. This volume has been created automatically during installation and contains a large number of profiles you can use now. If you have your own profiles and store them in another location, you should move them to the "ICC-Profiles" volume. Inside the top-level folders "Printer", "Scanner", and "Monitor" you can create subdirectories at any time (compare Fig.
12).
Fig. 12: Mounting and using the "ICC-Profiles" volume
|
|
Open the EtherShare Admin. The program is located on your "EtherShare Applications" volume; see option
1 in Fig.
13. Alternatively, it can be started from the Apple menu - provided that you installed it by means of the "EtherShare Client Installer"; see option
2 in Fig.
13. (The "EtherShare Client Installer" is described in your EtherShare 2.6 "Release notes".)
Note that for setting up PDF Handshake you should use the current Admin version which will be copied to your "EtherShare Applications" volume automatically during installation from the current CD-ROM (see page 0-6). In case you installed the EtherShare base product from a previous CD and created local copies of the Admin program then, these copies may be outdated now. Replace them by the correct version from the "EtherShare Applications" volume.
Fig. 13: Starting the EtherShare Admin program
|
|
7.2 Options for EtherShare users
7.2.1 Server-wide settings for PDF
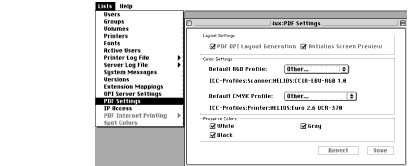
First, open the
Lists menu and select
PDF Settings to open the dialog for the PDF Handshake server settings (see Fig.
14). Note that the grayish items in the dialog are neither required nor accessible if you are not using EtherShare OPI.
Fig. 14: Opening the "PDF Settings" dialog
|
|
Default RGB Profile
Default CMYK Profile
The pop-up menus let you select an RGB and a CMYK default image profile for your PDF documents. These profiles will be used as input profiles for color data transformations in case the PDF files you want to print have not yet been tagged with specific profiles.
The default profiles shown in Fig.
14 are set automatically after product installation. They are both available on the "ICC-Profiles" volume on your server. You can define your own server defaults by choosing
Other from the pop-up menus. American customers should e.g. switch to a SWOP CMYK profile.
7.2.2 Printer queue settings for PDF
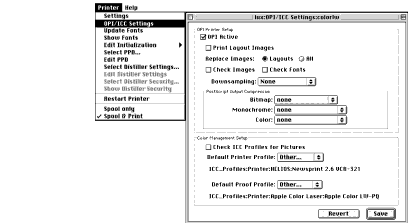
To set up printer queue specific parameters, highlight the desired printer from the
Printers list as shown in Fig.
15 and then select
Printer > OPI/ICC Settings from the Admin menu to open the dialog shown in Fig.
16.
Fig. 15: Selecting a printer queue
|
|
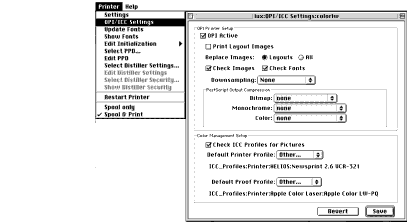
Fig. 16: Defining OPI/ICC Settings for a specific printer queue
|
|
Again, the grayish items in the dialog are meant for EtherShare OPI users only.
Check
ICC Profiles
for Pictures
This option is also meant for OPI only. You may check or uncheck it - this does not make any difference as long as EtherShare OPI is not installed on your server.
The
Default Printer Profile item lets you choose the correct profile for your output device and, at the same time, serves to switch on color matching for this printer queue. The pop-up menu contains four different options.
- None
switches off explicit color matching on the queue. This does not mean that there are no color transformations at all. In case you print separations and your PDF files contain e.g. RGB or Lab objects, these objects will be transformed into CMYK "behind the scenes". For these transformations, the server uses a default CMYK standard which is Euroscale. If you do not want to work on that Euroscale basis you have to specify a printer profile using the Other option from the pop-up menu.
- Other
opens a dialog that lets you select a specific profile. The "ICC-Profiles" volume on your server already contains printer profiles for many popular devices and for different CMYK standards (Euroscale, SWOP).
- EBU RGB
may be selected if you want to "print" to an RGB device as e.g. an imagesetter.
- Lab D65
is best-suited if you want to select a device independent output color space and leave the separation to the final PostScript RIP. In that case, you have to have a Level 2 (or 3) output device. The Rip will then be initialized with a specific color rendering dictionary (CRD) and, using this dictionary, will perform the separation into CMYK. This workflow may be sensible if you are sending your documents (e.g. a magazine) to different production sites. Your print job is not yet separated for a given output device and the Lab D65 color space is device independent. The different RIPs then transform the color data into the gamut of the respective printer/or press and the output results should all be identical.
Here, you can select the correct profile for your proof printer. This item will only be available if you have selected a default printer profile other than
EBU RGB or
Lab D65.
Note: You may read the paragraph Profile information in chapter 5 "Before getting started" for more details about the color matching of PDF files during printing.
For background information about color matching and proofs, please refer to appendix A 2: "Colors, color matching, proof printing - basic concepts".
7.3 More options for EtherShare OPI users
7.3.1 Server-wide settings for PDF
With EtherShare OPI 2.1 installed on your server, you have four options in the
PDF Settings dialog. Open the dialog as shown in Fig.
17.
Fig. 17: Setting up PDF on a server running EtherShare OPI
|
|
PDF OPI
Layout
Generation
PDF OPI Layout Generation activates PDF services on the OPI Server, meaning that it activates the generation of EPSF layouts for PDF high-resolution files. Please note that
Create Layouts in the Volume dialog has to be checked as well if you want to enable the generation of layouts (compare chapter 6.4 "Volume settings" in the EtherShare OPI 2.1 manual). If
Create Layouts is checked and
PDF OPI Layout Generation unchecked, this would mean that the OPI Server will automatically generate layouts on this volume - but not for PDF files.
Antialiasing is a method of smoothing contours. The option is only meant for screen previews of EPSF files the OPI Server has generated from PDF originals. Even though antialiasing is applied to all elements within the document, the effect is most evident for text elements. An example for antialiasing is shown in Fig.
18. The first EPSF file has been created with antialiasing, the second one without it. The readability of the first file is much better on a monitor.
Antialias Screen Preview is checked by default.
Fig. 18: Example of an antialias screen preview
|
|
Note: See chapter 7.2.1 above for details about the default profiles.
7.3.2 Printer queue settings for PDF
Printer queues can be set up for EtherShare and PDF Handshake only (as described in chapter
7.2.2 above), and for EtherShare OPI and PDF Handshake. In the latter case, there are more options available.
Highlight a printer in the "Printers" list and then open the
OPI/ICC Settings dialog as shown in Fig.
19. You will find that the dialog did not change compared to the one you may already know from setting up your EtherShare OPI queues. All options in the dialog are now available for PDF files as well.
Fig. 19: Setting up a queue on a server running EtherShare OPI
|
|
Please see chapter 6.5 in your EtherShare OPI 2.1 manual for detailed information on the above dialog.
Check ICC Profiles for Pictures
Note that the functionality of the
Check ICC Profiles for Pictures option has been expanded. Other than described in your EtherShare OPI 2.1 manual, the option will let the OPI server check for every image file or PDF document...
- whether all image profiles that have been tagged to any of the image files are available, and
- whether the images and files in the print job are tagged at all.
The server will automatically stop the print job if a single profile is missing or if a file is not yet tagged.
7.4 The spot color editor
The EtherShare Admin features a spot color editor which enables the user to define a preview color for a given spot color name. This allows Print Preview and EtherShare OPI to include spot color objects in the composite preview.
7.4.1 Setting up the spot color editor
Defining spot color names
A list of spot colors can be created as follows:
In the EtherShare Admin open
Spot Colors from the
Lists menu.
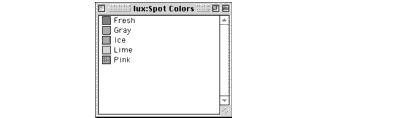
Fig. 20: The Spot Colors window
|
|
The
Spot Colors window (see Fig.
20), that may already contain the names of some previously defined spot colors, opens. For the definition of a new spot color in the spot color editor, CMYK or LabD50 values are accepted.
Select
File > New from the menu bar of the EtherShare Admin.
The
Spot Colors definition window opens:
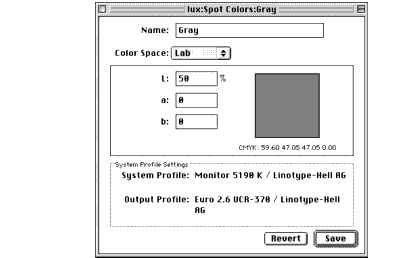
Fig. 21: The Spot Colors definition window
|
|
Select the appropriate color space in which you want to enter the CMYK or LabD50 values of your spot color from the
Color Space pop-up menu. After entering the values in the corresponding fields specify a name for the defined spot color and confirm the settings by clicking on the
Save button (see Fig.
21).
The
Revert button sets all entries back to default or, if you have only modified an entry, back to the last saved version. After closing the window the new spot color appears in the list of the
Spot Colors window (compare Fig.
20).
7.4.2 Accurate spot colors using ColorSync/ICC
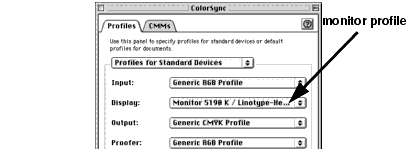
The following figures show the ColorSync profile settings for an RGB monitor (Fig.
22) and a CMYK (Fig.
23) printer which are used to represent accurate preview in the
Spot Colors definition window.
Fig. 22: ColorSync profile for RGB
|
|
Fig. 23: ColorSync profile for CMYK
|
|
Suitable profiles can be chosen in the
ColorSync dialog:
Open
Control Panels> ColorSync from the Apple menu and assign appropriate profiles from the pop-up menu to the output devices that you want to use.
These chosen profiles are displayed in the
System Profile Settings section of the
Spot Colors definition window. Figure
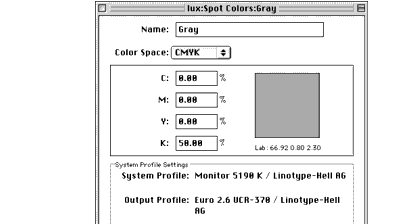
24 shows an example where the spot color "Gray" has been defined in the LabD50 color space. The color patch displays the accurate color according to the monitor profile. The CMYK values displayed below the color patch indicate how the LabD50 color is converted for printing.
Important: Make sure to use the appropriate monitor and printer profiles, which can be created with ICC profiling tools. Wrong or bad profiles (e.g. Apple's default profiles coming with Mac OS 9) will lead to inaccurate results!
Figure
25 shows an example where the spot color "Gray" has been defined in the CMYK color space, according to the selected printer profile. The color patch displays the accurate color according to the printer and monitor profiles. The LabD50 values displayed below the color patch represent the CMYK color in the LabD50 color space.
Since colors are best and most reliable represented in the LabD50 color space it is reasonable to enter the color in Lab values which have been determined by a spectrophotometer, e.g. by "GretagMacbeth".
Note: To make profile changes in the ColorSync dialog valid, the ColorSync dialog and the Spot Colors definition window must be closed. The new ColorSync profiles will be used at reopening the Spot Colors definition window.