Fig. 1: Defining a project automatically
Creating a project in WebShare Manager »
Customizing the WebShare Manager project list view »
Managing projects and the project file list »
Download files and folders from a sharepoint using WebShare Manager »
Uploading local files to the WebShare server »
Remote backups using WebShare Manager »
WebShare Manager adds web-based “Drag & Drop” workflow support and file synchronization to HELIOS WebShare, the web-based file access and management solution. Using any web browser, remote users can view server content in HELIOS WebShare, and drag and drop images, text, etc., straight from WebShare into an Adobe InDesign or QuarkXPress document, or into a project folder, with automatic two-way synchronization of changes.
Remote workflows – with remote drag and drop of files, remote workflows are much easier because users can work in their preferred manner even when working remotely. In a typical network environment, users can drag and drop files from network volumes onto their local workstation hard disk. WebShare Manager adds this same capability to WebShare web-based file access.
Remote project collaboration – is greatly facilitated because of the two-way file synchronization. For example, while one user is designing a document, another could be retouching the images at an entirely different site. When a file on the server gets updated (e.g. by another user) your local copy automatically gets updated as well. Or, when you make changes to your local copy, the server version can get automatically updated. Automatic synchronization of the content ensures that all parties are working with the same versions.
Remote backups – another significant benefit of WebShare Manager file synchronization is that it can automatically backup files from a workstation to a remote WebShare server. With WebShare Manager, files in a project can be automatically backed up to the WebShare server, allowing remote offices and laptops to be integrated into your corporate backup system.Note: Drag & drop files from WebShare into InDesign and QuarkXPress documents requires plug-ins which are not available in the present beta version of WebShare Manager.
Windows
Start WebShare Manager from a Windows workstation on the network by opening the network volume “HELIOS_APPS > Windows > WebShare Tools” via PCShare. Then double-click the “HELIOS WebShare Manager.exe” icon. Alternatively, you can copy the application to your local hard disk.
Mac OS X
Start WebShare Manager from a Mac OS X workstation on the network by mounting the network volume “HELIOS Applications > MacOS > WebShare Tools” via EtherShare. Then double-click the “HELIOS WebShare Manager” icon. Alternatively, you can copy the application to your local hard disk.
Note: For installations on Mac OS X, HELIOS WebShare Manager can be accessed directly on the server via > and then “/usr/local/helios/public/MacOS/WebShare Tools”.
UNIX/Linux:
Copy “/usr/local/helios/public/Java/HELIOS\ WebShare\ Manager.jar” to a UNIX/Linux workstation and enter the command:
# java -jar <path>/HELIOS\ WebShare\ Manager.jar
If the WebShare Manager application is available on one of your WebShare sharepoints, download the version for your platform, and launch as described above. Otherwise, contact your WebShare administrator to request WebShare Manager.
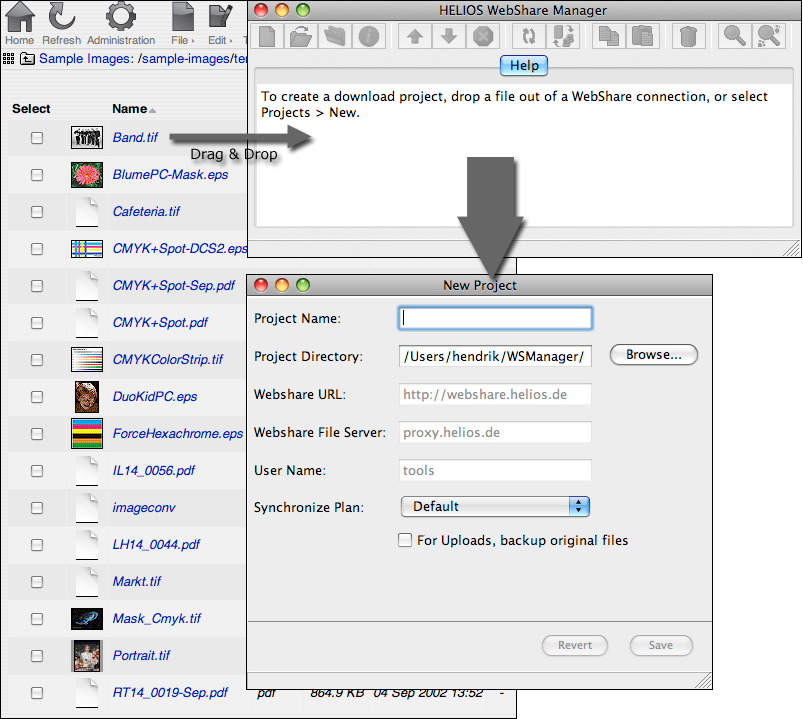
Before WebShare Manager can manage project files, with the related downloads, uploads, and synchronization, it is necessary to create a project. You may define a project either manually or automatically.
A WebShare Manager project is simply a list of files on a WebShare server, conveniently viewed in a single WebShare Manager project window. It is in effect a “virtual directory”, that can list files residing in any sharepoint or directory on a WebShare server. This makes it easy to work with a group of files related to a project, even though the files might be scattered in many directories on the WebShare server. For example, a project to create a financial report might require spreadsheets, artwork, financial analyses, document templates, etc. These would typically be saved to many different directories on the server, but can conveniently be collected in a single project list.
Each project consists of a list of files. Each “file” in the list is similar in some respects to a Windows file shortcut, or a Mac file Alias. But, there is a significant difference, in that each file name in a project list actually references two files: the version on the server, and the local copy.
Files from a WebShare server are added to a project by means of drag and drop, or via the WebShare Manager file chooser. These files are automatically downloaded to the project directory (specified when creating the project) on your local workstation. At the same time, the file names are added to the file list in the WebShare Manager project window.The project file list shows the file name, and both the “Server Path” and “Local File” path.
Local files can also be added to a project, via drag and drop. Since the file already exists on the local workstation, it is not copied into the local project directory. This can be verified in the “Local File” path list in the project window. Also, the local files added to a project are immediately uploaded to the WebShare server.
So once a project is created, and files added, there is always a copy on the WebShare server, and a copy on the local workstation. The project Synchronize Plan can be configured so that when the file on the WebShare server gets updated (e.g. by other users), the local file gets updated as well. Or, the synchronization can work the other way, so that changes you make to the local file get updated to the copy on the WebShare server. Two-way synchronization can be enabled as well.
If you drag and drop a file from the desired WebShare sharepoint into the WebShare Manager main window, a dialog window opens, with most fields already filled-in (Fig. 1).
Fig. 1: Defining a project automatically
In the example (Fig. 2), we use the previously created Synchronize Plan “MyPlan” (see Synchronization below). The project directory is the location to which all downloaded files will be saved. Files will be created with the same directory tree as in the WebShare sharepoint.
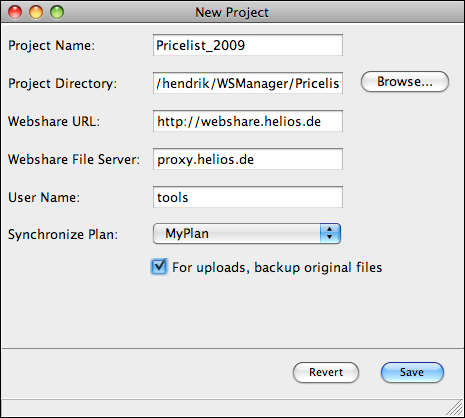
Fig. 2: Defining a project manually
If the option is checked, files that are uploaded from the local project folder to the WebShare server do not overwrite existing older files with the same name but receive the suffix “.sav”, “.sav1”, “.sav2” and so on.
After clicking , the project (in our example above “Pricelist_2009”) has been created and can be utilized.
The WebShare Manager toolbar contains the following items:
The WebShare Manager project list view can be customized according to your needs (Fig. 3):
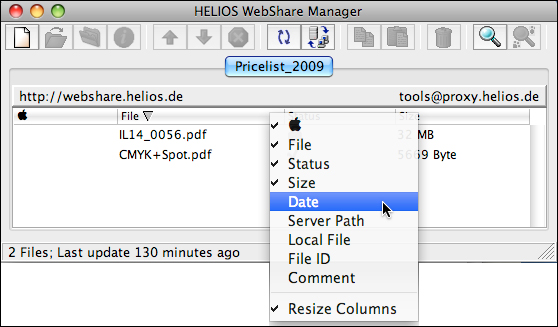
Fig. 3: Customizing the project list view
| Color label (used by Mac, WebShare, and “HELIOS Meta” PCShare plug-in) | |
| File name | |
| File status – Get more information from the tooltip | |
| File size | |
| File modification date | |
| Path to the file on the WebShare server | |
| Path to the local file | |
| Internal ID of the file | |
| File comment | |
| Allow resizing columns |
| Show/hide columns | Right-click (Mac: CTRL-click) on the column title. Check the columns to show. |
| Rearrange column headings | Click on a column title and drag to new position. |
| Adjust column width | Click and drag the vertical divider between column headings. |
| Sort column | Click on a column title to sort by that column, or to reverse the sort. |
Management of files in the project file list is performed by selecting one or more files. A right-click (Mac: CTRL-click) then opens the contextual menu, which allows selecting items from the toolbar, and offers in addition the possibility to lock and unlock respectively a file (Fig. 4). By setting the status of a file to “locked” (click on the ![]() icon), you can exclude it from being synchronized.
icon), you can exclude it from being synchronized.
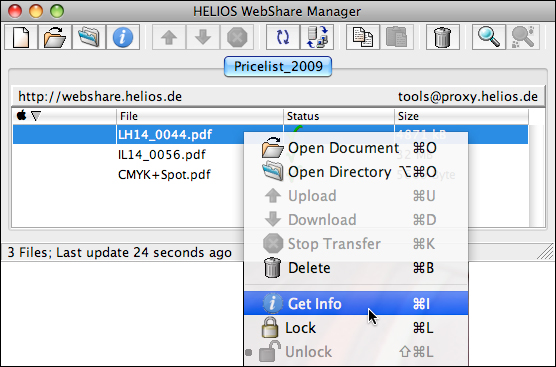
Fig. 4: Opening the contextual menu
Selecting opens a window (Fig. 5) containing information about the file creation and modification date, and allows changing color labels and comments.
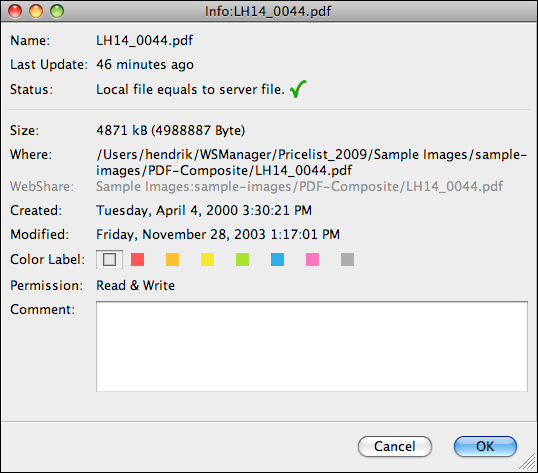
Fig. 5: File information window
Note: Comments and color labels changed via the WebShare Manager window get displayed in the WebShare project file list upon the next synchronization.
When a project is detached, the project is no longer shown in WebShare Manager, and the project files are no longer synchronized with the corresponding files on the WebShare server. However, the local project files are not deleted, they remain in the local project directory.
You can download files from a WebShare sharepoint, or the whole sharepoint, to a WebShare Manager project:
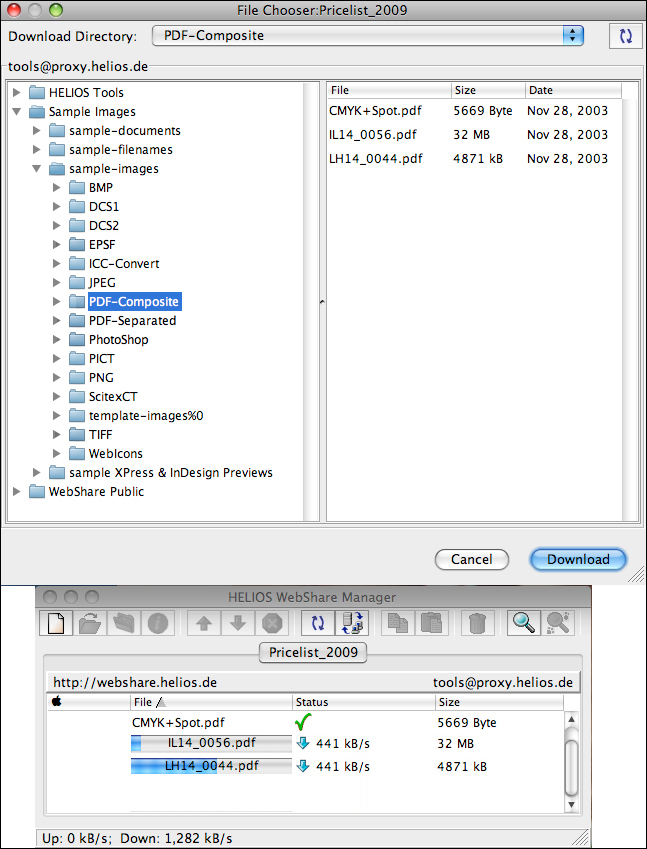
Fig. 6: Downloading “PDF-Composite” folder to WebShare Manager project
Management of files in the project file list is performed by selecting one or more files. A right-click then opens the contextual menu, which allows selecting items from the toolbar, and offers in addition the possibility to lock and unlock respectively a file (Fig. 4). Selecting opens a window (Fig. 5) containing information about the file creation and modification date, and allows changing color labels and comments.
Drag and drop uploads – WebShare Manager adds “drag and drop” upload support to WebShare. Select the local files and/or folders that you wish to upload, and drag and drop them into a project window. There are three options for selecting the upload destination directory on the WebShare server:
As soon as local files are added to a project, they are immediately uploaded to the WebShare server. The Synchronize Plan for that project will then determine how file changes get synchronized.
WebShare Manager makes it easy to use a WebShare server as a remote backup repository. Local files and folders can easily be backed up to the WebShare File Server by adding them to a project (as described above). It makes sense to configure a project or projects specifically for backup purposes, so that the project settings and Synchronize Plan can be set accordingly. For example, to provide a “versioning” control, the option could be checked. The Synchronize Plan should be defined to sync only uploads. Note that only files specifically added to the project will be uploaded to the WebShare server, and subsequently synchronized. So if you add a folder to a project, all the existing files in that folder will be added to the project file list. However, any new files files that are subsequently added to that folder will not be added to the list. To make such additional files available in the project list, the folder must be dragged anew to the project window. The new files will then be detected.
Once the local files have been uploaded to the WebShare server, you can then access them from any computer with Internet access. This ensures that critical files are preserved and available even in the case of loss or failure of the original system or files.
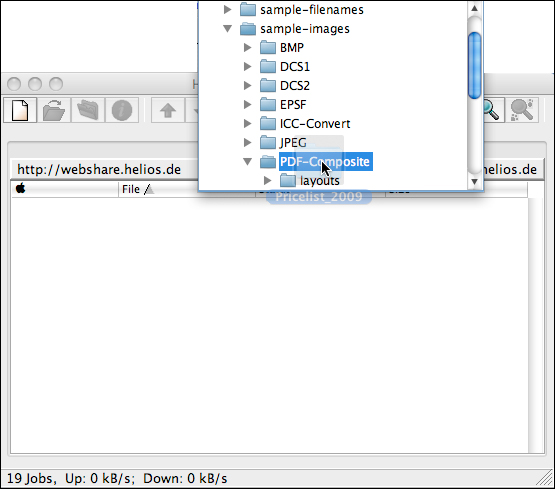
Fig. 7: Dragging the folder “Pricelist_2009” to the WebShare sharepoint “PDF-Composite”
Each WebShare Manager project has a Synchronize Plan, which specifies whether and how to synchronize changes between project files on the WebShare server, and the corresponding local copies.
Various synchronization plans can be created or changed via the > menu. Each Synchronize Plan allows you to define the time interval, days, and direction in which the content of the WebShare sharepoint, and of the WebShare Manager project, is synchronized (see Fig. 8). Each project can have its own Synchronize Plan, as selected when creating a project, or via the > menu.
Note: By setting the status of a file to “locked” (click on the ![]() icon), you can exclude it from being synchronized.
icon), you can exclude it from being synchronized.
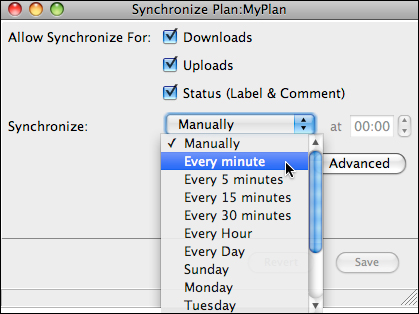
Fig. 8: Synchronize Plan
The options specify in which direction file changes get synchronized. Note that only the files listed in the project file list get synchronized.
Downloads
The option is used to ensure that when a project file gets changed on the WebShare server, the corresponding local copy (on your workstation) is updated as well. That way when content on the WebShare server has been updated by other users, the synchronize plan can update your local project content as well.
With the option checked for a Synchronize Plan, files on the WebShare server that have been modified will be downloaded to the local project directory during the next file synchronization process, replacing the prior version in the local project directory.
Files removed from the WebShare server will not affect the corresponding files in the local project directory. If the project Synchronize Plan enables uploads ( option), then the local file will be uploaded to the WebShare server during the next file synchronization process, to replace the missing file, and keep them in sync.
Note: Files added to the WebShare server (e.g. by other users) are not downloaded to the local project directory by the file synchronization process, because only files that are listed in the project get synchronized.
Uploads
The option is used to ensure that changes to the local copies of project files get changed on the WebShare server as well. That way when you update your local project content, the synchronize plan can update the corresponding files on the WebShare server. Not only does this facilitate remote collaboration, but it can also be used as a remote backup method.
Local copies of project files that have been modified will be uploaded to the WebShare server during the next file synchronization process, replacing the prior version there, unless the project setting is enabled.
Note: If the local copy of a project file is deleted, it will not affect the matching file on the WebShare server. If the project Synchronize Plan enables downloads ( option), then the corresponding file on the WebShare server will be downloaded to the local project directory during the next file synchronization process, to replace the missing file, and keep them in sync.
The status of files in the project window is represented by icons. The following table lists all available status icons and their meaning:
| Status icon | Meaning |
| Server file is being downloaded to the project folder. | |
| Local file is in sync with that on the server. | |
| Local file is missing. | |
| Local file is newer than that on the server. | |
| Local file is older than that on the server. | |
| Local file is locked and excluded from sync actions. (Only used in combination with other status icons.) |
|
| Local file and server file do not match, i.e. both have been modified. | |
| Server file is missing. | |
| Upload or download action is stopped (e.g. due to a disconnected server). (Only used in combination with other status icons.) |
|
| Local file file is being uploaded to the server. | |
| Wait … (Only used in combination with other status icons.) |
It can happen that one user modifies a file on the WebShare server, while you are also changing that file as a local project file. If you have both “Uploads” and “Downloads” enabled for the project Synchronize Plan, then a warning message pops up, stating that one file is newer than the other, and you must decide manually whether the local file or the one on the server should be taken.
It makes sense to have different synchronize intervals for different projects. A current project with many collaborators might call for a frequent synchronization schedule (perhaps every few minutes), while other projects would need less frequent synchronization (perhaps once a week). Of course, in addition to the automated Synchronize Plan schedule for each project, a user can simply click the ![]() icon on the WebShare Manager toolbar to initiate that project's Synchronize Plan at once.
icon on the WebShare Manager toolbar to initiate that project's Synchronize Plan at once.
The pop-up list allows selecting a time interval in minutes, or hourly, daily, or on a particular day of the week. The Synchronize time can also be set.
The button shows additional options to fine tune the intervals. For example, if is set to every day, but you want to skip certain days, then can be set for the days to skip. Or, it may be that your WebShare server is offline each night for backup. In that case, can be set to skip a time range, e.g. from 01:00 to 02:30. The option causes the settings from the Synchronize Plan to be used for the Synchronize Plan you are editing. That saves the trouble of entering these defaults for each Synchronize Plan. Uncheck to specify custom settings for a Synchronize Plan.
It can then be applied to a project by clicking on the project name in the WebShare Manager window, and then on the > menu. The Synchronize Plan can be selected from the pop-up list.
Project files are automatically synchronized according to the Synchronize Plan specified for that project. If a Synchronize Plan cannot be performed when scheduled, e.g due to an interrupted Internet connection, the files in the project window will be synchronized with those on the WebShare server as soon as the connection has been reestablished.
Note: When dragging and dropping folders from a server or the desktop into the WebShare Manager project window, all files within the dragged folder will be added to the upload/download synchronization. However, new files files that are subsequently added to that folder will not be added to the list. To make such additional files available in the project list, the folder must be dragged anew to the project window. In this case new files will be detected.
Allows you to specify a default WebShare Manager directory, i.e. the path to files and folders within the project(s).
You can check the size of the preview images in the window.
This section will be documented later.
In this menu you can choose the desired langage for WebShare Manager. The following languages are currently supported:
| Q: | If I have Upload synchronization enabled, how can I remove some files from a project, without having them deleted from the server? |
| A: | Just delete them from the WebShare Manager project window. However, the corresponding local file in the Project Directory will be deleted. |
| Q: | Is there a way to enable full Download synchronization of a WebShare server directory, so that any files added to that WebShare directory (e.g. by another user) get added to a project? |
| A: | No. |
| Q: | How can I delete Synchronize Plans? |
| A: | Open the Synchronize Plan to be deleted via > . Then select > from the menu and confirm the deletion of the selected Synchronize Plan. |
| Q: | Can I access and use the local project files directly (e.g. via the Mac Finder or Windows Explorer) instead of via the WebShare Manager file list? |
| A: | Yes. Open the directory for the selected file(s) via the |
| Q: | Can WebShare Manager be set up as a hidden process, so that the project synchronization plans run as scheduled? |
| A: | This feature is planned as a CLI option. |
| Q: | Can WebShare Manager be set up to launch automatically upon system startup so that the project synchronization plans run as scheduled? |
| A: | This feature is planned. |
Feedback welcome: your feedback to improve WebShare Manager or this documentation is welcome. Please use the feedback form at: http://www.helios.de/contact.html