HELIOS TCP/IP printing offers some great advantages over printing via AppleTalk:
- Print from remote TCP/IP networks without AppleTalk support
- Faster printing by using TCP/IP instead of AppleTalk PAP (great performance improvement using 100-MBit and faster networks)
- Allow secure remote printing
In this chapter we describe how to set up and configure a HELIOS TCP printer.
Start EtherShare Admin and log in as user "root" (or as member of the groups "SysAdm" or "QueueAdm").
Open
Lists > Printers and then
File > New
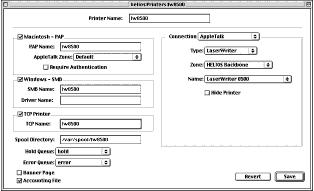
The Printers configuration window opens and lets you create a new printer on the host (Fig.
1).
Fig. 1: Printers configuration window
|
|
Note: How a printer is created and configured is described in the chapter "EtherShare Admin" in the EtherShare manual. Here we describe the steps for setting up a TCP printer.
Activate the
TCP Printer checkbox and specify the name that the TCP printer should appear under in the
TCP Name: field. Then click
Save to store the new settings on the server.
Secure printer connection
You may want to access the printer remotely through routers. To establish a TCP connection to the printer through e.g. routers, the TCP printer needs a unique port number. Add this number to the printer name in the
TCP Name: field:
After you have saved the new printer queue, a window appears asking you to select an appropriate PPD.
Now the TCP printer server configuration is done.
Mac OS 9 client configuration
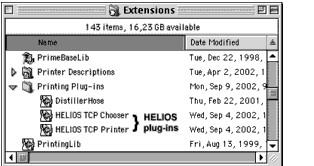
Installing the printing plug-ins
Mount the "HELIOS Applications" volume onto your desktop, open the folder
MacOS > EtherShare Tools > HELIOS TCP Printer and copy the plug-ins into the
System Folder > Extensions > Printing Plug-ins folder (Fig.
2).
Fig. 2: The "Printing Plug-ins" folder
|
|
Note: Make sure that the "Desktop Printer Spooler" and "Desktop Print Monitor" extensions be active (System Folder > Extensions). Otherwise it is not possible to create a Desktop printer.
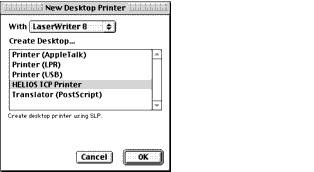
On your client's harddisk open the "Desktop Printer Utility" program (
Applications (Mac OS 9) > Utilities) and select the
HELIOS TCP Printer entry. Then click
OK (Fig.
3).
Note: If you cannot start the "Desktop Printer Utility" program and receive a -199 error from your Macintosh system instead, open the Macintosh system preferences and delete the file "DTP Utility Preferences".
Fig. 3: Apple "Desktop Printer Utility"
|
|
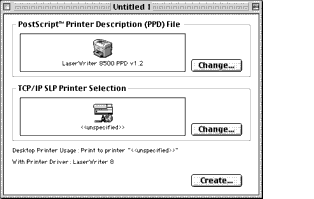
Now a PPD must be selected (use the same PPD as selected in "Server configuration" - compare Fig. 2) by clicking the
Change- button (Fig.
4).
Fig. 4: Select PPD - select queue
|
|
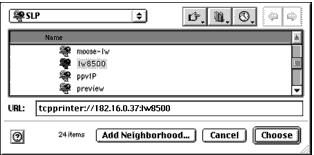
There are three ways of selecting the TCP printer queue:
Select the TCP printer queue (
TCP/IP SLP Printer Selection from the
Local Services list (Fig.
5) and click
Choose.
Access via IP number or host name
If the printer queue cannot be chosen because it is not visible in the list, e.g. due to a remote TCP/IP network, you may also specify the host 's IP number or the host name in the
URL: field.
182.16.0.37:lw8500 or
helios.de:lw8500
Then click
Create- (Fig. 5) and save the desktop printer.
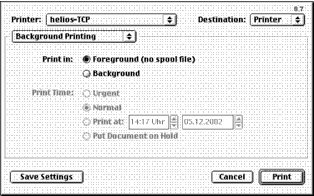
Printing via HELIOS TCP/IP
In the Print dialog, when you are printing for the first time via the HELIOS TCP/IP printer, select the
Background Printing item from the pop-up menu and switch the checkbox setting from
Background to
Foreground (no spool file) (Fig.
6). Then click the
Save Settings button.
Mac OS X client configuration
Installing the printing plug-ins
Mount the "HELIOS Applications" volume, open the folder
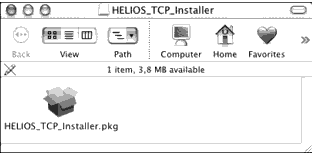
MacOS > EtherShare Tools > HELIOS TCP Printer > OS X and double-click the "HELIOSTCPPrinter.dmg" disk image.
The "HELIOS_TCP_Installer" drive appears on the desktop which contains the "HELIOS_TCP_Installer.pkg" package (Fig.
7).
Fig. 7: Content of the "HELIOS_TCP_Installer" image
|
|
Double-click the "HELIOS_TCP_Installer.pkg" icon.
Accomplish the authentication, click
OK and follow the instructions until the Mac OS X Installer has successfully installed the software.
Note: Make sure that the Apple Print Center application is not running during the installation. Otherwise the new HELIOS TCP/IP printing device will not be available.
Go to
Applications > Utilities, and open the Apple
Print Center application (Fig.
8).
Fig. 8: Apple "Print Center" application
|
|
Click
Add in the
Print Center menu.
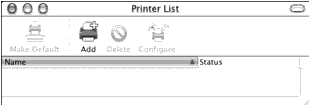
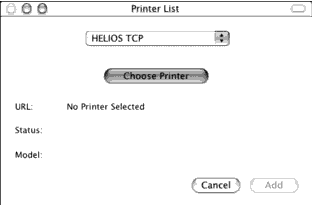
The
Printer List window appears and provides the
HELIOS TCP printer in the pop-up menu (Fig.
9).
Fig. 9: Printer List window
|
|
In order to specify a printer queue for the
HELIOS TCP printer, click the
Choose Printer button and select a queue. Then confirm with
Connect.
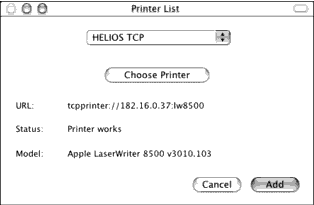
Back in the
Printer List window you can see the selected printer, its status, and the PPD (Fig.
10).
Fig. 10: Printer List window
|
|
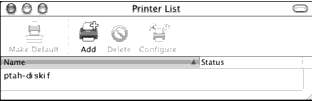
Click the
Add button and the new HELIOS TCP printer will show up in the list (Fig.
11).
Fig. 11: Apple "Print Center" application
|
|
Note: When using a Mac OS X client, the PPD file is automatically transferred from the HELIOS server to the Mac OS X client.
In case the server PPD is changed at a later date, just remove the printer and create it anew, according to the steps described before.
The changed server PPD will now be used for the queue.
Removing the printing plug-ins
During the installation of the HELIOS TCP/IP printer the following files are created on the client:
|
|
|
/Library/Printers/HELIOSTCP/HELTCPIOM.plugin
|
|
/Library/Printers/HELIOSTCP/HELTCPPBM.plugin
|
Print Center Browser module
|
/usr/libexec/cups/backend/heliostcp
|
"CUPS" compatible printer driver for communication with "papsrv"
|
To remove the HELIOS TCP/IP printer just delete the TCP printer queue(s), then the files listed in the table above.